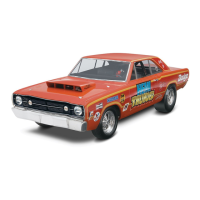
4320 85432000200
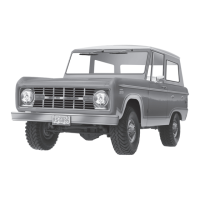
FORD BRONCO
The original Ford Bronco could be considered to be ahead of
its time. It was Ford’s first compact SUV vehicle, a category
which has become so popular today. The Bronco remained
basically unchanged from 1966 to 1977, and has extended to
5 generations. Based on a 92 inch wheelbase, the first Bronco
was intended as an off-road multi-purpose truck with 4 wheel
drive. The base price was under $2,200 when it was introduced.
The original Bronco offered a long list of options, but still
remained a very basic vehicle. It was designed with a clear
sheet, and unlike the Mustang, it did not use an existing
platform. There were two engines to choose from, a straight
6 cylinder or a more powerful small block V-8, and three
body styles, a wagon, a half-cab or a roadster. Other options
included such things as a swing-a-way spare tire and bench-
style back seat.
Le premier Ford Bronco était en avance sur son temps. Ce fut le
premier VUS compact de Ford, une catégorie devenue extrêmement
populaire de nos jours. Le Bronco est essentiellement resté
inchangé de 1966 à 1977, et couvre 5 générations. Basé sur un
empattement de 233 cm, le premier Bronco était prévu au départ
pour être un camion multifonctions tout terrain à 4 roues motrices.
À son lancement, son prix de départ était inférieur à 2 200 $.
Le Bronco d'origine avait une longue liste d'options, mais c'est
toujours resté un véhicule très basique. Il a été conçu de A à Z
et, contrairement à la Mustang, il n'était pas basé sur une plate-
forme existante. Deux moteurs (moteur 6 cylindre simple ou V8
à petit bloc puissant) et trois styles de carrosserie (break, cabine
monoplace déportée ou roadster) étaient offerts. Les autres
options incluaient une roue de secours à bascule et un siège
arrière de type banquette.
El Ford Bronco original se podría considerar que estuvo adelantado
a su tiempo. Fue el primer vehículo SUV compacto de Ford, una
categoría que se ha vuelto extremadamente popular hoy en día.
El Bronco se mantuvo básicamente sin cambios desde 1966 hasta
1977, y se extendió a 5 generaciones. Basado en una distancia
entre ejes de 92 pulgadas, el primer Bronco estaba previsto como
un camión todo terreno, de usos múltiples y con tracción en las 4
ruedas. El precio base era inferior a $2,200 cuando hizo su debut.
El Bronco original ofrecía una larga lista de opciones, pero aún seguía
siendo un vehículo muy básico. Fue planeado a partir de un nuevo
diseño, y al contrario que el Mustang, no hizo uso de una plataforma
existente. Tenían dos motores para elegir, uno de 6 cilindros en
línea o un motor más potente V-8 de bloque pequeño, y tres estilos
de carrocería; tipo vagón, tipo media cabina o descapotable. Otras
opciones incluían cosas tales como el neumático de repuesto que se
abatía a un lado y el asiento trasero de estilo banco.
READ THIS BEFORE YOU BEGIN
* Study the assembly drawings.
* Each plastic part is identified by a number.
* In the assembly drawings, some parts will
be marked by a star
★
to indicate chrome
plated plastic.
* For better paint and decal adhesion,
wash the plastic parts in a mild detergent
solution. Rinse and let air dry.
* Check the fit of each piece before
cementing in place.
* Use only cement for polystyrene plastic.
* Scrape plating and paint from areas to
be cemented.
* Allow paint to dry thoroughly before
handling parts.
* Any unused parts may be discarded.
LISEZ CECI AVANT DE COMMENCER
* Étudiez les plans d’assemblage.
* Chaque pièce de plastique est identifiée
par un numéro.
* Dans les plans d’assemblage, certaines
pièces seront marquées d’une étoile
★
pour indiquer des pièces en plastique
plaquées chrome.
* Pour une meilleure adhésion de la peinture
et de la décalcomanie, lavez les pièces en
plastique dans une solution de détergent
doux. Rincez et laissez sécher à l’air.
* Vérifiez l’ajustement de chaque pièce avant
de la coller en place.
* Utilisez uniquement de la colle pour
plastique au polystyrène.
* Grattez toute peinture et le placage sur les
régions à coller.
* Laissez sécher la peinture complètement
avant de manipuler des pièces.
* Toute pièce non-utilisée peut être jetée.
LEA ESTO ANTES DE EMPEZAR
* Estudie los dibujos de ensamblaje.
* Cada parte plástica está identificada con
un número.
* En los dibujos de ensamblaje, algunas
partes aparecerán marcadas con una
estrella
★
para indicar plástico enchapado
en cromo.
* Para mejor adhesión de pintura y
calcomanías, lave las partes plásticas
en una solución de detergente suave.
Enjuague y deje secar al aire.
* Verifique el encastre de cada pieza antes
de cementar en su lugar.
* Use sólo cemento para plástico de
poliestireno.
* Raspe las placas y la pintura de las áreas
a cementar.
* Deje secar la pintura totalmente antes
de manipular las partes.
* Cualesquiera partes sin usar se
pueden descartar.
CUSTOMER SERVICE
If you have questions, comments or problems
visit our website revell.com or write to us at:
Revell Inc. Consumer Service
1850 Howard St. Unit A
Elk Grove Village, IL 60007
Be sure to include this plan number
(85432000200), part number, description and
your return address and phone number.
SERVICE À LA CLIENTÈLE
Pour toute question, problème ou commentaire,
visitez-nous à l’adresse revell.com ou
écrivez-nous à :
Revell Inc. Consumer Service
1850 Howard St. Unit A
Elk Grove Village, IL 60007
Assurez-vous d’inclure ce numéro de plan
(85432000200), le numéro de pièce, une
description ainsi que votre adresse de retour
et numéro de téléphone.
SERVICIO AL CLIENTE
Si tiene preguntas, comentarios o problemas,
visite nuestro sitio web revell.com
o escríbanos a:
Revell Inc. Consumer Service
1850 Howard St. Unit A
Elk Grove Village, IL 60007
Asegúrese de incluir el número de plano
(85432000200), el número de parte, la
descripción y su dirección y número de
teléfono para responder.