Aufnahme an
den
Anfang zurück-
spulen
und
Betrjebsart
SYNC
wählen,
g1e'ichze'itig
den Betriebsartenschal-
ter
@
auf Stel 1 ung LEFT
stel I en.
Zwei taufnahme vorberei
ten :
Mikrofon an
den Eingang
des rechten
Kanals@ anschliessen
und
den Ei-
genschaften
des
Mi krofons entspre-
chend
auf HI oder L0 schalten.
Auf nahmevorwahl scha I ter
@
'i
n Stel -
lung OFF und
Aufnahmevorwahlschal-
ter
@
in Stellung
0N
bringen.
Den Abhörschalter@ auf
INPUT
schalten.Den
Aufnahmepegel
fijr den
eigenen
Gesang
oder
das eigene
Instrument mjt
dem
Pegelregler@
gemäss
Abschn'itt
3.2. der Bedienungs-
anl ei tung einstel
I en.
Das Abhören der
Taktspur erfolgt am
zweckmässigsten
über Köpfhörer,um
die Aufnahme
der Eigenleistung
a1s
reines Solo zu
erhalten.
Kopfhörer an
eine
der Buchsen
@
anschl iessen.
Durch
Drücken
der Tasten
@
und
@
in Aufnahme
starten
und
Synchronauf-
zeichnung
im
Rhythmus der
Taktspur
aufnehmen.
Ist
d'ie Aufnahme wunschgemäss
ge-
lungen,so
kann bej
nachfolgendem
Abhören
je
nach Einstellung
des
Betriebsartenschalters
@
Aie
Eigenleistung
oder
diese zusammen
mjt
den Taktspur
abgehört werden.
Der Abhörwahlschalter@
ist dazu
aufStellung
TAPE zu stellen.
Während des
Abhörens in Stellung
STERE0
kann durch
unterschiedliche
Ei nstel 1 ung
der
Lautstärkenregl
er
VOLUME
@
aas
Mi schungsverhäl
tni s
Taktspur zu E'igenleistung
indivj-
duell
verändert
werden.
Wind the
tape
back to the beginning
of the
recording,select
the SYNC
mode and switch
the
M0NITOR
selec-
tor
@
to
LEFT.
Preparation for
recordjng on
track 2:
Connect microphone
to the
MIC input
socket@for
the right channel
and
set the input
selector@ to
either
HI
or L0
in onder
to match the
caracteristics
of
your
microphone.
Select right
channel for recording
by
switching
the record
preselector
@
to
pos
i t'ion 0N.
Record
presel
ector
@must
be
switched
OFF.Set
the
mon'itor swi
tch
@
to
pos'ition
INPUT.
Prior
to commencing
with
recording
adjust the
level
of
your
own
per-
formance with
the
INPUT
LEVEL
con-
trol
@
as
described
'in
section
3.2
of the operating
instructions.
The
gujde
track should
be ljstened
to with headphones
in order to
ob-
tajn a'blean"
solo
recording.
Connect
the
headphones to one
of
the
sockets
@.
Start the
877
in the recording
mode by
pressing
buttonsOand@
and make
your
SYNC recording
by
keeping
to
the tempo as demanded
by
the
guide
track.
After
successful
comp'let'ion of
the
record'ing
it may
be
played
back
'in-
d'iv
j
dual 1y or
combi
ned
wi
th the
gu
i de track
by
se1
ect'ing ei ther
RIGHT,M0N0 or
STERE0 w'ith the
monitor mode
selector@
.fne
mon'itor switch
@
must
be
set
to
TAPE.When listening
to the
perfor-
mance wi th sw'itch
@
i
n
pos
i
ti on
STERE0
the
balance between
guide
track and
SYNC recording may
be
altered
by
means
of the concentric
control VOLUME@to
suit
jndjv'idual
preferences.
Rebobinez la
bande enregistrde
et
amenez-la au
d6but,puis
enclenchez
la
fonct'ion SYNC et
placez
le s6l6c-
teur du mode de reproduction
@
sur
LEFT.
Ensu'ite
pr6parez
le second enregis-
trement:en branchant.
par
exemple
un m'icrophone ä I'entr6e
@
Ou
canal
dr o'it et,
sel
on I a nature du m'icro-
phone,placez
le s6lecteur d'entrde
@.n
posit'ion
HI
(haut)
ou
L0
(ba!).
'le
prds6l
ecteur
d'enregi
strement
@
est en
position
OFF
(Aectench6)
et
1e
p16s6lecteur
d'enregistrement@
en
posit'ion
0N
(enclench6).Amenez
ensuite le commutateur@TAPE INPUT
en
pos.ition
INPUT.Et avant d'enre-
gistrer,rdglez
le seuil
d'enregis-
trement de la
propre
voix ou
de
I'air
en
question,ä
I'aide du rdg-
lage de niveau@,conform6ment
au
paragraphe
3.2 du mode d'emp1
oi .
Il
est vivement
conseil l6 de
su'ivre
1'enregistrement
de base
au casque
que
1'on branche
ä la
prise (9,afjn
d'obtenir
le deuxiöme
enregistrement
sous
forme de
solo.
Enclenchez 1'appare'i1 en
pos'ition
d'enregistrement
en appuyant simul-
tan6ment
sur
les touches
@
et@et
proc6dez
ä 1'enregistrement synchro-
ne,c'est
ä
dire en
parfaite
concor-
dance avec celui de base.
S'i 1
'enreg'istrement
a 6td effectud
dans
de
bonnes
conditions,vous
pouvez
selon 1a
positjon
RIGHT,M0N0
ou STERE0 du
s6lecteur
de
mode
de
reproduction
@
dcouter le
deuxiöme
ou
les
deux enregistrements
ä la
fois.
Le
commutateur
@fnPf/INPUT
sera
p1ac6
en
positjon
TAPE.En
€coute
STERE0,1e
bouton concentrique de
rdglage du
V0LUME@permet de rdgler'
'indivjduellement
le taux de m6lange
au casque.
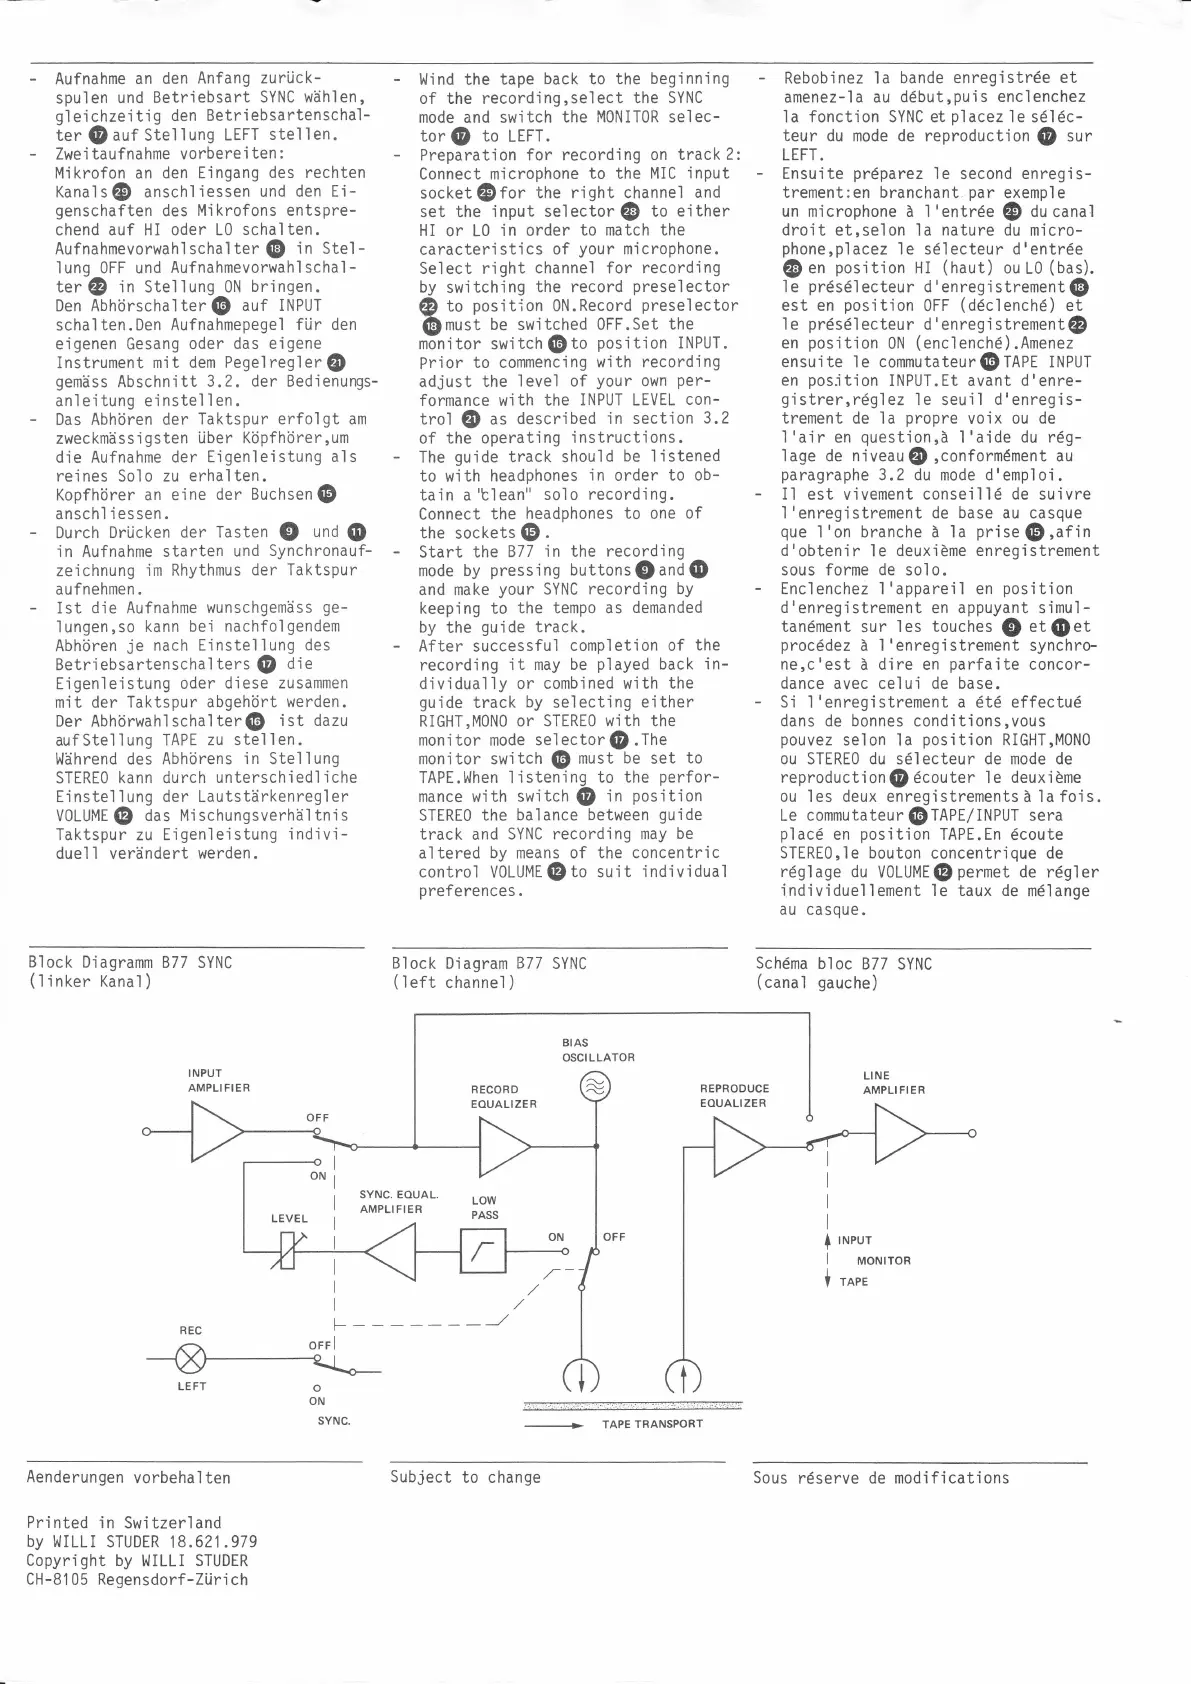
Block
Diagramm
877 SYNC
(
I
j
nker
Kanal
)
Block
Diagram
877
SYNC
(left
channel
)
Schdma
bloc
877 SYNC
(canal
gauche)
INPUT
AMPLI FI ER
BIAS
OSCILLATOR
+
TAPE
TRANSPORT
LINE
AMPLIFIER
RECORD
EOUALIZER
REPRODUCE
EOUALIZER
+
I
I
INPUT
MONITOR
TAPE
t-
orrl
o
ON
SYNC.
Aenderungen
vorbehalten
Printed
in
Switzerland
by
WILLI STUDER
18.621.979
Copynight by
l,/ILLI
STUDER
CH-8105 Regensdorf-Zürich
Subject
to change
Sous
r6serve de modifications
 Loading...