This document is an operating manual for the CN90 Industrial Coil Nailer.
Function Description
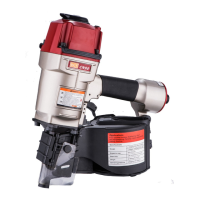
The CN90 Industrial Coil Nailer is a pneumatic power tool designed for driving fasteners. It is intended for industrial applications such as making pallets, drums, and export wooden boxes; crating; making wooden fences; and general construction applications. The tool operates by using compressed air to drive nails. It features a contact actuation mode, meaning the nailer will drive a fastener when the trigger is pulled and the contact arm is pressed against the workpiece.
Important Technical Specifications
- Type of tool: CN90 Industrial Coil Nailer
- Dimensions: 362mm x 132mm x 307mm
- Weight (without fasteners): 4.10 kgs
- Actuation mode: Contact actuation
- Magazine capacity: 225-275 nails
- Maximum allowable pressure: 8.3 bar (120 psi)
- Recommended pressure range: 5 bar to 7 bar (70 psi to 100 psi)
- Fasteners: The nailer uses 15° wire welded coil nails.
- Nail Length: 50mm to 90mm
- Shank Diameter: 2.8mm to 3.33mm (.11" to .131")
- Head Diameter: 7.9mm to 8.0mm (.315" to .31")
- Collation Type: 15 degree flat wire welded coil nails
- Air Supply: The tool requires a clean, dry, regulated compressed air supply. It should never be operated with oxygen or other bottled gases, as an explosion may occur. Moisture or oil in the air compressor can accelerate wear and corrosion in the nailer.
- Air Hose: A minimum working pressure rating of 180 psi is required. The hose should have an ID of 1/4" (ISO 7-1) and a maximum length of 17' (5 meters). The supply hose should contain a fitting that will provide "quick disconnecting" from the male plug on the tool.
- Operating Pressure: Recommended operating pressure range is 70 to 100 psi. Maximum permissible operating pressure is 120 psi.
Usage Features
The manual emphasizes safe and efficient operation. Key usage features and safety guidelines include:
- Safety Glasses: Always wear safety glasses with side shields when operating or servicing the tool to protect against dust blown up by the exhausted air or flying fasteners.
- Ear Protection: May be required in some environments with high noise levels.
- Air Compressor: Only use a power source that can supply compressed air. Do not operate the tool on any other high-pressure gas, combustible gases (e.g., Oxygen, acetylene, etc.). The operating pressure should be within the range of 70 to 100 psi, not exceeding 120 psi.
- Flammable Substances: Never operate the tool near flammable substances (e.g., thinner, gasoline, etc.) as volatile fumes can explode when mixed with compressed air.
- Air Supply Connection: Always ensure the air supply is disconnected when the tool is not in use, when loading fasteners, or during maintenance. A wrong fitting can cause injury if the tool remains charged with air after disconnecting.
- Magazine Management: Always empty the magazine when operation has been completed or suspended, when unattended, moving to a different work area, adjusting, disassembling, or repairing the tool, and when clearing a jammed fastener.
- Screw Tightness: Regularly inspect all screws and bolts to ensure they are tight and properly installed to prevent accidents and tool damage.
- Trigger Safety: Never touch the trigger unless you intend to drive a fastener. Always carry the tool with the trigger pulled and similar actions should be avoided.
- Discharge Outlet: Never point the discharge outlet toward people or yourself. Ensure the discharge outlet is pointed toward people, serious accidents may be caused when misfiring. Be sure the discharge outlet is not pointed toward people when connecting and disconnecting the hose. Loading and not loading the fasteners or similar operations.
- Specified Fasteners: Only use specified fasteners to prevent tool malfunction.
- Proper Discharge Outlet Placement: Failure to place the discharge outlet of the nose in a proper manner can result in a fastener flying up and is extremely dangerous.
- Hand and Body Away from Discharge Outlet: When loading and using the tool, never place a hand or any part of body in fastener discharge area of the tool. It is very dangerous to hit the hands or body by mistake.
- Workpiece Edges and Thin Material: Do not drive fasteners close to the edge and corner of the work and thin material, as the workpiece is likely to split and the fastener could fly and hit someone.
- Driving on Existing Fasteners: Do not drive fasteners on top of other fasteners, as this may cause deflection fasteners which could cause injury.
- Contact Trip Mechanism: Frequently check the operation of the contact trip mechanism. Do not use the tool if the trip is not working correctly as accidental driving of a fastener may result. Do not interfere with the proper operation of the contact trip mechanism.
- Working at Heights: When fastening roofs or similar slanted surfaces, start fastening at the lower part and gradually work your way up. Fastening backward is dangerous as you may lose your foot place. Secure the hose at a point close to the area you are going to drive fasteners. Accidents may be caused due to the hose being pulled inadvertently or getting caught.
- Tool Controls: Never use the tool if any portion of the tool controls (e.g., trigger, contact arm) is inoperable, disconnected, altered, or not working properly.
- Free Space Actuation: Never actuate the tool into free space to avoid hazards from free-flying fasteners and excessive strain on the tool.
- Assume Fasteners Present: Always assume that the tool contains fasteners.
- Scaffolding and Ladders: The tool should not be used on scaffolding, stairs, ladders, or ladder-like constructions (e.g., roof laths), when closing boxes or crates, or when fitting transportation safety systems on vehicles and wagons.
Maintenance Features
Regular maintenance and inspection are crucial for the safe and efficient operation of the CN90 Industrial Coil Nailer.
- Service and Repairs: All quality tools will eventually require servicing or replacement of parts due to wear from normal use. These operations should be performed by a professional technician.
- Disconnect Air and Remove Nails: Always disconnect the air hose and remove nails from the nailer when performing maintenance and inspection.
- Inspecting the Magazine:
- Disconnect the air hose.
- Clean the magazine. Remove dust which may have accumulated in the magazine.
- Lubricate the nailer rail with nailer lubricant.
- Clearing a Jam:
- Disconnect the air hose.
- Remove all nails.
- Remove the jammed nail with a slotted head screwdriver.
- In case of frequent jams, contact an authorized service center.
- Qualified Person: A qualified person should perform repair and maintenance.
- Periodic Maintenance:
- Check that the piston bumper is operating normally. A damaged piston bumper may cause damages to other component parts.
- Check o-rings for wear or damage. Damaged o-rings may affect overall performance.
- Make sure all screws are secure. Loose screws may affect overall performance.
- When repairing a tool, make sure the internal parts are clean and lubricated.
- Storing:
- When not in use for an extended period, apply a thin coat of lubricant to the steel parts to avoid rust.
- The nailer should be stored in a warm and dry place when not in use. Do not store the nailer in a cold weather environment.
- Lubrication: The lubricator supplies oil mist to the nailer. Inspect the lubricator before operation to be sure the supply of lubricant is adequate. If an inline lubricator is not used, a few drops of oil will need to be added to the nailer inlet before each use.
- Air Filter: An air filter will help to get the best performance and minimum wear from the tool. Frequent, but not excessive, lubrication is required for the best performance. Oil added through the air line connection will lubricate the internal parts.