This document is an instruction manual for Rheninghaus slicers, specifically models MO12 and MO14. It provides comprehensive information for owners and operators to ensure safe and productive use of the equipment.
Function Description:
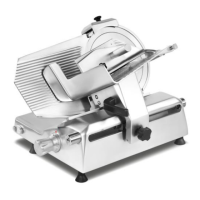
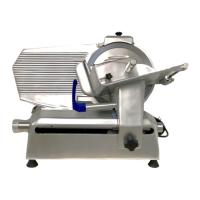
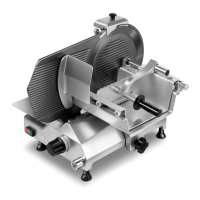
The Rheninghaus slicers are designed for cutting salami, boneless meat, and hard cheese. They are equipped with a sharp knife blade for precise slicing and a product holder to secure food items during operation. The slicers are designed for commercial food preparation environments, emphasizing sanitation and safety.
Important Technical Specifications:
The manual does not explicitly list detailed technical specifications such as motor power, blade diameter, or dimensions for models MO12 and MO14. However, it highlights several key operational and safety features:
- Electrical Requirements: The machine is provided with a three-prong grounding plug, requiring a properly grounded outlet. Users are explicitly warned against cutting or removing the third ground prong or using adapter plugs.
- Safety Certifications: The slicers are Intertek certified for sanitation (ETL Sanitation Listed 4001164) and electrical safety (cETL US Listed 4001164), indicating compliance with North American safety and sanitation standards.
- Blade: Features a sharp knife blade, with warnings throughout the manual about its danger. The blade is covered by a blade cover (E1) and includes a sharpener (G1) for maintenance.
- Regulator Knob (L1): Used to adjust slice thickness and to close the slicer table after use, covering the blade's edge for safety.
- Product Holder (C1) and Food Pusher (D1): Components designed to hold and push food products safely towards the blade during slicing.
- Reset Switch: A safety feature located on the bottom of the slicer that protects the motor from mechanical overload. It requires manual reset after an overload event.
- Materials: The manual mentions an "Aluminium base" for slices to drop onto, and advises against using certain cleaning products that may discolor or destroy parts, implying the use of materials like stainless steel or aluminum in construction.
Usage Features:
- Operation:
- Placement: Must be installed on a level, solid, nonskid, nonflammable surface in a clean, well-lighted work area, away from children and visitors.
- Lifting: Requires at least two people to lift by its base.
- Preparation: Before slicing, the product holder (C1) is pulled completely forward, food is placed, and secured with the food pusher (D1). The regulator knob (L1) is rotated counter-clockwise to set the desired slice thickness.
- Slicing: The slicer is turned on using the "I" button. The food pusher handle (B1) is used to manually push the product holder back and forth. Users are strictly warned not to use their hands to hold food or catch slices.
- Completion: After slicing, the product holder is pulled back, the slicer is turned off (using the "O" button), and the regulator knob (L1) is turned clockwise until it stops, closing the slicer table and covering the blade.
- Food Type: Only boneless, unfrozen food products are to be sliced.
- Safety Precautions:
- Training: Only trained and authorized personnel over 18 years old should operate the slicer.
- Blade Safety: Never touch the blade. Keep hands and arms away from all moving parts. Always ensure the blade cover is securely installed.
- Food Pusher: Emphasizes using only the food pusher handle to manipulate food during slicing, never hands.
- Shutdown Procedure: Always turn off the slicer, turn the regulator knob clockwise to close the gauge plate, and unplug the power cord before cleaning, sharpening, servicing, or removing any parts.
- Modifications: Prohibits bypassing, altering, or modifying the equipment from its original condition.
- Warning Labels: Requires the warning label to be properly positioned and legible.
- Accessories: Only original slicer accessories, properly installed, should be used.
- Reset Switch Operation: In case of motor overload, the slicer must be turned off, the cause of overload removed, the reset push-button pressed, and then the slicer can be turned on again. Frequent activation of the reset switch indicates a need for service.
Maintenance Features:
- Cleaning & Sanitizing:
- Frequency: The entire slicer, including removable parts, must be thoroughly cleaned and sanitized at least every 4 hours when in contact with food products, following local and state health department guidelines and chemical sanitizer instructions.
- Procedure:
- Turn off the slicer, close the gauge plate, and unplug the power cord.
- Disassemble removable parts: blade cover (E1), last slice device, food pusher handle (B1), product holder shaft, food pusher (D1), blade sharpener (G1), and rear blade slice deflector.
- Soak, clean, and scrub all removed parts in a three-compartment sink using a solution of mild detergent and warm water, then rinse with fresh, clean water.
- Sanitize removed parts in a quaternary sanitizer solution for a minimum of two minutes, following label instructions.
- Clean the blade by pressing a damp cloth (soaked in mild detergent and warm water) on the front side and moving slowly from the center towards the edge, avoiding moisture in the blade hub. Insert the cloth between the blade and the blade ring guard to clean the internal side.
- Clean the gauge plate (with the regulator knob in zero position) by scrubbing and wiping from the blade towards the user, never towards the blade.
- Wipe down the entire slicer base and all surfaces with a clean cloth and brush using mild detergent and warm water, then rinse with clean, fresh warm water.
- Spray both sides of the knife, gauge plate, and the entire slicer base with a non-bleach, non-chlorine sanitizer.
- Allow all parts to air dry before reassembly.
- Restrictions: Do not put components in a dishwasher, hose down, pressure wash, or pour water on the slicer. Do not use scrubber pads, steel wool, abrasive materials, bleach, sodium hypochlorite, or other caustic/strong detergents.
- Blade Sharpening:
- Indicators: Excess waste or a "tail" on the unsliced portion indicates a dull blade.
- Frequency: Sharpen lightly every few days for optimal performance.
- Procedure:
- Turn off the slicer, turn the regulator knob clockwise to cover the blade's edge.
- Clean and dry both sides of the blade.
- Lift the sharpener (G1) up, rotate it 180° clockwise, and push down until the sharpening stone contacts the blade.
- Turn the slicer on for approximately 20 seconds.
- Push the deburring stone for approximately 2 seconds.
- Turn the slicer off and return the sharpener to its original position.
- Unplug the power cord, lift and rotate the sharpener back to its stored position.
- Clean the entire slicer after sharpening.
- Lubrication:
- Food Pusher Shaft: Periodically lubricate the food pusher shaft using the oil supplied with the slicer or food-safe lubricant if it becomes difficult to push.
- Procedure: Close the gauge plate, unplug the slicer, apply a few drops of oil to the shaft, slide the food pusher up and down to distribute the oil, then plug the slicer in.
- Warning: Do not use vegetable oil, as it will damage the slicer.
- Reassembly & Inspection:
- Reassembly: After cleaning and drying, reinstall all removable parts in reverse order of disassembly, ensuring the regulator knob is in the zero position.
- Inspection: Conduct a thorough visual inspection of the entire slicer and its parts for damage, broken seals, or gaskets. An authorized service agent should inspect the slicer at least every 6 months. If a seal or gasket is found to be damaged, missing, or not properly sealing (referencing Figure 16 for seal locations around the switch boot cover and blade pulley), the slicer must be removed from service until repaired by an authorized servicer.
- SBR (Safe Blade Removal) Instruction:
- This section details a specific procedure for safely removing the blade, indicating that the slicer supports a feature for easier and safer blade removal for cleaning or replacement. The steps involve lifting the sharpening unit, unscrewing the blade cover disc, positioning an "SBR" tool with an extractor shaft, screwing two knobs of the SBR, unscrewing the SBR central handle, and then removing the blade. Reassembly is the reverse process.
- It is recommended that a repair service company perform all adjustments and major maintenance.
The manual emphasizes that proper training, supervision, adherence to instructions, and common sense are crucial for safe operation. It also provides contact information for the distributor (Food Service Solutions) and the manufacturer (Essedue Srl).