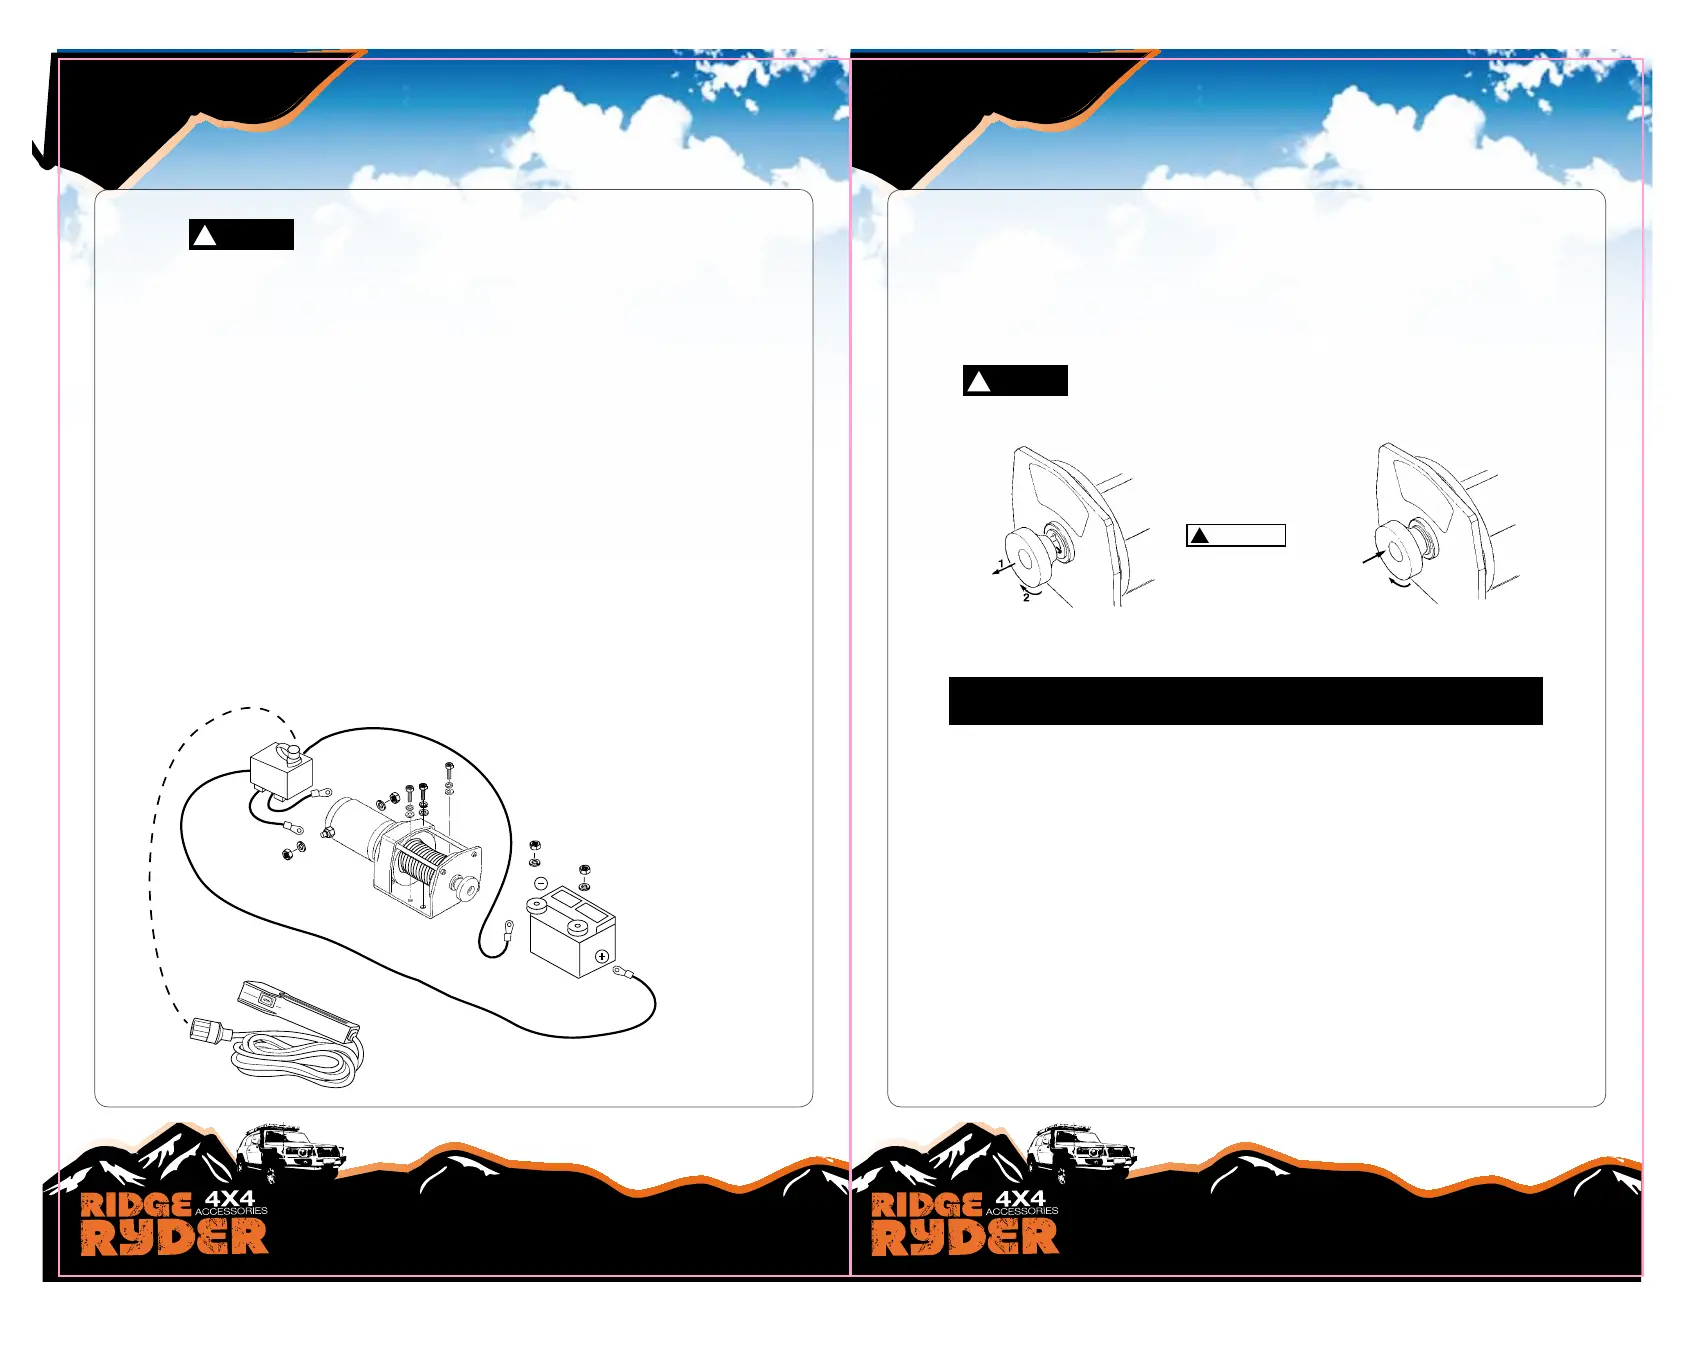
Step (3)
Refer to Figure 8 for wiring diagram.
Route the short red and black colour coded wires from the control box to the
motor. Route the long red and black colour coded wires from the control box
to the battery. Attach the circuit breaker to battery end of the red wire. Wrap
the circuit breaker with electrical tape to prevent accidental short circuits.
Apply several layers of electrical tape where wiring may come into contact
w
ith sharp metal parts of the vehicle to prevent insulation abrasion or
cutting.
Attach the circuit breaker to the battery positive terminal. Connect the
r
emaining black control box wire to the battery negative terminal. Open the
cover on the control box, attach the remote control to the control box.
Step (4)
FREESPOOL OPERATION
Pull and turn the clutch knob to the “Free ” position as shown in Figure 9.
If there is a load on the winch rope, the clutch knob may not pull out easily.
DO NOT FORCE THE CLUTCH KNOB. Release tension on the clutch by jogging
out some of the winch rope. Release the clutch and pull out the winch rope and
Batteries contain gasses which are ammable and
explosive. Wear eye protection during installation and
remove all metal jewellery. Do not lean
over battery
while making connections.
Warning
!
(7) (8)
Clutch must be fully engaged before winching. Never
engage clutch knob while drum is turning.
Caution
!
secure to anchor or load. Check that there are at least ve (5) turns of winch
rope left on the drum. Re-engage the drum by returning the clutch
knob to the “Engaged” position. (See Figure 9). Activate the winch in Cable
Out momentarily to check drum rotation direction. If the drum rotates in the
wrong direction, recheck your wiring.
DYNEEMA ROPE
1. The life of the dyneema winch rope is directly related to the care it receives.
The winch rope on a new winch, and any replacement ropes, should be
respooled under a minimum of 100 lb load before using the winch. Failure to do
this will result in winch rope damage. Inspect winch rope before use. Mashed,
pinched, frayed or kinked areas severely reduce the load-carrying capacity.
Replace damaged winch rope.
2. Prevent kinks before they occur.
(a) This is the start of a kink. At this time, the winch rope should be
straightened.
(b) The winch rope was pulled and the loop has tightened to a kink. The winch
rope is now permanently damaged and should not be used .
(c) The result of kinking is that each strand pulls a dierent amount causing
the strands under greatest tension to break
and reduce load capacity of the
winch rope.
Black(-)
Black
Red(+)
Red
Battery
ToBattery
Washer
Washer
Figure 8
to remote control
Engaged
Free
Figure 9
CAUTION
!
If the winch motor
stalls, do not continue
to apply power.
1
2
Step (3)
Refer to Figure 8 for wiring diagram.
Route the short red and black colour coded wires from the control box to the
motor. Route the long red and black colour coded wires from the control box
to the battery. Attach the circuit breaker to battery end of the red wire. Wrap
the circuit breaker with electrical tape to prevent accidental short circuits.
Apply several layers of electrical tape where wiring may come into contact
w
ith sharp metal parts of the vehicle to prevent insulation abrasion or
cutting.
Attach the circuit breaker to the battery positive terminal. Connect the
r
emaining black control box wire to the battery negative terminal. Open the
cover on the control box, attach the remote control to the control box.
Step (4)
FREESPOOL OPERATION
Pull and turn the clutch knob to the “Free ” position as shown in Figure 9.
If there is a load on the winch rope, the clutch knob may not pull out easily.
DO NOT FORCE THE CLUTCH KNOB. Release tension on the clutch by jogging
out some of the winch rope. Release the clutch and pull out the winch rope and
Batteries contain gasses which are ammable and
explosive. Wear eye protection during installation and
remove all metal jewellery. Do not lean
over battery
while making connections.
Warning
!
(7) (8)
Clutch must be fully engaged before winching. Never
engage clutch knob while drum is turning.
Caution
!
secure to anchor or load. Check that there are at least ve (5) turns of winch
rope left on the drum. Re-engage the drum by returning the clutch
knob to the “Engaged” position. (See Figure 9). Activate the winch in Cable
Out momentarily to check drum rotation direction. If the drum rotates in the
wrong direction, recheck your wiring.
DYNEEMA ROPE
1. The life of the dyneema winch rope is directly related to the care it receives.
The winch rope on a new winch, and any replacement ropes, should be
respooled under a minimum of 100 lb load before using the winch. Failure to do
this will result in winch rope damage. Inspect winch rope before use. Mashed,
pinched, frayed or kinked areas severely reduce the load-carrying capacity.
Replace damaged winch rope.
2. Prevent kinks before they occur.
(a) This is the start of a kink. At this time, the winch rope should be
straightened.
(b) The winch rope was pulled and the loop has tightened to a kink. The winch
rope is now permanently damaged and should not be used .
(c) The result of kinking is that each strand pulls a dierent amount causing
the strands under greatest tension to break and reduce load capacity of the
winch rope.
Black(-)
Black
Red(+)
Red
Battery
ToBattery
Washer
Washer
Figure 8
to remote control
Engaged
Free
Figure 9
CAUTION
!
If the winch motor
stalls, do not continue
to apply power.
1
2
280 x 215mm
 Loading...