EasyManua.ls Logo

Right Weigh 250 Series - User Manual

Right Weigh 250 Series
12 pages
Print Icon
To Next Page IconTo Next Page
Loading...
ONBOARD LOAD SCALE
EXTERIOR ANALOG | 250 Series
Question and Answer IconNeed help?

Do you have a question about the Right Weigh 250 Series and is the answer not in the manual?

Summary

Parts Required

Specifications and Overview

250 Series Model Guide

Lists gauge models for different axle configurations and weight capacities.

Scale Installation Guide

Checking for Leaks

Procedure to inflate the system and check for air leaks.

Calibration and Operation

Calibrating the Gauge

Step-by-step guide for calibrating the gauge with a loaded vehicle.

Operating and Weighing Procedures

Instructions on how to operate the gauge and weigh the vehicle.

Troubleshooting Guide

Troubleshooting Common Gauge Issues

Addresses common problems like inaccurate readings and leaks.

Overview

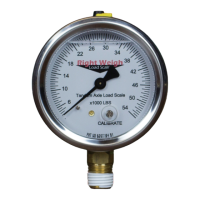
The Right Weigh Onboard Load Scale, specifically the Exterior Analog 250 Series, is a device designed to measure the weight on an axle group of a truck or trailer equipped with a single height control valve air suspension system. Its primary function is to provide real-time, on-the-ground axle group weight readings, helping operators ensure compliance with weight regulations and optimize load distribution.

Function Description:

The load scale operates by connecting to the vehicle's air suspension system. As the air bags inflate or deflate due to changes in load, the pressure within the system changes. The Right Weigh gauge translates this air pressure into a corresponding weight reading, displayed on an analog dial. This allows the operator to view the current axle group weight directly on the gauge, which can be mounted on the exterior of the truck or trailer. The system is designed for ease of installation and use, providing a simple and effective way to monitor axle loads without requiring frequent trips to a certified scale.

Important Technical Specifications:

The 250 series gauges are available in various configurations to suit different axle group setups and measurement units (Pounds - LBS or Kilograms - KGS).

  • Flange Mount Dimensions:

    • Gauge Diameter: 3.5"
    • Mounting Depth: 1.48"
    • Overall Depth (including fitting): 2.21"
    • Height (from mounting surface to top of gauge): 2.7"
    • Fitting Length: 1.69"
    • Fitting Diameter: 0.40"
    • Hex Fitting Width: 0.70"
  • Lower Mount Dimensions:

    • Gauge Diameter: 2.69"
    • Overall Depth (including fitting): 3.48"
    • Fitting Length: 1.00"
    • Fitting Diameter: 0.27"
    • Hex Fitting Width: 0.83"
  • Gauge Models by Suspension Type and Unit:

    • Single Axle:
      • Pounds (LBS): 250-30-LM, 250-30-FF
      • Kilograms (KGS): 250-16KG-LM, 250-16KG-FF
    • Tandem Axle:
      • Pounds (LBS): 250-54-LM, 250-54-FF, *250-HKANT40K-LM, *250-HKANT40K-FF
      • Kilograms (KGS): 250-25KG-LM, 250-25KG-FF
      • (*For use with Hendrickson VANTRAAX HKANT 40K or ULTRAA-K UTKNT 40K air suspension only)
    • Tri Axle:
      • Pounds (LBS): 250-64-LM, 250-64-FF
      • Kilograms (KGS): 250-30KG-LM, 250-30KG-FF
  • Included Parts:

    • 1/4" Straight Air Line Fitting (Female)
  • Additional Required Parts (sold separately in 101-SK kit):

    • Street Tee Fitting (thread size and type must match vehicle suspension)
    • Male NPT Tube for 1/4" Air Line (thread size and type must match vehicle suspension)
    • 1/4" Air Line (length depends on mounting location)

Usage Features:

The Right Weigh load scale is designed for straightforward operation and calibration.

  • Installation:

    • Gauge Location: The gauge should be mounted vertically in an easily accessible location on the exterior of the truck or trailer, safe from potential damage. Direct mounting to the chassis or main beam is not recommended unless approved by the vehicle manufacturer to avoid voiding warranties. For flange mount models, a 2 5/8" diameter hole is required, or it can replace an existing flange-mounted PSI gauge. A separate mounting bracket (250-BR) is available from Right Weigh, Inc.
    • Vent Gauge: Before mounting, the gauge vent, located on the top, must be opened by moving the yellow pointer to the open position.
    • Mounting: The gauge must be installed vertically using a wrench on the hex fitting. The housing or other parts of the gauge should not be used for tightening or loosening.
    • Air Line Connection:
      1. Dump air from the suspension system.
      2. Remove the suspension air line fitting from the top of one of the air bags.
      3. Insert a street tee fitting (matching vehicle suspension thread size) into the top of the air bag.
      4. Reinstall the suspension air line and fitting into the street tee.
      5. Install a new 1/4" air line and fitting into the remaining port on the tee.
      6. Route the new 1/4" air line from the tee fitting assembly to the gauge, securing it with zip ties.
      7. Insert the air line into the push-to-connect fitting on the back of the gauge. Do not rotate the air fitting.
    • Leak Check: After installation, air up the suspension system and check for leaks.
    • Sticker Placement: Place the provided Calibration / Operating Instructions sticker near the gauge.
  • Calibration:

    • Calibration must be performed with the vehicle fully loaded, ideally within 1500 lbs or 750 kgs of the typical axle group weight. Do not calibrate empty.
    • Obtain a certified loaded weight for the axle group using an in-ground scale.
    • Park on a level surface, shift to neutral, and set parking brakes.
    • Chock the wheels to prevent movement.
    • Release parking brakes.
    • Ensure the Height Control Valve (HCV) has fully inflated the air bags. If needed, briefly dump air from the suspension and allow the HCV to refill.
    • Using a flathead screwdriver, turn the calibration screw on the dial face until the gauge matches the certified axle group weight.
  • Operating and Weighing:

    • Park on a level surface, shift to neutral, and set parking brakes.
    • Chock the wheels.
    • Release parking brakes.
    • Ensure the HCV has fully inflated the air bags. If needed, briefly dump air and allow the HCV to refill.
    • View the load scale to determine the on-the-ground axle group weight.

Maintenance Features:

While the manual doesn't detail specific routine maintenance for the gauge itself, it emphasizes proper installation and troubleshooting to ensure accuracy and longevity.

  • Troubleshooting Erratic/Inaccurate Readings:

    • Vehicle not parked on a level surface: Parking on sloped or banked surfaces can shift weight distribution.
    • Vehicle's brakes are on: Set brakes can apply additional pressure/torque to air bags, affecting readings.
    • Vehicle parked on an uneven or rough surface: Potholes can cause additional pressure/torque on air bags.
    • Significant air leak in the suspension system: Leaks cause the HCV to refill frequently, leading to fluctuating gauge readings (slow decrease, then quick increase).
    • Height Control Valve (HCV) malfunctioning or broken: An inconsistent or erratic HCV can lead to inconsistent air pressure. To test, record a gauge reading, drive the vehicle, return to the same location, and record a second reading. Significant differences suggest an HCV malfunction.
  • Warranty: Right Weigh, Inc. provides a 3-year warranty from the date of purchase, covering significant defects in material and workmanship. The warranty does not cover issues arising from improper application, installation, wiring, operation outside specifications, accidents, faulty suspension parts, power surges, inadequate maintenance, abuse, misuse, unauthorized modification, or acts of God.

  • Repairs/Replacements: For any returns, an RMA# must be obtained from Customer Service. Products under warranty will be repaired or replaced at no charge. Out-of-warranty repairs are done at customer expense with authorization. Shipping costs for returns are prepaid by the customer, while Right Weigh covers return shipping for warranty repairs. Only new, unused products can be returned for credit; installed, used, damaged, modified, or customized products are not eligible for credit.

Right Weigh 250 Series Specifications

General IconGeneral
BrandRight Weigh
Model250 Series
CategoryMeasuring Instruments
LanguageEnglish