Do you have a question about the Riley Hopkins 250 and is the answer not in the manual?
| Brand | Riley Hopkins |
|---|---|
| Model | 250 |
| Category | Power Tool |
| Language | English |
Lists the necessary tools for assembling the Riley Hopkins 250 press.
Identifies all components included in the packaging for the press.
Details components of the Riley 250 print station mounting hardware kit.
Details components for the Riley 250 bump stop hardware kit.
Install spring assemblies with hooks upward, lowering print heads onto stop bolts.
Install upper stop bolts and rubber sleeves, avoiding overtightening.
Securely mount the press base to a sturdy table or press cart.
Attach print stations using hardware, ensuring numbered alignment.
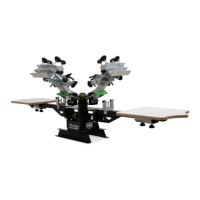
Overview of the Riley 250 multi-station press dimensions and recommended setup.
Detailed breakdown and identification of parts for the print head assembly.
Details general provisions, coverage, exclusions, and how to secure warranty service.
Provides contact details and further information regarding the press warranty.
