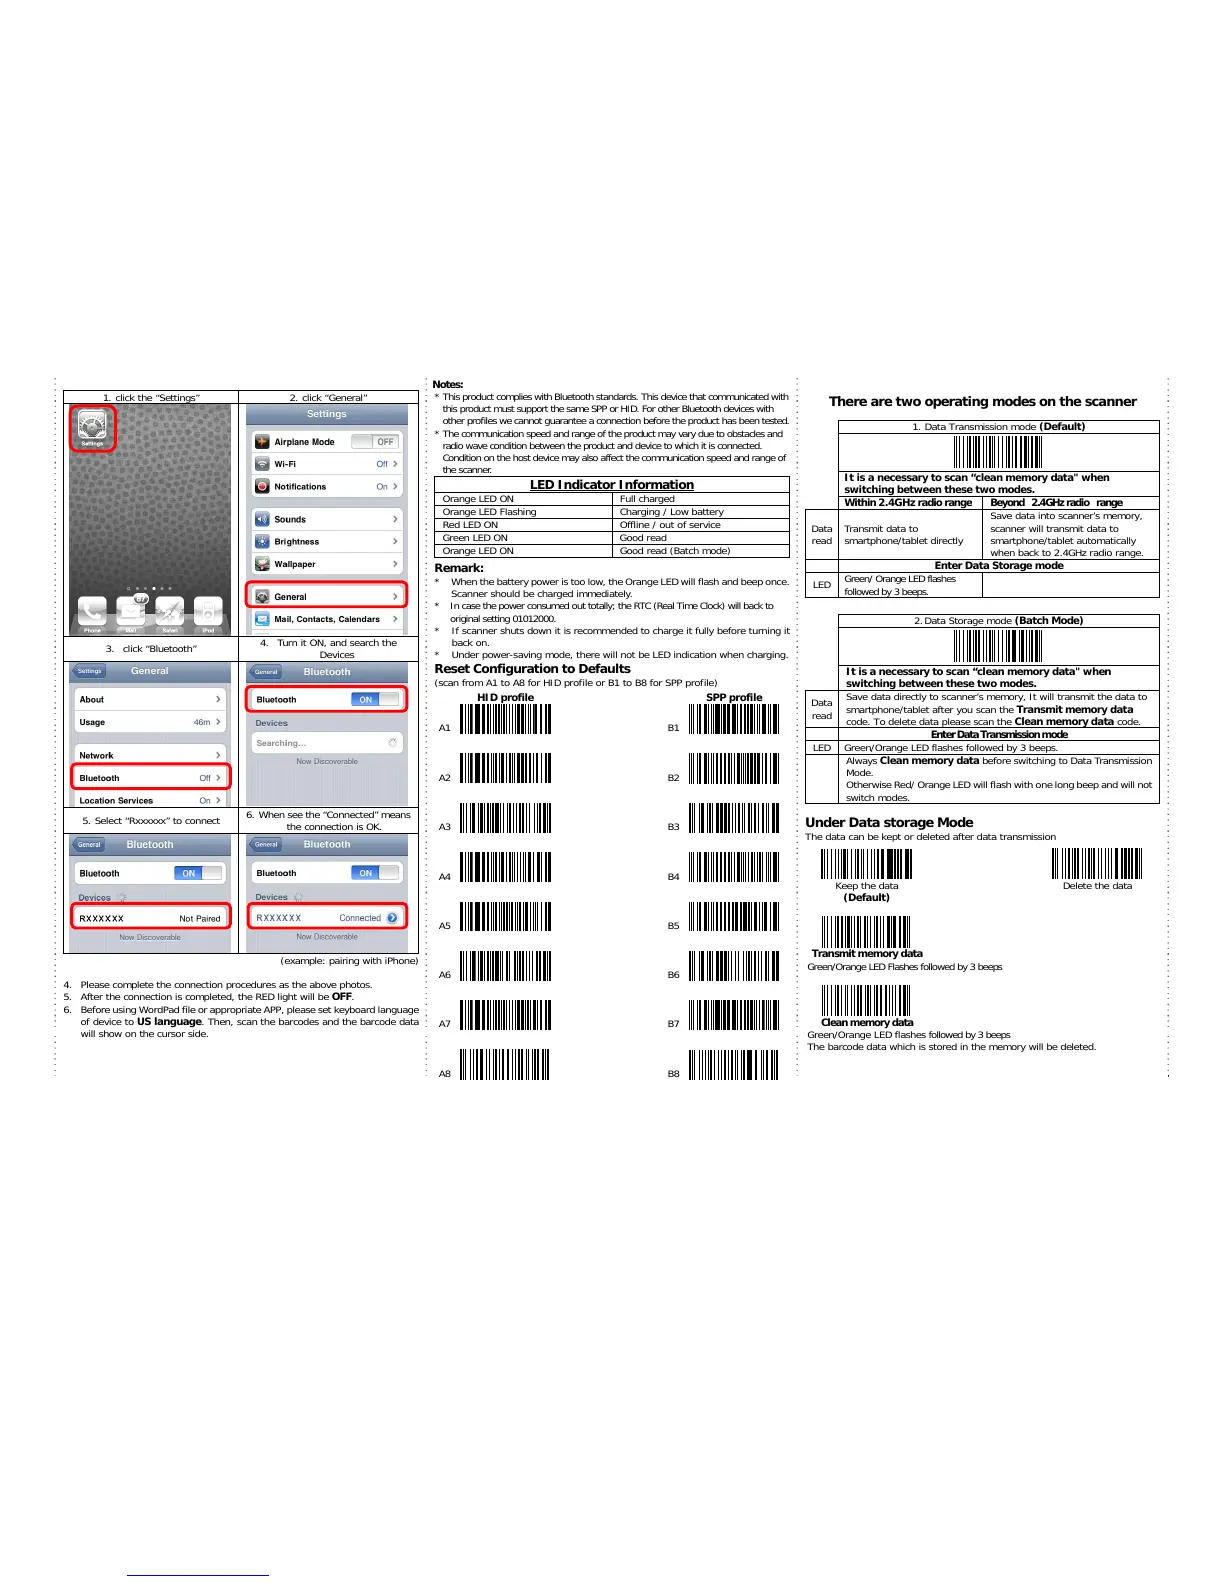
s” 2. click “General”
3. click “Bluetooth”
4. Turn it ON, and search the
Devices
5. Select “Rxxxxxx” to connect
6. When see the “Connected” means
the connection is OK.
(example: pairing with iPhone)
4. Please complete the connection procedures as the above photos.
5. After the connection is completed, the RED light will be OFF.
6. Before using WordPad file or appropriate APP, please set keyboard language
of device to US language. Then, scan the barcodes and the barcode data
will show on the cursor side.
Notes:
* This product complies with Bluetooth standards. This device that communicated with
this product must support the same SPP or HID. For other Bluetooth devices with
other profiles we cannot guarantee a connection before the product has been tested.
* The communication speed and range of the product may vary due to obstacles and
radio wave condition between the product and device to which it is connected.
Condition on the host device may also affect the communication speed and range of
the scanner.
LED Indicator Information
Oran
/ Low battery
Red LED ON Offline / out of service
Green LED ON Good read
Oran
e LED ON Good read (Batch mode)
Remark:
* When the battery power is too low, the Orange LED will flash and beep once.
Scanner should be charged immediately.
* In case the power consumed out totally; the RTC (Real Time Clock) will back to
original setting 01012000.
* If scanner shuts down it is recommended to charge it fully before turning it
back on.
* Under power-saving mode, there will not be LED indication when charging.
Reset Configuration to Defaults
(scan from A1 to A8 for HID profile or B1 to B8 for SPP profile)
HID profile SPP profile
A1
B1
A2
B2
A3
B3
A4
B4
A5
B5
A6
B6
A7
B7
A8
B8
There are two operating modes on the scanner
1. Data Transmission mode (Default)
It is a necessary to scan “clean memory data" when
switching between these two modes.
Within 2.4GHz radio ran
Data
read
Transmit data to
smartphone/tablet directly
Save data into scanner’s memory,
scanner will transmit data to
smartphone/tablet automatically
when back to 2.4GHz radio range.
Enter Data Stora
e LED flashes
followed by 3 beeps.
2.Data Stora
e mode (Batch Mode)
It is a necessary to scan “clean memory data" when
switching between these two modes.
Data
read
Save data directly to scanner’s memory, It will transmit the data to
smartphone/tablet after you scan the Transmit memory data
code. To delete data please scan the Clean memory data code.
Enter Data Transmission mod
e LED flashes followed by 3 beeps.
Always Clean memory data before switchin
to Data Transmission
Mode.
Otherwise Red/ Orange LED will flash with one long beep and will not
switch modes.
Under Data storage Mode
The data can be kept or deleted after data transmission
Keep the data
(Default)
Delete the data
ransmit memory data
Green/Oran
e LED Flashes followed by 3 beeps
Clean memory data
Green/Oran
e LED flashes followed by 3 beeps
The barcode data which is stored in the memory will be deleted.
 Loading...