Do you have a question about the Risco RW432KPP and is the answer not in the manual?
Procedure for configuring the keypad via RF mode.
Procedure for configuring the keypad using its serial number.
Details icons and their meanings on the LCD Keypad.
Explains the function of each control key on the keypad.
Summarizes typical user actions like arming and disarming.
Guide on using proximity tags with the keypad.
Step-by-step instructions for battery replacement.
Process for updating keypad parameters.
Details available models and their descriptions.
Information on regulatory compliance and declarations.
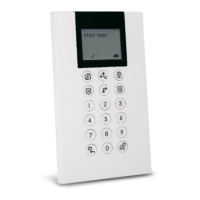
The RISCO WL Panda for LightSYS is a bi-directional wireless keypad designed for use with a LightSYS control panel, enabling seamless communication between the two devices. Its bi-directional nature means that for every command sent from the keypad to the panel, a reply status indication is received back, ensuring clear feedback to the user. The keypad offers flexible operation, allowing users to interact with the system either by entering a code or by using a proximity tag.
Key features of the WL Panda for LightSYS enhance its functionality and user experience. It utilizes bi-directional wireless communication, ensuring reliable and responsive interaction with the control panel. For emergency situations, the keypad includes an S.O.S./Two-way communication emergency key, providing a quick way to signal for help. Proximity tag operation offers a convenient and swift method for arming and disarming the system, reducing the need to remember and type in codes. The device is also equipped with double tamper protection, covering both the box and wall, to enhance security against unauthorized removal or tampering. Additionally, a battery economy mode is incorporated to extend the keypad's operational life, optimizing power consumption.
Setting up the WL Panda for LightSYS involves identifying the keypad to the system receiver. This can be achieved in two ways: either by manually typing the keypad's 11-digit serial number into the system or by using RF (Radio Frequency) mode for automatic allocation.
For RF communication setup, the process begins by navigating through the installer menu on a wired keypad. Users select "7)Install > 2)WL Device > 2)Allocation > 1)By RF > 3)Keypad" and then press "OK". If multiple receivers are present, the user selects the desired receiver and presses "OK". Next, the keypad's location within the system is selected, followed by pressing "OK". To send a Write message from the WL Panda keypad, both the "8" and "OK" keys are pressed simultaneously for at least two seconds, which will display the keypad's serial number. Finally, pressing "OK" on the wired keypad completes the allocation procedure.
Alternatively, the keypad can be set up by its serial number. From the wired keypad's installer menu, the path is "7)Install > 2)WL Device > 2)Allocation > 2)By Code > 3)Keypad," followed by pressing "OK". If multiple receivers are available, the user selects the appropriate one and presses "OK". The keypad's location is then chosen, and "OK" is pressed. The user then enters the keypad's 11-digit serial number and presses "OK"; the keypad will display its serial number. It's worth noting that adding the keypad can also be done remotely using configuration software, either by entering the serial number or via RF communication. To download labels to the keypad, the "gear" key is pressed for two seconds, prompting the panel to send an update.
Mounting the keypad involves securing it to a wall using the provided mounting bracket. Before final installation, it is recommended to test the keypad's communication with the system. The process starts by removing the fastening screw that secures the mounting bracket to the keypad. The bracket is then separated from the keypad. The battery cover is released from the keypad's battery compartment. The battery cable is attached to the connector, and batteries are inserted, paying close attention to polarity, before closing the battery compartment. After allocating the keypad to the receiver (as described in the communication setup), the mounting bracket is secured to the wall using the mounting holes as a template. Finally, the keypad is mounted onto the bracket, and the fastening screw is inserted to lock it in place.
The keypad features various visual indicators on its LCD display to provide clear status information. A "Trouble" icon, when "On," indicates a system trouble, while "Off" signifies normal operation. For arming status, "On" means the system is ready to be armed, "Off" means it's not ready, and a "Slow Flash" indicates readiness while an exit/entry zone is open. The "Arm/Alarm" indicator is "On" when the system is in Full Arm or Stay Arm mode, "Off" when disarmed, "Slow Flash" during exit delay, and "Rapid Flash" during an alarm condition. The "Stay/Bypass" icon is "On" for Stay Arm mode (Part Set) or Zone Bypass mode, and "Off" if there are no bypass zones. A "Tamper" icon "On" indicates a tampered zone, keypad, or external module, while "Off" means all zones are operating normally. The "Cloud Connectivity" icon is "On" when connected to the cloud, "Slow Flash" for cloud connectivity trouble, and "Off" if no cloud connection is configured or available.
The control keys on the WL Panda for LightSYS facilitate various user operations. The "lock" key, in normal operation, is used for Away (Full setting) and, in the User Functions menu, for changing data. The "house" key, in normal operation, is for Stay arming (Part Setting) and, in User Functions, for changing data. The "OK" key is used to disarm (unset) the system after a user code is entered, and also to terminate commands and confirm data storage. The "up arrow" key scrolls up lists or moves the cursor left, and provides system status. The "down arrow" key scrolls down lists or moves the cursor right. The "gear" key, in normal operation, enters the User Functions menu and, in User Functions, moves back one step in the menu.
Common user operations include Away (Full Setting) by entering a code and pressing the "lock" key, Stay (Part Settings) by entering a code and pressing the "house" key, and Disarm (Unset) and Silence an alarm by entering a code and pressing "OK". Partition Disarm (Unset) for partitions 1/2/3/4 involves entering a code and pressing "OK". Duress Unset is performed by entering a duress code and pressing "OK". Quick Zones Bypass (Omit) is done by entering a code, then the zone number, and pressing "OK". Activating an output involves pressing the "gear" key, then "OK", then entering the code, selecting activities, and pressing "OK" for output, then "OK" for control, and finally entering the program output number. Defining Follow-Me involves pressing the "gear" key, then "OK", entering the code, selecting "Follow Me", and pressing "OK", then "Define". Viewing Faults involves pressing the "gear" key, then "OK", entering the code, selecting "View", and pressing "OK" for fault. Viewing Event Log is similar: "gear" key, "OK", code, "Event Log", "OK". Keypad Chime On/Off is done by pressing the "gear" key, then "OK", entering the code, selecting activities, pressing "OK" for keypad, then "OK" for sound, and "OK" for chime. Editing User Code involves pressing the "gear" key, then "OK", entering the code, selecting "Codes/Tags", and pressing "OK", then "Define".
Emergency keys provide quick access to critical functions. Pressing "4" and "6" simultaneously for at least two seconds activates a Fire alarm. Pressing "7" and "9" simultaneously for at least two seconds activates an Emergency alarm. Pressing the "star" and "shield" keys simultaneously for at least two seconds activates a Police (Panic) alarm.
Function keys include "1/2/3/5", which are used to arm (set) groups of zones by default or to activate prerecorded series of commands (macros). To activate, these keys are pressed for two seconds. If both group arming and macros are defined in the panel, only macros will operate upon button press. The numerical keys (0-9) are used for inputting numeric codes for arming, disarming, or activating specific functions.
Keypad settings can be defined individually for each connected keypad. To access these settings when the keypad is idle, press "OK" for two seconds until the Keypad Settings menu appears. Users can then select relevant icons using the "up" and "down" arrow keys to adjust brightness, contrast, and keypad buzzer volume. After making adjustments, "OK" is pressed to save, and the "gear" key is pressed to exit.
The Proximity Tag operation involves presenting the tag to the keypad (after waking it up) as illustrated in the manual, allowing for quick system interaction.
To extend battery life, the keypad is designed with a Sleep mode function. By default, 10 seconds after the last key press, the display and LEDs will turn off.
Replacing batteries involves removing the fastening screw, sliding the keypad off the mounting bracket, removing the battery compartment cover, and disconnecting the battery cable. New batteries are then inserted with correct polarity, the cable reconnected, the cover closed, and the keypad re-mounted and secured. A caution is provided regarding the risk of explosion if an incorrect battery type is used, and proper disposal of used batteries according to local regulations is advised.
Any changes made to the keypad parameters require an update. This is performed by pressing the "gear" key for two seconds, prompting the panel to send an update to the keypad.
| Frequency | 433.92MHz |
|---|---|
| Buttons | 4 |
| Compatibility | Risco Alarm Systems |
| Battery Type | CR2032 |
| Power Source | Battery |
| Weight | 30 grams |
| Operating Range | Up to 100 meters |