Do you have a question about the Robinson Willey FIREGEM VISA 2 and is the answer not in the manual?
Information regarding the mandatory dressguard for safety and its limitations.
Step-by-step instructions for igniting the gas fire using different ignition methods.
How to ignite the fire using the piezo electric spark generator.
How to ignite the fire using the battery-powered electronic spark generator.
Guide to the control knob settings and corresponding radiant output levels.
Tips and settings for economical operation of the gas fire.
Alternative method to light the pilot if electronic ignition fails.
Instructions for removing the front panel and changing the radiant.
Guidance on cleaning the appliance safely and effectively.
Information on obtaining spare parts and arranging for professional servicing of the appliance.
Details on fire dimensions and Gas Council (GC) numbers for models.
The provided document is a user manual for the Firegem Visa 2 and Firegem Visa 2 Deluxe gas fires, both equipped with SAFEGUARD technology. These appliances are designed for heating and operate on Natural Gas only. They are not to be used with any other gas type.
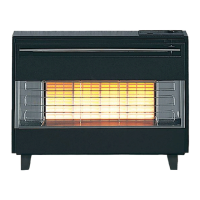
The Firegem Visa 2 and Firegem Visa 2 Deluxe are radiant gas fires that provide heat through a combination of radiant and convected air. They feature a control knob for adjusting the heat output and are equipped with either Piezo Spark Ignition (2 clicks) or Battery Spark Ignition for lighting the pilot. A key safety feature is the integrated flame supervision and Oxygen depletion device, which automatically shuts off the fire if the pilot light extinguishes for any reason, including low oxygen levels in the room or poor flue pull. This device is crucial for user safety, preventing the release of unburnt gas. The fire is designed to be installed and serviced by a competent person (a GAS SAFE registered engineer) in accordance with relevant Codes of Practice and Gas Safety (Installation and Use) Regulations. If the chimney has been used for solid fuel, it must be swept before installation.
The manual provides specific dimensions for both models:
Firegem Visa 2:
Firegem Visa 2 Deluxe:
Both models, when operating at full power, consume approximately 6 units of gas per hour. When installed in a typical chimney, the fire delivers an output of 4.87kW (16600Btu/h). The radiant part numbers are 995 971, with a G.C. number of 154 371. The electronic ignition system, where applicable, uses a PP3 battery.
The appliance must be installed with permanent objects no closer than 3mm (1/8in) to its sides. If floor-mounted, it must not be placed directly on a carpet or combustible material. If wall-fitted, the bottom of the case must be at least 150mm (6in) above the floor, carpet, or other combustible materials. A shelf of combustible material can be fixed above the fire, provided it is no more than 150mm (6in) deep and maintains a gap of at least 114mm (4.5in) between the top of the fire and the underside of the shelf. This 114mm (4.5in) gap also applies to non-combustible shelves to allow access to the tap handle.
The fire is fitted with a dressguard that conforms to BS 1945: 1991 and satisfies the Heating Appliance (Fireguards) (Safety) Regulations 1991. While it prevents fire risk and injury from burns, it does not provide full protection for young children, the elderly, or the infirm, for whom a guard conforming to B.S. 8423 is recommended.
The fire's operation is controlled via a single knob, which should be pushed in slightly before turning and always set to one of the stated positions. Lighting instructions are also provided inside the lift-up flap of the bezel on the top right side of the fire.
Lighting Procedure (Piezo Spark Ignition):
Lighting Procedure (Battery Spark Ignition):
Lighting with a Match or Taper: If the spark ignition fails (e.g., due to a low battery in electronic ignition models), the fire can be lit manually.
Turning Off: Push in the control knob slightly and turn it clockwise to the OFF position.
Heat Settings and Economy Use: The control knob allows for various heat settings, corresponding to different radiant configurations:
The pilot light burns at all settings, producing a localised extra glow to the left of the centre right-hand radiant, which is more visible at lower settings and is considered normal.
General Cleaning: The heater should never be cleaned while warm. Cleaning can generally be done with a damp soapy cloth, followed by polishing with a soft cloth. Abrasive cleaners should never be used. For the teak or rosewood effect of the Firegem Visa 2 Deluxe, wipe with a damp cloth only; do not apply furniture polish.
Front Panel Removal and Replacement: The front panel is a one-piece assembly designed for easy removal.
Radiant Changing: Before changing a radiant, ensure the fire is cold.
Replacing Battery (Electronic Ignition Models):
Servicing: Regular servicing and inspection by a GAS SAFE registered engineer (at least once a year) are strongly recommended to ensure continued and safe operation. If any home improvements are made to the dwelling where the appliance is fitted (e.g., extractor fan, draught proofing, double glazing), the air supply and flueing of the appliance must be re-checked by a competent person.
Troubleshooting: If the fire keeps going out due to the flame supervision and Oxygen depletion device, it indicates a potential issue with oxygen levels or flue pull, and the appliance must be checked by a competent person. If the pilot light extinguishes and the control knob is not in the OFF position, the knob must be turned to OFF, and no attempt should be made to relight the gas for at least 3 minutes.
Contact Information (as per the updated contact details):
The Help Centre on the website provides additional information, including manuals, guides, servicing information, where to buy products, and literature downloads.
| Brand | Robinson Willey |
|---|---|
| Model | FIREGEM VISA 2 |
| Category | Heater |
| Language | English |