This document provides an operating manual for RoboLabs cotton candy machines, including the Twister-M2 (ACB-02E), Twister-M2 (ACB-02U), and Monster (ACB-07) models.
Function Description
These machines are designed to produce cotton candy using sugar, with or without added flossine. They feature a classic horizontal setup where cotton candy exits the spinning head horizontally and is collected with a stick inside a floss pan.
Important Technical Specifications
The manual outlines specifications for three models:
Twister-M2 (ACB-02E):
- Productivity: Up to 3 kg/h
- 'Cold start' time: <30 seconds
- Rated current: Not more than 6.5 A
- Operating voltage: 230 Vac, 50 Hz
- Dimensions: 670x670x470 mm
- Weight: Not more than 15 kg
- Ingress protection: IP21
- Power cord: 3 m 16 A Schuko plug
- Voltage tolerance: +/-10% of nominal voltage
Twister-M2 (ACB-02U):
- Productivity: Up to 3 kg/h
- 'Cold start' time: <30 seconds
- Rated current: Not more than 16 A
- Operating voltage: 120 V, 60 Hz
- Dimensions: 670x670x470 mm
- Weight: Not more than 15 kg
- Ingress protection: IP21
- Power cord: 6 ft with NEMA 5-20 standard plug
- Voltage tolerance: +/-10% of nominal voltage
Monster (ACB-07):
- Productivity: Up to 8 kg/h
- 'Cold start' time: <30 seconds
- Rated current: Not more than 9 A
- Operating voltage: 230 Vac, 50 Hz
- Dimensions: 700x680x480 mm
- Weight: Not more than 18 kg
- Ingress protection: IP21
- Power cord: 3 m 16 A Schuko plug
- Voltage tolerance: +/-10% of nominal voltage
All models include a cotton candy machine, plastic floss pan, mesh screen with clips set, power supply cord, and operation manual in their delivery set. The floss pan is an integral part of the machine and must be installed for safe operation.
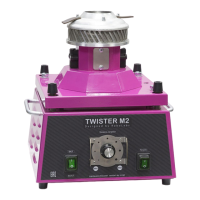
The machine's main components include a Housing, Chassis with an electric motor, and a Spinning Head. The spinning head and electric motor are mounted on the chassis, which is connected to the housing by four spring-mounted supports to dampen vibrations and allow the motor to self-balance. The front panel features a motor switch, heating switch, adjustment knob for heating power, and a voltmeter (Monster only).
Ambient operating conditions range from +5°C to 40°C (+41°F to +104°F) with relative humidity not exceeding 50% at 104°F. Higher temperatures and humidity can result in denser, heavier cotton candy that may melt quickly. Altitude should not exceed 1000 m (3280 ft).
Usage Features
Safety Requirements:
- Only trained personnel should operate the machine.
- Ensure transport fastening nuts are fully raised before turning on.
- Do not overfill the spinning head with flossugar.
- Wear eye protection during operation.
- Do not touch the head while rotating or when hot after use (wait until cool).
- Avoid overheating; the motor should rest 15 minutes per hour of operation.
- Do not modify the machine's design.
- Unplug the power cord before cleaning or servicing.
- The machine must be connected to a grounded outlet.
- Damaged supply cords must be replaced by the manufacturer or qualified personnel.
- For the ACB-02U model, use only the manufacturer's cord set (PF52012C1972) to avoid fire and electric shock.
- Children aged 8 and above, and persons with reduced capabilities, can use the machine under supervision and after understanding hazards. Children should not play with the appliance. Cleaning and user maintenance by children require supervision.
Getting Started:
- Unpack and save materials for future shipping.
- Place the machine on a stable table or cart.
- Before attaching the power cord, fully raise all four transportation fastening nuts until they reach the rubber support legs. Failure to do so will result in machine failure.
- Remove the protective film from the Floss Pan and wash it. Place the pan on the machine, ensuring indentations rest on the rubber support legs.
- Attach the mesh screen with clips to the pan.
Raw Materials:
- Use only 100% pure beet or cane sugar, with flossine or ready-to-use flossugar.
- Do not use sugars with starch, dextrose, or similar additives, as they can lead to poor quality floss or clog the heater coil.
Operation:
- After turning on, add flossugar to the spinning head (approximately ¼ full). Rotate the head manually to distribute sugar evenly.
- Use wood, paper, or plastic sticks to collect cotton floss. Wooden and plastic straws should be soaked in water first for better adhesion.
- Turn on the motor switch and the spinning head will begin to rotate.
- Turn on the heating switch and use the adjustment knob to set the operating voltage (150-160 Volts for Twister machines). The voltmeter (if present) indicates the voltage.
- Allow 1 minute for the machine to warm up. A candy aroma should be noticeable within 10-15 seconds before production begins.
- For a 'cold start' (machine off for >15 minutes), it takes at least 60 seconds for the heating coil to warm up. For brief shutdowns, this time is reduced.
- An experienced operator can turn the adjustment knob to maximum for 10-15 seconds after switching on both motor and heating, then decrease voltage to the recommended range. This reduces warm-up time.
- Do not apply maximum voltage for more than 10-15 seconds to avoid overheating sugar, which can burn the floss and eject irregular flakes.
- Due to thermal lag, voltage changes take 15-30 seconds (or longer) to take effect.
- To collect cotton candy, insert a stick into the pan and start collecting floss. Pull the stick out while spinning it with your hands to gather the floss. Continue winding until enough serving is on the stick, then tear the floss flow.
Shutting Down:
- For shutdowns less than 24 hours, remaining flossugar can be left in the spinning head.
- Turn off the heating element switch and collect any remaining cotton candy as the head cools. Let the head spin for 5-7 minutes to cool down before turning off the main power switch.
- Once cooled and the motor is stopped, cover the head with a bag to protect flossugar from dust and insects.
- Wipe down the machine and Floss Pan with a damp cloth to remove excess flossugar.
- For shutdowns longer than one day, perform a complete cleaning of the spinning head.
- Do not leave unused flossugar in the spinning head for more than a day or two, as it can harden/caramelize and affect head balance, potentially leading to machine failure.
- During transportation, always secure the chassis with lock-down nuts to prevent damage.
Maintenance Features
Technical Maintenance Schedule:
- Cleaning machine and pan surfaces (removing sugar and cotton candy): Once a day
- Sidewall and heater cleaning: Twice a month
- Brush unit maintenance: Every 6 months
- Maintenance may be required sooner if parts become fouled.
General Instructions:
- This section is for trained personnel experienced with electrical equipment.
- Disconnect power supply before cleaning or maintenance.
- Do not clean the spinning head or components with sharp or metal parts. Use hot water, a sponge, or a soft bristle brush.
- Do not immerse heating element terminal leads in water.
- Abrasive or mechanical cleaning of the heating element and sidewall is prohibited.
Spinning Head Cleaning:
- Long-term operation can clog the heating element and sidewall slits with sugar and carbon deposits, reducing productivity and quality.
- To clean, disassemble the spinning head:
- Remove all sugar from the head (turn upside-down if needed).
- Detach the floss head cover by removing four flat-head screws. Gently tap if 'glued'.
- Remove the central wing nut, steel washer, and plastic holding washer.
- Using a 7 mm nut driver or wrench, remove the nuts securing wire ends to terminal posts. Remove nuts, lock washers, terminal ends, and washers.
- Lift off the sidewall with the heating element as one unit.
- Wash the sidewall and heating element with very hot water to melt flossugar. Carefully separate the heater coil from the sidewall to clean contact areas.
- Ensure the sidewall and heating element are dry before reinstalling.
- Reassembly is done in reverse order. After reassembly, turn on the motor and heating coil for ~30 seconds to spin off moisture.
Brush Unit Maintenance:
- The machine uses brushes and slip rings subject to wear.
- Inspect slip rings for bumps and color changes; they should fit closely to insulators and show no excessive wear.
- Slip rings are made of high-grade brass and can last years with proper service. Replace if excessively worn or covered with bumps by qualified service staff.
- To replace brush units, remove screws securing the unit. Inspect carbon brushes; replace if worn more than half their length.
- After replacing brush units, remove all dust, debris, and tarnish from the slip rings.
- After installing new brushes, run the motor for 15 minutes before turning on the heating element. This allows brushes to conform to slip rings, preventing arcing under load.
- If the unit is unused for a prolonged period, perform routine maintenance before placing it back into service.
Troubleshooting:
The manual includes a troubleshooting table for common issues:
- Machine doesn't turn on: Check wall socket power, power supply cord, and fuse.
- Motor spinning but no cotton candy: Check power regulator and heating element.
- Low productivity: Clean sidewall and heating element, check outlet voltage.
- Smoke from spinning head: Reduce voltage on heating element, check power regulator.
- Significant vibration: Ensure head is filled at least ¼ full with flossugar and rotated manually to spread sugar, check for foreign objects, check for caramel stuck on heating element, clean sidewall and heating element.