F-2.4G PC Combo PS2 Gamepad
Hardware Overview
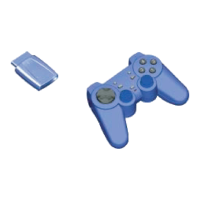
Receiver
1. 1 Connection Button
2. 2 LED Indicator (One is connection indicator and another is low-battery indicator.)
3. 1 USB Connector for PC
Gamepad
PC PlayStation
Eight ways D-Pad Eight ways D-Pad
Button 1, 2, 3, 4
Χ,○,□,△
Button 5, 6, 7, 8, 11, 12 L1, L2, L3, R1, R2, R3
Button 9, 10 Select, Start
Analog Ministick
Analog/Digital switching button
Program (Macro/Turbo) button
Vibration/Connection button
Red/Green/Orange LED indicator
Connection LED
Low-Battery LED
Connection Button
USB Connector
D-Pad
Right stick & button12/R3
Left stick & button11/L3
Mode-LED
Button1 /Χ
Button3 /□
Button2 /○
Button4 /△
Button6, 8 / R1, R2
Button5, 7 / L1, L2
A/D
Macro/Turbo
Button10/Start
Vibration/Connection
Button9/Select
Operation Reference
1. Gamepad Calibration
Before using this gamepad, please rotate the sticks once to calibrate perfectly.
2. Connect Gamepad with Receiver
Please follow below steps to connect the gamepad with the receiver.
1) Press and hold the Connection/Vibration button of the gamepad until the Mode-
LED twinkles with orange color.
2) Press the button of the receiver to connect with each other.
> L ED indicator:
Condition Online Off line
Connecting
Connection -LED
ON OFF Twinkle & Orange
3. Analog/ Digital S witching
This gamepad is equipped with Digital and Analog modes. And there are some
different features with PC and PlayStation modes in A/D modes as followings:
> PC
Gamepad Analog Digital
D-pad POV HAT X&Y Axis motion
Left Mini-stick X&Y Axis motion POV HAT
Right Mini-stick Throttle& Rudder Throttle& Rudder
Button 11, 12 Normal function No function
Other Buttons Normal function Normal function
Mode-LED Indicator Red Green
> PlayStation
You can switch between digital and analog modes. The Mode-LED turns ON with
red color in Analog mode and with green color in Digital mode. When the
gamepad is in Analog mode, the following buttons and sticks may operate in
Analog fashion depending on the features supported by the software title. Refer to
the software manual for details.
PlayStation2 format software
D-Pad / Χ,○,□,△ / 2 ministicks / L1, L2, R1, R2
PlayStation format software
2 ministicks
4. Vibration Function
You can switch the vibration function ON or OFF by pressing the Vibration
Connection button.
>LE D indicator:
Vibration ON Vibration OFF
Mode-LED
Twinkle ON
5. Macro function
There are four buttons (L2, L3, R2, R3) allowed being set as the macro buttons.
Please follow below steps to set up the macro function.
1) Press the Program button to set up the macro function.
2) Press one of four buttons (L2, L3, R2, R3) which you want to set as a macro
button.
3) Press the buttons (D-Pad, △,Χ,□,○, L1, R1, L2, R2, L3, R3, Start) in turn to
set into the Macro function.
4) Press the Program button again to finish the Macro function setup.
> L E D indicator
Steps of the
Macro set
Step 1) Step 2) Step 3)
Step 4)
Mode-LED
Orange Twinkle & Orange OFF.
Connection-
LED
OFF. OFF ON
6. Turbo function
Please follow below steps to set up the Turbo function.
1) Press the Program button.
2) Press the buttons (△,Χ,□,○, L1, R1, Start) which you want to set with the
Turbo function.
Note: If you want to remove the Turbo function, please repeat the above steps.
> L E D indicator
Steps of the Turbo set
Step 1) Step 2)
Mode-LED
Orange OFF
Connection-LED
OFF ON