3
Blank Preparation
1. Cut the blanks about 1/8” longer than the Brass Tubes
to allow for blowout or hole elongation. Maintain grain
orientation of the two blanks for turning by drawing a
line lengthwise across the cut line.
2. Drill the blanks with a 7mm drill bit at a speed of
900 to 1,200 RPM.
3. Scuff the Brass Tubes with 220 grit sandpaper to remove
oxidation and roughen the Tubes for better adhesion.
4. Prepare to glue with medium cyanoacrylate (CA) glue
or two-part fast-drying epoxy.
5. Working on one at a time, apply the glue to the outside of
the Brass Tubes, with a liberal amount around the ends that
will be inserted first. Do not apply glue to the inside of the
blank, as this will cause the glue to get inside the Brass
Tubes and ruin the tube.
6. Insert each tube with a twisting motion into the blank until
the tube is equidistant between both ends of the blank. Wipe
off any excess glue. Allow the glue to cure.
7. Using a barrel trimmer or a disk or belt sander, trim the ends
of the blanks until you can just see the bright brass ends of the
tubes. The faces of the ends must be perpendicular to the
Brass Tubes and parallel with each other. It is imperative that
the length of the trimmed blanks match the original length of
the Brass Tubes and that the insides of the Brass Tubes are
clean and free of any glue.
8. Use a permanent marker to make marks inside the Brass
Tubes that line up with the grain-alignment lines you drew
on the outside of the blanks. This will help you maintain grain
continuity after the blanks have been turned. Fig. 1.
Turning the Blank
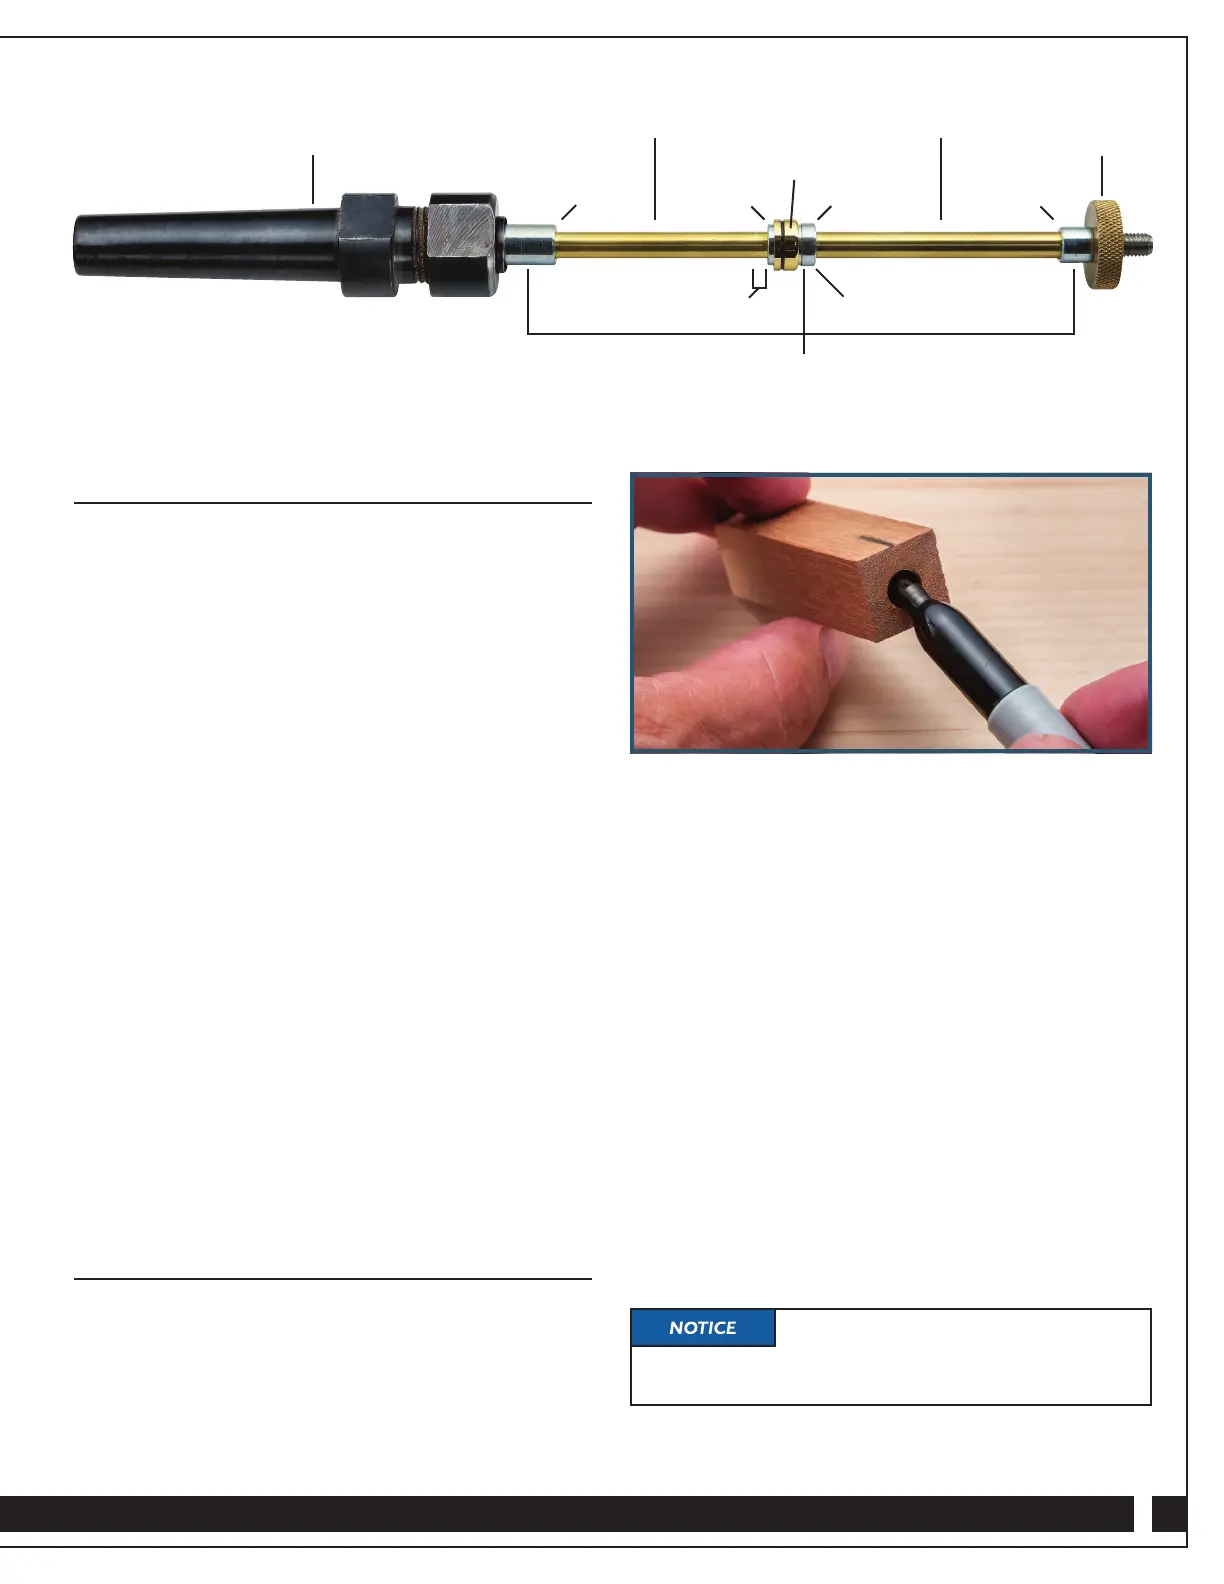
1. Assemble the blanks and bushings on the mandrel in the
order shown in Mandrel Setup. Keep the grain orientation
of the blanks in line when mounting. Note that the Stepped
Bushing should be placed between the blanks and oriented
as shown. The pen’s Center Band may be taped onto the
Stepped Bushing and used to test the fit of the tenon you will
turn on the blank containing the Upper Tube (Short). Just be
sure not to contact the Center Band with cutters or sandpaper,
or you might damage the finish.
2. Tighten the tailstock and then tighten the mandrel nut that
holds the blanks. Do not overtighten the tailstock or mandrel
nut as this may cause the mandrel to flex, causing the blanks
to go out of round.
3. Mark and turn a 3/16” wide tenon on the end of the Upper
Tube (Short) nearest the Stepped Bushing to match the inside
diameter of the Center Band. Go slowly and make light cuts to
avoid cutting the tenon too small. Stop the lathe occasionally
to test the fit by trying to slide the Center Band onto the tenon.
The fit should be snug. Make sure the Center Band has been
resecured before turning the lathe back on. The portion of
the Upper Blank nearest the tenon should be turned to
the diameter of the Center Band (approximately 13mm).
4. Turn the blanks to the desired shape, making sure that the
other surfaces next to the bushings are turned to the same
diameter as the bushings.
5. After turning, sand the surfaces in progressive steps of
180, 240, 320, 400 and 600 grit. If a higher-gloss finish is
desired, Micro-Mesh abrasives may be used.
6. Apply the finish of choice and polish.
7. Remove the blanks from the mandrel, taking care to maintain
blank orientation and grain alignment.
Place a small piece of painter’s tape
around the blanks toward the center onto which you can
transfer the grain-alignment marks from inside the tubes.
Mandrel Setup
Fig. 1
Upper Tube (Short) Lower Tube (Long)
Nut
Mandrel
10.3mm 10.3mm 10.8mm 9.1mm
Stepped Bushing
Center Band
Summit Bushings
3/16" Tenon


 To Next Page
 Loading...