Do you have a question about the Rockler Router Table Box Joint Jig and is the answer not in the manual?
Avoid serious injury by keeping hands and fingers away from the rotating cutter.
Follow safe usage guidelines including wood thickness, securing parts, and avoiding excessive resistance.
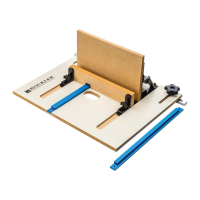
Assemble jig, select indexing key, install router bit, and position platform on router table.
Set bit height, attach fence, slide sled, adjust platform, tighten knobs, and perform test cuts.
Adjust the spacing between the router bit and indexing key for optimal joint fit.
Lay out workpieces, label them, and make the initial cuts against the indexing key.
Reposition workpieces using previous cuts against the indexing key for successive cuts on all edges.
| Minimum Stock Thickness | 1/4 inch |
|---|---|
| Joinery Type | Box Joint |
| Material | Aluminum |
| Compatibility | Fits standard router tables with a miter slot |
| Includes | Jig, indexing key, instructions |
| Adjustability | Adjustable for different stock thicknesses and joint tightness |