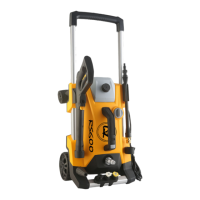
This document describes the RS600 Electric Pressure Washer, a device designed for cleaning tasks using high-pressure water. It functions by converting mains water into a high-pressure stream, suitable for various cleaning applications.
Function Description
The RS600 Electric Pressure Washer is used to clean surfaces by discharging a high-pressure stream of water. It is equipped with a gun and an adjustable nozzle, allowing the user to vary the width of the spray for different cleaning needs. The device can draw water from a tap connection or a water tank. It also features an integrated detergent tank for applying cleaning solutions.
Important Technical Specifications
- Model: RS600
- Electric Supply: 240V/50HZ
- Power: 2000W
- Protection Degree: IPX5
- Max. Input Water Temperature: 40°C
- Max. Input Water Pressure: 0.6MPa
- Cleaning Solution: Household detergent
- Hose Length: 10m
- Rated Pressure: 10MPa (100 BAR)
- Rated Flow: 360 L/H
Usage Features
Safety First:
- Always read all instructions before use.
- Close supervision is necessary when children are nearby.
- Familiarize yourself with controls to stop the product and bleed pressure quickly.
- Stay alert and avoid operating when fatigued or under the influence of alcohol or drugs.
- Keep the operating area clear of all persons.
- Maintain good footing and balance; do not overreach or stand on unstable ground.
- The inlet water temperature must not exceed 40°C.
- Never discharge the stream at people or animals due to the risk of injection or injury.
- The product is provided with a ground fault circuit interrupter (GFCI) built into the power cable plug for electric shock protection. Use only identical replacement parts if the plug or cable needs replacement.
- Ensure all connections are dry and off the ground; do not touch the plug with wet hands.
Grounding Instructions:
- The product must be grounded to reduce the risk of electric shock in case of malfunction.
- It is equipped with a cable with a grounding conductor and plug. This plug must be inserted into an appropriate, professionally installed, and grounded outlet.
- Improper connection of the grounding conductor can lead to electrocution. Consult a qualified electrician if unsure about proper grounding.
- Do not modify the plug. If it doesn't fit the outlet, have a proper outlet installed by a qualified electrician.
- Do not use any type of adapter with this product.
Extension Cables:
- Use only 3-wire, 3-prong grounding-type extension cables intended for outdoor use, marked "Acceptable for use with outdoor appliances; store indoors while not in use."
- The electrical rating of the extension cable must not be less than that of the product.
- Do not use damaged extension cables; inspect them before use and replace if damaged.
- Avoid abusing the extension cable or pulling on it to disconnect.
- Keep the cable away from heat and sharp edges.
- Always disconnect the extension cable from the receptacle before disconnecting the product from the extension cable.
Preparation:
- Upon unpacking, inspect for any transportation damage and contact your dealer if found.
- Verify the packing list and information paper.
- Confirm that the voltage on the rating plate (220-240VAC) matches the power source, and the circuit's current carrying capacity is at least 10A.
Installation:
- Ensure the pressure washer is switched off and disconnected from the mains supply.
- Connect the pressure hose and trigger assembly.
- Always fit the filter inside the water inlet to prevent sand, limestone, and other impurities from damaging the pump valves. Failure to do so will invalidate the guarantee.
- Connect the water supply hose (not provided) to the connector.
Operation:
- Connect one side of the inlet hose with the inlet nipple to the machine and the other side to the water tap, securing it with a clamp (ensure the sealing ring is in place).
- Eye protection is advised during operation.
- Connect the water supply and power source. Turn on the water supply, ensuring the tap is fully open.
- Turn on the machine's power switch and the gun trigger. Squeeze the trigger to exhaust any air from the machine, then it's ready for use.
- Rotate the nozzle to adjust the width of the spray.
- If using a water tank, ensure the water level is not lower than the machine itself, and the inlet hose must be fitted with a filter and primed with water.
- During cleaning, maintain a distance of no more than 30cm between the nozzle and the object surface to maximize impulsive force.
- Hold the gun trigger firmly during cleaning.
- The safety catch prevents unintentional opening but does not control the gun during operation.
- After cleaning, release the trigger, switch off the machine, and unplug the power cable. Close the water inlet and detach the appliance. Depress the trigger to release pressure and secure it with the safety button.
Maintenance Features
User Maintenance (Monthly or as required):
- Cleaning the Nozzle: Disconnect the machine from power and release residual pressure by squeezing the trigger. Remove dirt from the nozzle hole with a needle and rinse with water.
- Cleaning the Strainer: Clean the strainer in the water connection. It can be easily removed with flat-nosed pliers.
Storage Instructions (Winter Protection):
- Frost can damage the appliance if water remains inside.
- To prepare for winter storage, separate the inlet hose from the water supply system.
- Turn on the machine for about 30 seconds to extract water.
- Remove the high-pressure plastic hose to remove any remaining water.
- Store the appliance in a warm room.
Troubleshooting:
The manual provides a troubleshooting guide for common issues:
- Appliance not working: Check power source, socket connection, and cable condition.
- Appliance not reaching operational pressure: Check for worn nozzles, air in the hose, blocked/leaking inlet hose, damaged inlet/outlet valves, damaged plunger sealed ring, damaged O-ring of unload valve, or leaking pump seat. Solutions include changing parts, bleeding air, or cleaning.
- Pump leaks: Check for damaged sealed rings or loose bolts.
- No water flow or low flow rate: Check if the pump is primed, for dirt in the pump, or damaged inlet/outlet valves. Solutions include priming the pump, removing dirt, or changing valves.
- For problems not covered, refer to qualified service personnel.
Accessories:
The pressure washer comes with several accessories:
- Gun
- Wand
- Male Connector
- Cleaning Pin
- Integrated Detergent Tank
- Patio Cleaner
- Rotary Brush
- Fixed Brush