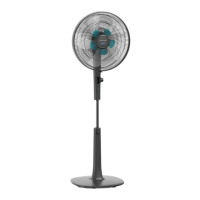
This document is an instruction manual for the Rohnson® Stand Fan with double blade and remote control, Model R-8600.
Function Description:
The Rohnson R-8600 is a stand fan designed to provide cooling with its double blade system and offers convenient control via a remote. It features various operating modes and timer functions to suit different user preferences and environmental conditions. The fan is designed for household use and should be operated in an upright position.
Important Technical Specifications:
- Model: R-8600
- Rated Voltage: 220V-240V~50Hz/60Hz
- Rated Power: DC motor 28W
- Fan Speed: Adjustable from 1 to 26 speeds in Normal Mode.
- Oscillation: Horizontal oscillation through approximately 90° angle (Left-Right).
- Timer:
- Timer ON Feature: Selectable from 1 to 18 hours. The fan will start operating in normal mode at speed 8 after the selected time elapses.
- Timer OFF Feature: Selectable from 1 to 24 hours. The fan will turn off after the selected time elapses and remain in standby mode.
Usage Features:
The fan offers several modes of operation and control options:
Control Panel and Digital Display:
The fan features a control panel with buttons for Timer, Mode, Oscillation, and Power. A digital display provides visual feedback on the fan's status.
- Digital Display Indicators:
- Normal mode indicator light
- Natural mode indicator light
- Night mode indicator light
- Fan speed digits
- Hour digits
- Timer indicator light
- The digital display goes into standby after 30 seconds of inactivity.
Remote Control:
A remote control is included for convenient operation, featuring:
- Power button
- Up button (to increase fan speed)
- Timer button
- Down button (to decrease fan speed)
- Oscillation button
- Mode button
- Mute button
Operating Modes:
-
ON / Stand-By Button:
- Pressing ON starts the unit with a beep, operating at a default low speed (speed 18) in Normal Mode.
- Pressing it again turns the unit off and puts it in standby.
-
SWING Button:
- Activates horizontal oscillation of the fan head through approximately 90° (Left-Right).
-
Timer Button:
- Used to set the desired operating time for both Timer ON and Timer OFF features. The time interval is incremented by 1-hour steps.
-
Mode Button:
Assembly Instructions:
The fan requires assembly of its foundation and other parts before operation.
- Attach the base stand to the base plate, securing it with the base fixing nut.
- Loosen the fan head locking nut, adjust the extension tube height, and attach the fan head.
- Firmly tighten the extension tube locking nut.
Grill & Fan Blade Assembly:
- Attach the rear guard to the adjustable head, securing it with the rear guard fixing nut.
- Insert the big blade onto the motor shaft, aligning the pins and holes.
- Hold the big blade and firmly tighten the small blade to the motor shaft.
- Attach the front guard to the rear guard, ensuring guides are locked in the outer ring.
- Close the plastic lock on the front blade and tighten the screw.
Safety Warnings:
- Can be used by children aged 8+ and persons with reduced capabilities if supervised and instructed.
- Children should not play with or clean the appliance without supervision.
- Damaged supply cords must be replaced by qualified persons.
- Read and understand instructions before first use.
- Retain instructions for future reference.
- Do not use if defective; dispose of correctly.
- Never use in explosive environments or near flammable liquids/gases.
- Ensure the device cannot restart unintentionally.
- Do not use if the on/off switch is faulty.
- Keep children and unauthorized persons away.
- Do not overload or use for unintended purposes.
- Exercise caution and only operate when in good condition (not tired, ill, or under influence of alcohol/medication/drugs).
- Not intended for use by persons with limited physical, sensory, or mental capacities or lack of experience/knowledge unless supervised or instructed.
- Always comply with safety, health, and working regulations.
- Ensure the fan is on a flat, stable surface before use to prevent damage.
- Set all switches to OFF before plugging into a standard AC socket-outlet.
Maintenance Features:
- Always unplug the fan and allow it to stop before cleaning.
- Clean external surfaces with a soft, damp (not dripping wet) cloth.
- WARNING:
- Do not immerse the fan in water.
- Do not use cleaning chemicals (detergents, abrasives).
- Do not allow the interior (especially the PCB) to get wet to avoid hazards.
- When not in use, unplug the fan. Store it in its original carton in a cool, dry place.
- In case of malfunction or doubt, do not attempt repairs yourself to prevent fire or electric shock.
- At the end of its working life, the product must not be disposed of as urban waste.
- It should be taken to a special local authority waste collection center or to a dealer providing this service.
- Separate disposal helps avoid negative environmental and health consequences and allows for material recovery, saving energy and resources.
- The product is marked with a crossed-out wheeled dustbin symbol to indicate separate disposal is required.