Do you have a question about the ROKIOTOEX Coyote Crossbars and is the answer not in the manual?
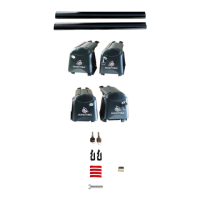
Includes front and rear crossbars, noting length differences.
Driver/Left and Passenger/Right side brackets with hardware details.
Details on keys, plastic clips, and optional sticky foam.
M6X12 Bolts used for securing the crossbars.
Identify and orient brackets and bars for correct positioning.
Insert bracket fillet into bar tube until a click is heard.
Repeat assembly steps for all brackets and bars.
Notes on crossbar positioning and loose bolt adjustments.
Instructions for using keys to lock/unlock and details on plastic clips.
Guidance on applying optional sticky foam for protection.
Remove rail screws and place crossbars on roof rails.
Loosen specific bolts to allow clamp plates to fit roof rails.
Position clamps, insert M6 bolts, and lightly tighten center bolt #6.
Balance bars and lightly tighten top bolts (#3, #4, #5).
Tighten all bolts after confirming alignment, avoiding over-tightening.
Slide on covers, align with plastic poles, and turn key to lock.
Warning against forceful removal and advice on bracket adjustment for noise.
Loosen both bolts completely with Allen keys.
Slide outer bracket part to expose inner fillets with plastic clip.
Use Allen key to push plastic clip and slide out inner part.
Contact information for support and concerns in Canada.
Adhere strictly to the manufacturer's specified roof rack load limit.
Ensure even load distribution and periodic checks for security.
Ensure correct orientation and full installation of crossbars.
Details on warranty terms, remedies, and limitations of liability.
| Brand | ROKIOTOEX |
|---|---|
| Model | Coyote Crossbars |
| Category | Automobile Accessories |
| Language | English |