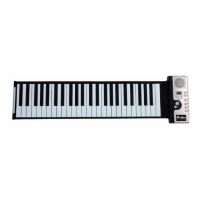
4. PLAY OPERATION
I. Press the “POWER” key to switch on the piano. The
LED Display, Volume and Tone Indicators will light up. The
LED display will show 001, and the tone setting will be on
PIANO 1, use the (▲) up or (▼) down keys to choose a tone
preference.
II. VIB KEY: Press VIB key to choose the vibrating sound
effect.
III. RHYTHM: Press the FUNCTION key to turn on the rhythm
option. When the RHY light turns on, use the (▲) up or (▼)
down keys to choose a rhythm preference. Then press the
START/STOP key to start and stop your rhythm selection.
You can also control the tempo speed by pressing the (▲)
or (▼) keys during your playing. (Refer to the RHYTHM List
for more details).
IV. SONG DEMONSTRATIONS: Press DEMO Key. The
LED display will show on (001), use the (▲) up or (▼) down
keys to choose a song preference. Then press the START/
STOP key to start and stop your song selection. You can
also choose other song during the song stop. (Refer to the
Demo Song List for more details).
V. MIDI OUT JACK: This jack, which is located on the bottom
right side of the piano, lets you input or output sound data
and MIDI signals. Insert the MIDI Cable (not included) to
the MIDI OUT jack and then connect the cable to any other
electronic musical instrument.
VI. DC 6V JACK: Insert the DC 6V power adaptor into this
jack in order to use the piano without batteries.
VII. HEADPHONE JACK: Connect stereo headphones to
this jack.
VIII. OUT EXT SP JACK: Connect an external speaker to
this jack.
4. OPERAZIONE PLAY
I. Premere il tasto “POWER” per accendere Roller
Piano. Il display a LED, e gli indicatori di Volume e suoni
si accenderanno. Il display a LED mostrerà 001, e la
regolazione del suono sarà su PIANO 1, usare i tasti freccia
su(▲) e giù (▼) per selezionare il suono desiderato.
II. TASTO VIB: Premere il tasto VIB per selezionare l’effetto
sonoro vibrante.
III. RHYTHM: Premere il tasto FUNZIONE per accendere
l’opzione ritmo. Quando si accende la luce RHY, usare i
tasti freccia su (▲) e giù (▼) per selezionare un ritmo.
Poi premere il tasto START/STOP per avviare e arrestare
la selezione di ritmi. Premendo i tasti freccia su (▲) e giù
(▼) mentre si suona, si può controllare anche la velocità
del tempo. (Per maggiori dettagli, consultare la Lista dei
RITMI).
IV. CANZONI DIMOSTRATIVE: Premere il tasto DEMO. Il
display a LED mostrerà (001), usare i tasti freccia su (▲)
e giù (▼) per selezionare una canzone. Poi premere il
tasto START/STOP per avviare ed arrestare la selezione di
canzoni. Durante la fase di arresto di possono scegliere altre
canzoni. (Consultare la Lista Canzoni Demo per maggiori
dettagli).
V. JACK MIDI OUT : Questo jack, che si trova nella parte
inferiore del lato destro del Roller Piano, permette l’ingresso
e l’uscita di dati sonori e di segnali MIDI.
VI. VI.JACK DC 6V: Inserire l’adattatore di alimentazione DC
6V in questo jack per usare la pianola senza batterie.
VII. JACK AURICOLARE: Collegare gli auricolari stereo a
questo jack.
VIII. JACK OUT EXT SP: Collegare uno speaker esterno a
questo jack.
 Loading...