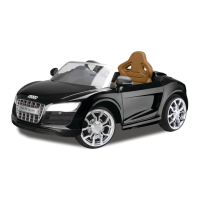
This document serves as the owner's manual and assembly instructions for the Rollplay Audi R8 Spyder, a ride-on vehicle designed for children. It provides comprehensive guidance on assembling, operating, and maintaining the vehicle, emphasizing safety precautions throughout.
The primary function of this device is to provide a fun and engaging ride-on experience for children. It is a battery-powered vehicle that mimics the appearance of an Audi R8 Spyder, allowing children to steer, accelerate, and experience a sense of driving. The vehicle is designed for single riders and is intended for use under direct adult supervision in safe, open environments.
Usage Features:
The Audi R8 Spyder ride-on vehicle is equipped with several features to enhance the user experience and ensure safe operation. Before any use, it is crucial to charge the battery for a full 24 hours. Subsequent charges should be for 8-12 hours after each use, and at least once a month even when not in use, to maintain battery health. An adult must always handle the battery and charger.
Assembly of the vehicle involves several steps, starting with the wheels. For the front wheels, users need to remove tape from the axle, slide on a large washer, then the front wheel (ensuring the slotted side faces out), followed by a flat washer, and finally secure it with a snap pin. The hubcap is then snapped into place. The process is repeated for the other front wheel. For the rear wheels, the procedure is similar, but it's noted that the right side of the vehicle will only have one washer. For the left rear wheel, an inner wheel spacer is slid onto the axle with the wide end facing out, followed by the left rear wheel with gear teeth facing inward, a flat washer, and a snap pin. The hubcap is then positioned. For the right rear wheel, the wheel is slid onto the axle with gear teeth facing inward, ensuring connection with the pre-installed gear box, and then secured with a flat washer and snap pin, with the hubcap positioned afterward. A helpful tip suggests using pliers to remove snap pins and provides guidance for realigning the rear axle if both wheels are difficult to fit.
The dashboard and windshield assembly is another key step. The two front tabs on the dashboard are positioned above the slots on the windshield, and then the windshield is snapped onto the dashboard. The entire dashboard/windshield assembly is then held together, and the steering rod from the car body is inserted through the dashboard's hole. The dashboard is aligned with slots on the car and slid into place, then fastened with two dashboard screws using a Phillips-head screwdriver.
The steering wheel assembly involves installing two AAA batteries into its compartment. A Phillips-head screwdriver is used to remove the screw, insert the batteries, and then replace the cover. It's important not to mix old and new batteries, or different types of batteries (alkaline, standard, rechargeable). Once batteries are in, the steering wheel is slid onto the steering rod, aligning the holes. A steering wheel screw is then slid through the steering wheel and steering rod, and a nut is fastened to the end of the screw, tightened with a screwdriver.
Mirrors are attached by aligning their bottom with the holes on the car body near the dashboard and gently pressing them into place. This is repeated for both mirrors.
The seat attachment requires ensuring the seat lock is in the unlock position. The two hooks on the back of the car seat are aligned with the holes on the back of the battery compartment. The hooks are inserted into the holes, and the seat is rotated down into place. Finally, a flat head screwdriver or a coin is used to turn the seat to the locked position.
Once assembled, the vehicle's operation is straightforward. The steering wheel turns left to steer left and right to steer right. Mirrors can be turned in and out. A pedal is pressed to go and released to stop. A forward/reverse shifter controls the direction of travel. There is a power switch to turn the vehicle on and off. Buttons on the dashboard activate sounds, and a seat lock mechanism unlocks and locks the seat. A button at the rear allows access to the trunk.
Maintenance Features:
Proper maintenance is essential for the longevity and safe operation of the Rollplay Audi R8 Spyder. The manual provides detailed instructions for battery and charger care, as well as general vehicle upkeep.
Regarding battery and charger information, only an adult who understands the safety warnings should handle these components, keeping them away from children. The initial 24-hour charge (no more than 30 hours) is critical, followed by 8-12 hour recharges after each use (no more than 20 hours). The battery should be charged at least once a month, even during periods of non-use, and never left in a discharged state. When charging, the battery terminal and charger must be connected, and the charger plugged into a 240V AC outlet. It's normal for the charger to warm up slightly, but if it exceeds 71°C / 160°F, it should be disconnected, and customer service contacted. The charger must be kept away from water or excessive moisture to prevent short-circuiting. Only the specified charger should be used; charging with any other charger is prohibited. Non-rechargeable batteries should not be attempted to be recharged with the original charger. Replacing the battery with any other type will void the warranty. Damaged batteries must be removed immediately and disposed of responsibly. Supply terminals should not be short-circuited. The battery should not remain connected in the vehicle for extended periods of non-use; the battery connector should be disconnected from the engine connector before storage. The vehicle is equipped with a thermal fuse for circuit protection; if the vehicle cuts out, turning it off and on will reset it.
For general care, all vehicle parts should be regularly inspected for good working condition. The charger, cord, plug, and related parts should also be inspected for damage. Any damaged parts must be removed immediately, and customer service contacted for replacements. The vehicle should not be operated if any parts are damaged. Cleaning should be done carefully with a damp cloth and mild soap, avoiding water near electrical parts and never washing with a hose. The vehicle should be stored indoors or covered with a tarp, away from stoves, heaters, or other heat sources.
A troubleshooting guide is included to help diagnose common issues. For instance, if the vehicle doesn't run, potential causes include a low battery (solution: recharge), a tripped thermal fuse (solution: reset fuse), loose snap pins (solution: tighten), or loose wires/connectors (solution: ensure secure attachment or contact customer service). If the battery is dead, the electrical system is damaged, or the motor is damaged, customer service should be contacted for replacement or repairs. If the vehicle runs for a short time, it could be an undercharged battery (solution: ensure secure connection and recharge for 8-12 hours) or an overcharged battery (solution: never charge for more than 30 hours). An old battery would require replacement. If the vehicle runs slowly, it might be an old battery, a battery not fully charged, too much weight on the vehicle (solution: reduce weight to 35kg max), or harsh operating conditions (solution: operate on level, safe surfaces). If the vehicle needs a push to start, it could be loose wires/connectors or a "dead spot" on the motor, both requiring attention to connections or contacting customer service. Difficulty shifting means the vehicle was moved while attempting to shift (solution: stop vehicle before shifting). Grinding noises from the motor or gearbox indicate motor or gear damage, requiring customer service contact. If the battery won't recharge, the charger might not be plugged in (solution: plug into functional outlet), the charger might not be working (solution: contact customer service for replacement), or there might be loose connectors/adapters (solution: check connections). Bubbling noise from the battery while recharging and a warm charger are both normal and require no action.
For any service, repairs, or replacement parts, users are directed to contact Hunter Products Customer Service, providing proof of purchase.