Do you have a question about the Roma ZipSCREEN 2 and is the answer not in the manual?
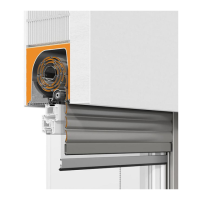
Diagram illustrating the various components of the zipSCREEN system.
List of necessary tools for installation and assembly.
Instructions for stamping and attaching the cover plates to the guide rails.
Procedure for shortening guide rails and adjusting the inlet.
Specifies the number of fasteners needed for elements wider than 2000 mm.
Specifies the number of fasteners needed for elements wider than 4000 mm.
Guidance on mounting two additional fasteners to prevent box sagging.
Details on the 20mm distance piece used with additional box fasteners.
Specific mounting instructions for the 130 S model when installed outside a recess.
Instructions on how to detach the base profile from the clip-on profile.
Steps to secure the box using the securing screw.
How to insert the base profile into the top cover or side cap.
Instructions for tightening the M4 x 10 securing screw with torque specification.
Details on additional fastening for facade guide rails with specific components.
Ensuring the rail substrate is flat and parallel for proper system function.
Performing dimensional checks and setting the distance to the windowsill.
Instructions for assembling the housing and guide rails separately.
Performing dimensional checks and determining required air space above guide rails.
Table indicating the required number of screws based on guide rail length and element width.
Instructions for screwing the base rail, including edge protection.
Ensuring the cloth is parallel to the rail at the top and bottom.
Instructions for sliding the clip-on profile into the guide rail and using transport safety devices.
Ensuring correct insertion of the bottom rail glider and zip fastener.
Steps to align and securely fasten the clip-on profile.
Detailed instructions for setting the lower and upper end positions of the screen.
Notes on fabric width and periodic adjustments for window fabric.
Important warning regarding the necessity of end position adjustment and motor programming.
Diagrams and dimensions for installing the crank and feeder mechanism.
Notes on limited external use and risk of corrosion for the crank mechanism.
Details and dimensions for the standard guide rail with plastering capability.
Details and dimensions for the compact guide rail, not suitable for plastering.
Details and dimensions for flush guide rails, suitable for plastering.
Details and dimensions for guide rails intended for façade installation.
Information on additional profiles used for guide rail mounting.
Specific solutions for mounting screens on façades.
Methods for fastening guide rails to rectangular tubes.
Methods for attaching strut brackets and their dimensions.
Table showing the required number of strut brackets per guide rail.
Warning about the substructure's ability to withstand loads and proper fastening.
Details on the optional Hirschmann coupling and minimum installation dimensions.
Information on the plastic receptacle and cable cover for the Hirschmann coupling.
Information about the additional box cover and when it needs to be shortened.
Minimum dimensions required for mounting as a complete system in a shaft.
Table detailing wind resistance classes based on element width and mounting type.
Table showing recommended maximum values for different mounting configurations and loads.
Diagnosing and resolving issues with the system not moving downwards.
Troubleshooting steps for when the bottom rail fails to reach its lowest position.
Addressing issues with kinks and folds appearing on the fabric surface.
Description of the textile screens' purpose as external sun protection.
Explanation of general safety symbols and their meanings.
Safety precautions and guidelines for transporting the product.
Hazards related to installation, repair, removal, and handling by qualified personnel.
Safety guidelines for electrical work, compliance with standards, and motor operation.
Measures to prevent plaster cracks, including securing the box and reinforcement fabric.
Considerations for sealing the area between the frame and guide rail before plastering.
Ensuring proper drainage and integration with the window sill during mounting.
Guidelines for rendering and weather-protecting Styrodur boards after installation.
Methods to avoid fissures in render, including securing boxes and reinforcement fabric.
Steps for sealing between frame and guide rail before rendering.
| Brand | Roma |
|---|---|
| Model | ZipSCREEN 2 |
| Category | Window Blinds |
| Language | English |