Do you have a question about the Rothenberger ROWELD ROFUSE Basic 48 V2.0 and is the answer not in the manual?
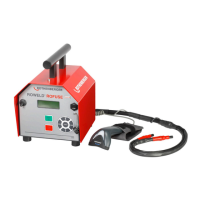
Weld fittings with barcode-controlled heating elements. Data codes conform to international standards.
Configure the machine to read fitting codes or enter manually.
Connect welding plug contacts to the fitting securely and ensure cleanliness.
Hold scanner 5-10 cm from the barcode label; device beeps on successful read.
Press START/SET after code is read and "Start?" is displayed. Confirm tube preparation.
Process is monitored according to fitting code parameters; display shows voltage, resistance, current.
Process is complete when actual time matches set time and two beeps occur.
Select voltage and welding time manually; press START/SET to confirm.
Enter fitting code manually using keypad; confirm with START/SET.
Measures fitting resistance at start of weld; compares to code; indicates error if deviation is too large.
Welding is interrupted if transformer overheats; device requires cooling.
Configure settings like welding code check, memory control, language, date/time, buzzer volume.
Configure welding code, commission number entry, and label printing options.
Lists errors like "Codefehler", "Kein Kontakt", "Unterspannung", "Überspannung", "Gerät zu heiß", "Systemfehler".
Lists errors like "Unterspannung", "Überspannung", "Widerstandsfehler", "Frequenzfehler", "Spannungsfehler".
| Power Supply | 48 V |
|---|---|
| Welding Process | Electrofusion |
| Operating voltage | 48 V |
| Frequency | 50/60 Hz |
| Output voltage | 8 - 48 V |
| Protection class | IP54 |
| Data logging | Yes |
| Welding report | Yes |
| Barcode scanner | Optional |
| Model | ROFUSE Basic 48 V2.0 |
| Category | Welding System |
| Brand | Rothenberger |
| Temperature Range | -10°C to +50°C |
| Operating temperature | -10°C to +50°C |