4
FRONT TIRE
3
WHITE SIDE
WALL INSERT
2
FRONT
WHEEL
METAL AXLE
2
FRONT WHEEL
4
FRONT TIRE
3
WHITE SIDE
WALL INSERT
2
REAR WHEEL
##
REAR TIRE
3
WHITE SIDE
WALL INSERT
1
CHASSIS
METAL AXLE
2
REAR WHEEL
3
WHITE SIDE
WALL INSERT
4
REAR TIRE
8
INTERIOR
7
STEERING
WHEEL
6
SHIFT SELECTOR
& TURN SIGNAL
5
DASHBOARD
25,26
SIREN
HALVES
36
WHIP
ANTENNA
22
FRONT
BULKHEAD
18
PARABOLIC
ANTENNA COVER
16
WEATHER
RADAR DOME
15
RADAR &
ANTENNA MAST
29
CLEAR COVER
14
AIR TANK
32
RIGHT
TAIL FIN
13
AIR TANK
12
ROOF RACK
35
DRIVER’S SPOTLIGHT
& MIRROR
11
BODY
30
LIGHT
30
LIGHT
30
LIGHT
30
LIGHT
31
LEFT TAIL FIN
34
DUCT
33
DUCT
28
LIGHT BAR
23,24
EQUIPMENT STORAGE
TUBE HALVES
27
SPOT
LIGHT
20
ELECTRON
CANNON
17
ANTENNA
BASE
19
CANNON
MOUNT
21
ELECTRON
CANNON
PYLON
3
DECAL / STICKER
X2
or
Red
2
DECAL / STICKER
X2
or
Red
28
LIGHT BAR
29
CLEAR COVER
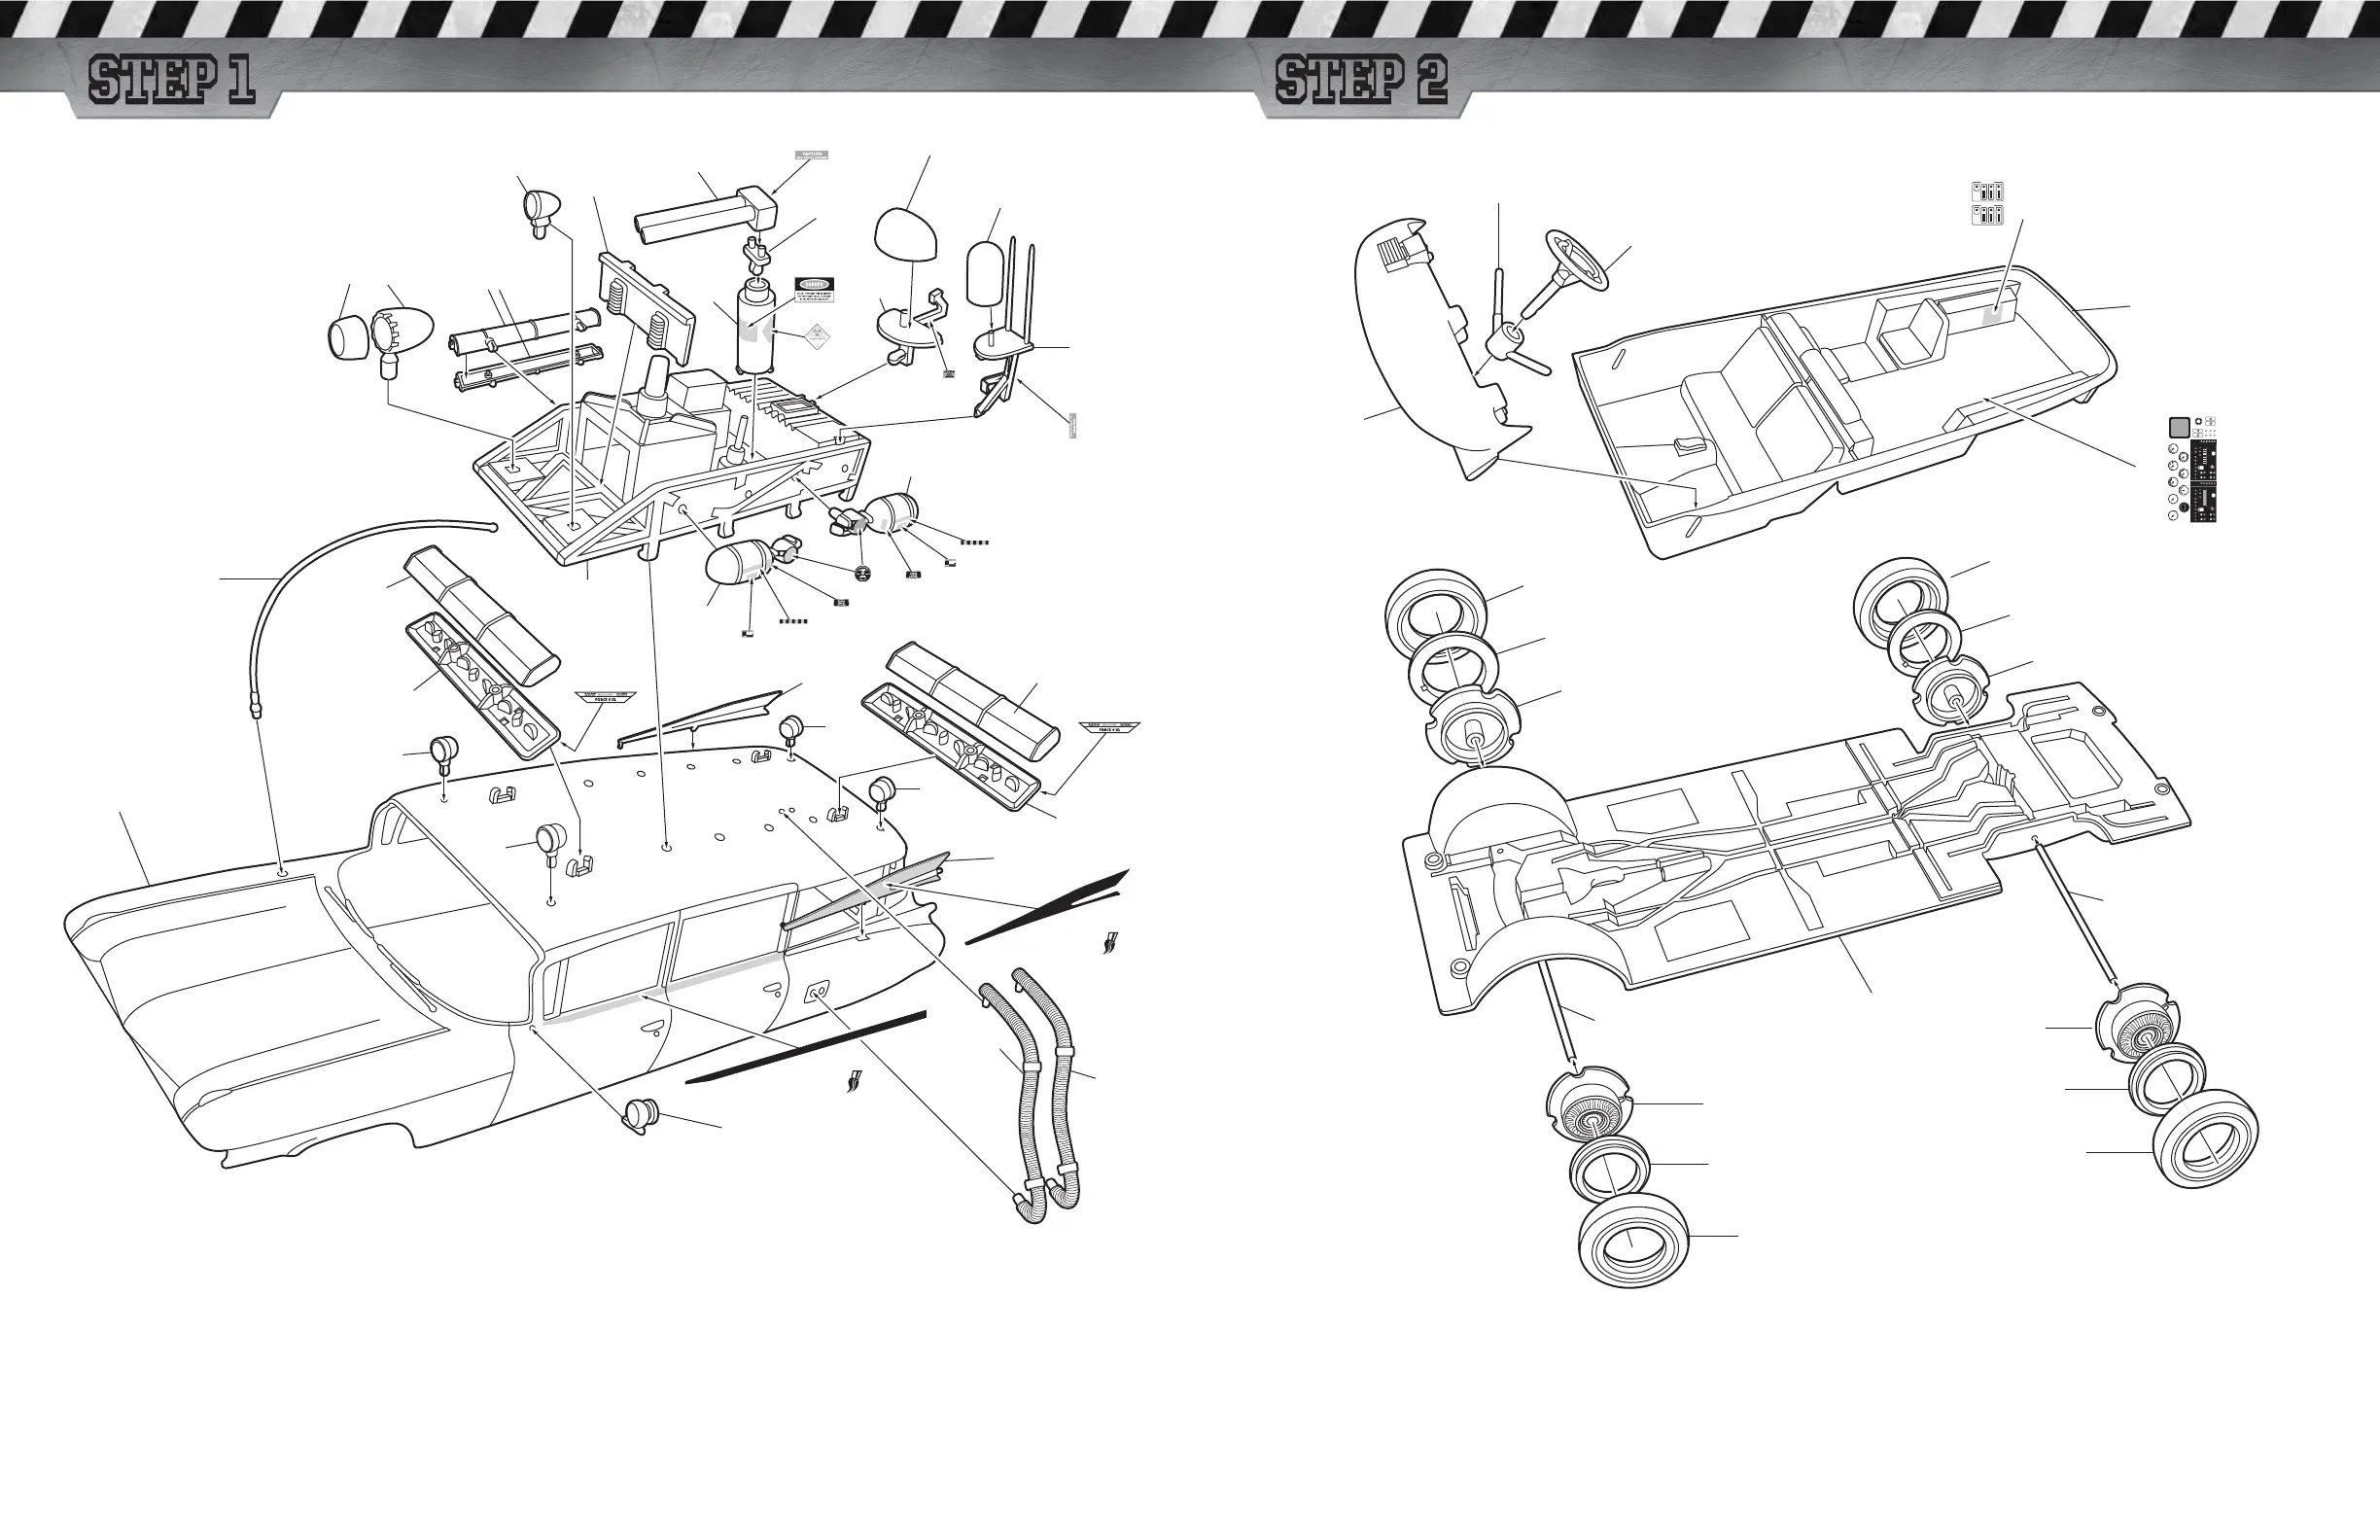
Assemble the body of the ECTO 1.
Snap the Air tanks #13 & #14 to the left side of the Roof rack #12 – Snap the Front bulkhead #22 in place in the Roof rack #12. Install the Weather radar dome #16
on the Radar and antenna mast #15 and snap the assembled Mast to the left rear corner of the Roof rack #12. Install the clear Parabolic antenna cover #18 to the Antenna
base #17 – Snap the assembled Parabolic antenna to the rear of the Roof rack #12. Snap the Electron cannon mount #19 into the Cannon #20 – Snap the assembled
Cannon into the Electron cannon pylon #21 – Snap the pylon in place on the floor of the Roof rack #12. Snap the Equipment storage tube halves #23 & #24 together –
Then snap the assembled Tube to the right side of the Roof rack #12. Assemble the Siren parts #25 & #26 – Then snap the Siren and Spotlight #27 in place at the Front
of the Roof rack #12.
Install the Left tail fin #31 & Right tail fin #32 onto the Body #11. If you wish to add the Red Body-Side Stickers to your Model kit – DO SO NOW. Install the Ducts #33
& #34 to the left side and roof of the Body #11. Snap the assembled Roof rack #12 in place on the roof of the car Body #11. Snap the Clear covers #29 onto the Light
bars #28 – Snap the two assembled Light bars in place on the roof of the Body #11. Install four Lights #30 – Two to the front, and two to the rear of the roof. Install the
driver’s Spotlight & mirror #35 to the driver’s side door – Then attach the Whip antenna #36 to the top of the right front fender.
Assemble the chassis & the interior of the ECTO 1.
Assemble the White side wall inserts #3 onto the Wheels #2 – Snap these assemblies into the Tires #4. Press the assembled Wheels and Tires onto the Metal axles after
inserting the Axles into the holes in the Chassis #1.
Push the Steering wheel #7 through the Shift selector & Turn signal #6 – Then install the Steering column assembly in the Dashboard #5 – Snap the assembled
Dashboard into the Interior #8.
10
DECAL
20
DECAL
22
DECAL
X2
21
DECAL
21
DECAL
23
DECAL
AC POWER
EFC RT980 SSLPAUHF
INPUT
AC POWER
EFC RT980 SSLPAUHF
INPUT
24
DECAL
18
DECAL
X2
19
DECAL
X2
16
DECAL
15
DECAL
11
DECAL
X2
CANNOT READ THIS
OR FIND AN EXAMPLE
CANNOT READ THIS
OR FIND AN EXAMPLE
8675309
THIS CONTAINER
CONTAINS THE
CONTENTS, WHICH
ARE CONTAINED
INSIDE THE SAME
CONTAINER
THAT CONTAINS
THE CONTENTS
10
DECAL
20
DECAL
CANNOT READ THIS
OR FIND AN EXAMPLE
CANNOT READ THIS
OR FIND AN EXAMPLE
8675309
THIS CONTAINER
CONTAINS THE
CONTENTS, WHICH
ARE CONTAINED
INSIDE THE SAME
CONTAINER
THAT CONTAINS
THE CONTENTS
11
DECAL
X2
13
DECAL
STEP 1 STEP 2
23
CHARGER EMP
SYS ARMED
EVR
ENABLED
OFF
SERVO
DISABLE
SYS TEST
CALIBRATION
CHARGEREMP
SYS ARMED
EVR
ENABLED
OFF
SERVO
DISABLE
SYS TEST
 Loading...