Model professionally assembled and finished by Mike Wherry
Contents include: All plastic pieces to complete
model, metal axles and pictorial instructions
describing assembly. Paint and glue not included.
SKILL
NIVEAU
NIVEL
1
round2models.com collectormodel.com
TM & ©2018 Columbia Pictures Industries, Inc. All rights reserved. GENERAL MOTORS Trademarks used under license
to Round 2, LLC. POLAR LIGHTS and ROUND 2 and design are trademarks of Round 2, LLC. ©2018 Round 2, LLC, South
Bend, IN 46628 USA. Product and packaging designed in the USA. Made in China. All rights reserved.
P958-200
Assembly:
Carefully study and understand the
entire instruction sheet. Compare the parts in the box
to the instruction sheet to be sure you have received
all the parts required. Carefully remove parts from
trees. If subassemblies and components are painted
do so before any parts are attached. Use only cement
and paint made for styrene plastic.
Painting:
Painting is optional and is not required
to complete kit.
Wash parts thoroughly with mild soap
and water. Parting lines, glue joints, and sharp edges
should be sanded or filled with filler putty designed for
plastic. Apply a "primer" coat and allow to dry. Check
parts for imperfections and repeat the procedure if
necessary. Remove any lint or dust. Apply paint
evenly, in several thin coats rather than one heavy
coat. Allow each coat to thoroughly dry before the next
is applied. Each coat should be carefully “wet
sanded” using slightly damp No. 1200 sandpaper. Be
careful not to remove any detail while sanding.
Lightest colors should be painted first. Use frosted
tape to mask off areas not to be painted. Remove tape
after paint is dry to the touch. Use a very fine brush to
touch up edges.
DECALS:
See back of decal sheet for proper
application.
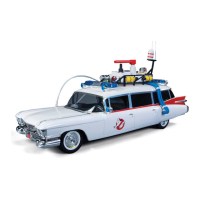
ECTO-1 INFORMATION
WHAT COULD BE MORE APPROPRIATE FOR CHASING
GHOSTS THAN A BLOCK-LONG ‘59 CADILLAC
AMBULANCE, SPECTACULARLY OUTFITTED WITH
ECTOPLASMIC SURVEILLANCE, DETECTION AND STORAGE
EQUIPMENT FOR THE ETHERIAL BOGIES? PLUS, ENOUGH
FLASHING LIGHTS TO LIGHT UP A SMALL TOWN?
WHY, NOTHING ELSE EVEN COMES CLOSE - IT IS THE
PERFECT VEHICLE FOR THIS SPOOKY JOB. WHETHER IT’S
SLIME IN YOUR REFRIGERATOR OR DANCING FURNITURE
OR REAL GHOSTS IN YOUR TV, THE ECTO-1 IS ALWAYS
ON CALL. AND WHO ARE YOU GONNA CALL?
GHOSTBUSTERS, THAT’S WHO! THEY BELIEVE YOU.
1
DECAL / STICKER
7
DECAL / STICKER
NEW YORK
SCREWS
SCREWS
39
REAR BUMPER
& TAILLIGHTS
12
ASSEMBLED ROOF RACK
11
BODY
9
FRONT
WINDOWS
40
FRONT BUMPER,
GRILLE &
HEADLIGHTS
10
REAR
WINDOWS
38
ELECTRICAL
CONDUIT
37
LADDER
Final Assembly of the ECTO 1.
Snap the Front windows #9 and the Rear windows #10 into the Body #11. Install the Front bumper, grille & headlights #40 to the front of the Body #11. Install the Rear
bumper, grille & headlights #39 to the rear of the Body #11. Place the Interior assembly #8 into the Body #11 and fasten the Chassis assembly #1 into the Body #11
using the four Screws provided. Snap the Ladder #37 and the Electrical conduit #38 to the right side of the Body #11 and the Roof rack #12.
1
DECAL / STICKER
X2
7
DECAL / STICKER
NEW YORK
6
DECAL / STICKER
X2
6
DECAL / STICKER
X2
1/25 SCALE MODEL KIT
ECTO-1
WITH
SLIMER
International Hobbycraft (UK) Ltd.
10 Temple Back
Bristol BS1 6FL England
Round 2, LLC.
4073 Meghan Beeler Court
South Bend, IN 46628
8
DECAL / STICKER
X2
12
DECAL
X2
17
DECAL
14
DECAL
X2
15
DECAL
9
DECAL / STICKER
STEP 3