Do you have a question about the ROWAN ELECTRIC APPLIANCE CM9429D-UL and is the answer not in the manual?
This document provides an instruction manual for a Single Serve Coffee Maker, identified by ITEM NO.: CM3729-BLACK and MODEL NO.: CM9429D-UL.
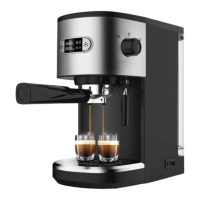
The Single Serve Coffee Maker is designed to brew coffee using either ground coffee or capsules. It offers various brew sizes (6 oz, 8 oz, 10 oz, 12 oz, and 14 oz) to suit different preferences. The device features a control panel with indicator lights for size selection, power, add water, descale, and brew. It is intended for household use only.
The manual does not explicitly list detailed technical specifications such as wattage, voltage, or material composition. However, it does mention that the coffee maker operates on a 120V AC electrical wall outlet. It is equipped with a removable water tank and a drip tray. The device is designed to accommodate both ground coffee holders and capsules.
Before using the coffee maker for the first time, it is crucial to thoroughly clean both the ground coffee holder and the drip tray with warm soapy water. The unit should be cleaned by filling the water tank with water and brewing 3 to 4 full cups. The removal water tank should be grasped using the designated grips, lifted up, and removed from the base of the unit. The lid should be removed, and the water tank filled to the MAX indicator line with cold water. The water tank should then be placed back into position, ensuring it is securely in place. The desired height for the drip tray should be selected depending on the size of the cup, mug, or tumbler being used. Finally, an empty cup, mug, or tumbler should be placed in position on the drip tray cover. No accessories should be added for this initial cleaning.
To make coffee, first press the Power button; the product will power on, and the indicator light will illuminate. Next, select the desired brew size (6 oz, 8 oz, 10 oz, 12 oz, or 14 oz) by pressing the Size button until the indicator light illuminates the desired size. If using ground coffee, press the Ground Coffee (BREW) button to start brewing. At the end of the cycle, the Coffee Maker will enter standby mode. It is important to repeat the cleaning process twice before using the machine for the first time. The Coffee Maker should be unplugged when not in use.
Before brewing, it is recommended that the water tank be filled at least to the MIN indicator line. The water tank should never be filled past the MAX indicator line. To avoid damage to the Coffee Maker, it should never be operated when the water tank is empty. To use, grasp the removal water tank using the designated grips, lift it up, and remove it from the base of the unit. Remove the lid and fill the water tank to the MAX indicator line with cold water. If the "Add water" blue light on the control panel flashes, it indicates that there is no water in the water tank. In this case, room temperature water should be added to the water tank, and the brewing process can then be re-started.
For optimal flavor, distilled water is preferred. The lid should be put back and the water tank placed back into position. It should be pressed down firmly to make sure it is securely in place. The desired height for the drip tray should be selected depending on the size of the cup, mug, or tumbler being used. An empty cup, mug, or tumbler should be placed in position on the drip tray cover. The holder compartment lid's front lid should be pulled up to unlock and lift the lid. The capsule holder should be chosen, and the capsule of choice added into the holder. The capsule should be pressed down until it is flush with the holder. A needle will penetrate the capsule. The capsule holder should be placed into the holder compartment. The holder compartment lid should be pressed down firmly. An audible click will be heard as the lid is locked firmly into position, and the top of the capsule will be punctured. The Coffee Maker should be plugged into a 120V AC electrical wall outlet. The Power button should be pressed; the product will power on, and the indicator light will illuminate. The brew size (6 oz, 8 oz, 10 oz, 12 oz, or 14 oz) should be selected by pressing the Size button until the indicator light illuminates the desired size. The Ground Coffee (BREW) button should be pressed to start brewing. The Coffee Maker will begin heating the water. The pump will then activate, and coffee will begin to stream through the nozzle. To interrupt the brewing cycle at any time, the brew button should be pressed. The plug should then be removed from the wall outlet. At the end of the cycle, the Coffee Maker will enter standby mode. The unit should be allowed to cool before removing the used capsule to discard. The Coffee Maker should be unplugged when not in use.
CAUTION: There are two sharp needles that puncture the capsules. One is located inside the capsule holder, and the other is located on the top underside of the holder compartment. To avoid risk of injury, fingers should not be placed inside either part. Caution should also be exercised when cleaning the parts.
The ground coffee holder allows the user to create their own favorite blend of coffee. To personalize blends, a dash of cinnamon, orange peel, cardamom, or vanilla bean can be added for flavoring. For best results, medium ground coffee should be used.
WARNING: Before brewing, it is recommended that the water tank be filled at least to the MIN indicator line but never past the MAX indicator line. To avoid damage to the Coffee Maker, it should never be operated when the water tank is empty. To use, grasp the removal water tank using the designated grips, lift it up, and remove it from the base of the unit. Remove the lid and fill the water tank to the MAX indicator line with cold water. If the "Add water" blue light on the control panel flashes, it indicates that there is no water in the water tank. In this case, room temperature water should be added to the water tank, and the brewing process can then be re-started.
IMPORTANT: For optimal flavor, distilled water is preferred. The lid should be put back and the water tank placed back into position. It should be pressed down firmly to make sure it is securely in place. The desired height for the drip tray should be selected depending on the size of the cup, mug, or tumbler being used. An empty cup, mug, or tumbler should be placed in position on the drip tray cover. The holder compartment lid's front lid should be pulled up to unlock and lift the lid. The ground coffee holder should be chosen and filled in with drip or regular grind coffee. It is recommended to use 1 level tablespoon of grind coffee for each cup of coffee desired (1 cup = 5oz. of coffee). For stronger or milder coffee, the amount of coffee should be adjusted to suit taste. The MAX fill line should not be exceeded.
The selection of the ratio of coffee powder to water is as follows:
| Water | Grounds |
|---|---|
| 6oz | 0.35oz (10g) |
| 8oz | 0.4oz (12g) |
| 10oz | 0.5oz (15g) |
| 12oz | 0.6oz (18g) |
| 14oz | 0.7oz (20g) |
The holder compartment's lid should be pressed down firmly. An audible click can be heard as the lid is locked firmly into position. The Coffee Maker should be plugged into a 120V AC electrical wall outlet. The Power button should be pressed; the product will power on, and the indicator light will illuminate. The brew size (10 oz., 12 oz., or 14 oz.) should be selected by pressing the Size button until the indicator light illuminates the desired size. The Ground Coffee (BREW) button should be pressed; the machine starts to work. The white BREW light will illuminate. The Coffee Maker begins heating the water. When the water has reached the optimum temperature, the pump will then activate, and coffee will begin to stream through the nozzle. To interrupt the brewing cycle at any time, the Ground Coffee button should be pressed. The plug should then be removed from the wall outlet. At the end of the cycle, the Coffee Maker will enter standby mode. The Coffee Maker should be unplugged when not in use.
This appliance requires little maintenance. It contains no user-serviceable parts. Any servicing requiring disassembly other than cleaning must be performed by a qualified appliance repair technician.
To ensure proper care, the Coffee Maker should always be unplugged, and the drip tray and cover should be cool before removing them from the base. The drip tray and cover should be rinsed and replaced in the Coffee Maker base. The holder compartment's front lid should be pressed to unlock and lift the lid. The used capsule should be removed from the capsule holder and discarded. The capsule holder should be rinsed in warm water before each use. When using the reusable ground coffee holder, the used coffee should be discarded. The holder should be washed in warm, soapy water to remove all coffee grinds. It should then be rinsed well.
NOTE: Both the capsule and the ground coffee holder are top rack dishwasher safe.
A damp paper towel or sponge should be used to completely remove any residue from the holder compartment. The exterior of the Coffee Maker should be wiped with a damp cloth to remove superficial stains. For stubborn stains, a nylon or plastic pad with a non-abrasive cleanser should be used. Metal scouring pads or abrasive cleansers should not be used.
Special cleaning of the Coffee Maker is recommended at least twice a year, depending on frequency of use and quality of water used in the unit. If water in the area is especially hard, the following cleaning procedure should be performed more often, since minerals in water can detract from the flavor of the coffee and possibly lengthen brew time.
NOTE: If the DESCALE white light on the control panel flashes, it means the unit must be cleaned.
To descale, the water tank should be filled with 1 part white vinegar to 3 parts cold water; no accessories should be added. An empty tumbler should be placed in position on the drip tray cover. The Size Button and Ground Coffee (BREW) button should be pressed at the same time to start the product and start cleaning. The CLEAN white indicator will always be on, and the Ground Coffee (BREW) button white indicator will always be on. The heater will start to heat up. After heating, it will be pre-soaked for a period of time, and then the hot water will be pumped out to complete a cleaning procedure. Steps 3 to 6 should be repeated until the water tank is empty. Following the same procedure, clean water should be run through the Coffee Maker three times. The Coffee Maker should be unplugged when not in use. The parts should be thoroughly dried. The Coffee Maker's exterior should be wiped with a dry cloth.
The unit should be unplugged and allowed to cool. The cord should be wrapped tightly around the appliance. Any stress on the cord where it enters the unit could cause the cord to fray and break. A clean adaptor should be stored in the Coffee Maker's holder compartment. The other adapter should be stored with the unit. The Coffee Maker should be stored in a cool, dry place. The unit should never be stored while it is still plugged in.
| Brand | ROWAN ELECTRIC APPLIANCE |
|---|---|
| Model | CM9429D-UL |
| Category | Coffee Maker |
| Language | English |