Do you have a question about the RS PRO RS-5200 and is the answer not in the manual?
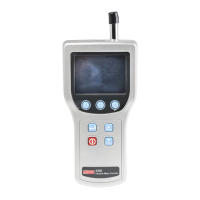
Description of the isokinetic probe and its protective cap.
Details on connecting the 12 VDC, 3 A external power source.
Identification and purpose of the USB port for data transfer.
Explanation of how to turn the meter on and off using the power key.
How to use arrow keys for mode selection and screen scrolling.
Procedure for saving settings and returning to the main screen.
Describes how function keys map to menu options and vary by screen.
Shows mass ranges, counts, battery status, location, time, delay, volume, temp, humidity.
Allows configuration of count mode, sample time/volume, data type, buffer, alarm, date/time, delay, temp units, K-factors.
Allows assigning labels to samples taken from different areas or rooms.
Step-by-step guide for creating and saving custom sample labels.
Instructions for reviewing stored sample data and comparing results.
Guides the user through setting up the meter for sampling.
Explains Concentration, Totalize, and Audio modes for data acquisition.
Details how to set sample volume (L/CF) or sampling time (h:m:s).
Explains Cumulative and Differential counting methods.
Procedure to set the number of samples to be stored (1 to 500).
Instructions for selecting internal flash memory or micro SD card for data storage.
How to configure audible alarm limits for particle count and size.
Procedure to set the current date and time on the meter.
How to set a delay timer between automatic sample collections.
Guide to selecting the display unit for temperature (°F or °C).
Explanation and setting of K-Factor coefficients for mass conversion.
Steps to follow after meter configuration is complete.
Procedure using a zero count filter to ensure accurate readings.
Instructions on how to collect air samples in MASS or COUNT modes.
Guide on connecting the meter to a PC for data transfer.
Explanation of the meter's 500-record rotating buffer storage.
Reference to section 6-3-2 for reviewing stored sample data.
How to view the current count of stored samples in the buffer.
Procedure to erase stored data from the meter's buffer.
Instructions for cleaning the meter's external casing.
Details on charging the battery and using the AC adapter for power.
Procedure to purge the sensor using a zero count filter for accuracy.
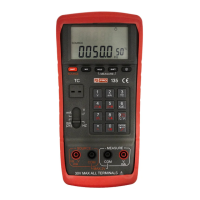
| Type | Digital Multimeter |
|---|---|
| True RMS | Yes |
| Display Type | LCD |
| Maximum DC Voltage | 1000V |
| Maximum AC Current | 10A |
| Maximum DC Current | 10A |
| Maximum Capacitance | 100mF |
| Operating Temperature | 0°C to +40°C |
| Operating Humidity | < 80% RH |
| Functions Measured | Voltage, Current, Resistance, Capacitance, Frequency |
| Safety Category | CAT III, CAT IV |