Do you have a question about the RTA Products Techni Mobili RTA-3800SU and is the answer not in the manual?
| Brand | RTA Products |
|---|---|
| Model | Techni Mobili RTA-3800SU |
| Category | Indoor Furnishing |
| Language | English |
Check all parts and hardware against the list. Report missing or defective parts for replacement.
Service limited to continental US. Contact supplier for other regions.
Contact Customer Service for assembly issues or clarification.
Thoroughly read and analyze each step's instructions and illustrations before proceeding.
Ensure correct hardware is used and tighten screws properly after positioning.
Carefully pierce laminate to reveal screw holes if not visible or too small.
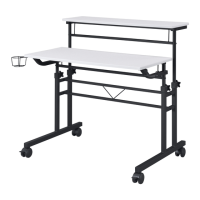
Install casters (E, F) and attach covers (G1) and knobs (G2) to legs (3).
Attach central structure (6) between legs (3) using screws (A).
Attach back structure (4) to back lift structures (7) using screws (A).
Attach front structure (5) to front lift structures (8) using screws (A).
Insert front lift structures (8) through covers (G1) into legs (3). Do not tighten knobs yet.
Secure front tabletop (2) to structure (5) and lift structures (8) with screws (C, D).
Insert back lift structures (7) through covers (G1) into legs (3). Do not tighten knobs yet.
Assemble back tabletop (1) to back lift structures (7) using screws (B).
Attach headphone hanger (9) and cup holder (10) to tabletop (2) using screws (D). Adjust height and tighten knobs.
Observe maximum weight capacities for different parts of the unit.
Guidelines for cleaning, avoiding sunlight, not sitting on the unit, and unlocking casters before moving.
Protect and secure the unit during transit to avoid damage.
Details on 5-year desk/cart warranty and 2-year TV stand warranty.
Excludes damage from misuse, commercial use, modifications, and consequential damages.
Steps to follow for making a warranty claim via phone or email.
Visit website, click Support tab, or scan QR code for replacement parts.
Contact support via email at support@rtaproducts.com for assistance.