It’s Under Control
®
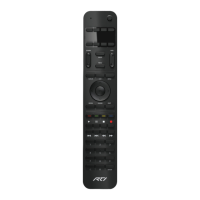
T2x
Wireless Remote Control
Programming the T2x
THE TOUCHSCREEN DISPLAY AND HARD BUTTONS
The T2x touchscreen display and buttons are programmed using the RTI
Integration Designer
®
programming software. (Integration Designer software
available to authorized RTI dealers only).
FIRMWARE AND SOFTWARE UPDATES
Please verify that you have the most recent rmware and software installed
for this and all RTI products. Authorized RTI dealers can download the latest
rmware and Integration Designer from the dealer section of www.rticontrol.
com.
INSTALLING FIRMWARE
1. Turn o the T2x - Press and hold the “Backlight” button and the “OK” buttons
simultaneously.
2. Connect the T2x dock to a PC using a USB cable (USB A to Micro B).
3. Press and hold the “5-way Joystick” button.
4a. Place the T2x into the docking station.
Or
4b. Connect the T2x to a PC directly using an RTI programming cable. (Contact
your local distributor to purchase this cable. The programming cable is also
included with the RTI IRPRO programming kit).
UPDATING INTEGRATION DESIGNER PROGRAMMING
RTI’s Integration Designer data les can be downloaded to the T2x using the
following methods:
• Connect the docking station to a PC using a USB cable (USB A to Micro B) and
place the T2x into the docking station.
Or
• Connect an RTI programming cable to the T2x and a PC. (Contact your local
distributor to purchase this cable. The programming cable is also included with
the RTI IRPRO programming kit).
Or
• Wirelessly via the local area Ethernet network (LAN). NOTE: Initial
programming including network settings will need to take place using the
docking station or the RTI programming cable.
Powering On/O the T2x
TO POWER THE T2x ON:
• Press and hold the “Backlight” button and the “OK” buttons simultaneously
until the T2x powers on (Approximately 1-2 seconds).
OR
• Place the T2x in the docking station - this will automatically power the T2x on.
(Docking station does not need to be powered).
NOTE: If the unit does not power on, it may be necessary to charge the battery.
See charging information below.
TO POWER THE T2x OFF:
• Press and hold the “Backlight” button, then press the “OK” button for
approximately 5 seconds until the T2x powers o.
NOTE: During normal operation, powering the T2x o should not be necessary.
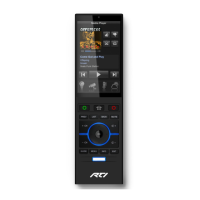
LIST BACK
CH
CH
Light Sensor
Front of T2x
Charging the T2x Battery
WHEN TO CHARGE THE T2x:
The T2x uses a Lithium-ion rechargeable battery which does not exhibit a
memory eect from being charged too often and may be placed into the dock
when not in use.
• A low battery icon will illuminate at the top right of the T2x (above the display)
when the battery capacity becomes low and a charge cycle is required.
CHARGING THE T2x:
1. Locate and install the appropriate wall outlet plug on to the power supply.
2. Insert the micro USB end of the power supply cable into the USB port located
on the backside of the docking station.
3. Plug the power supply cable into a wall outlet.
4. Gently slide the T2x into the docking station clear plastic alignment sleeve
until the remote is seated on to the dock connector.
NOTE: Plugging the T2x docking station into a PC
using a USB cable will also charge the T2x.
Backlight Button Color Guide:
Blue = Normal use
Red = T2x charging
Green = T2x fully charged
Multi-colored = T2x connected to a PC.
T2x Remote
(Backside)
Power Supply Cable
(With Micro USB Connector)
T2x Docking Station
(Backside)
To Wall Outlet
T2x Remote
USB A to Micro B Cable
T2x Docking Station
To PC USB port
PC
Downloading software/rmware updates
via the T2x docking station and USB cable
Replacing the T2x Battery
The following steps for removing the battery door should be performed by an
authorized service center or trained installer only.
REMOVE THE BATTERY DOOR:
1. Gently insert a small paper clip into the battery door latch hole until it stops
(see diagram).
2. Tilt the paper clip toward the top of the T2x to release the battery door latch.
REPLACE BATTERY:
1. Remove two (2) battery bracket screws
(Phillips head) and remove bracket.
2. Slide battery out of T2x - pull on
plastic tab connected to battery.
3. Slide new battery into T2x - metal
contacts inserted rst and label
facing up.
4. Replace battery bracket and install
two (2) screws - in order to align
battery bracket properly, get both
screws started before tightening fully.
5. Reinstall battery door - rst align the
wide end of the battery door against
the battery door opening, then
push the latch end of the door into
the T2x until it snaps in place.
NOTE: Always use ocial RTI batteries. Using batteries with improper power will
void warranty. Batteries available for purchase at www.rticontrol.com.
T2x (Backside)
Battery Door
Battery Bracket Screws (2)
Battery Door
Latch Hole
Paper Clip
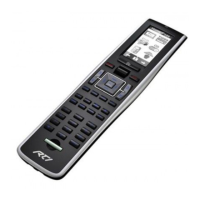
The T2x Control Panel
The T2x has many settings that can be adjusted directly on the remote through
the control panel. Please note that changes made directly in the T2x control
panel will be overwritten by changes made in Integration Designer.
ACCESSING THE CONTROL PANEL
The Control Panel page can be displayed by holding down the “Backlight” button
until the page is displayed (approx. 5 seconds).
ADJUSTABLE SETTINGS
• Backlight Level • Time Out • Tilt Switch • Grip Sensor • Battery
• Sound • Calibrate Touchscreen • Network Information
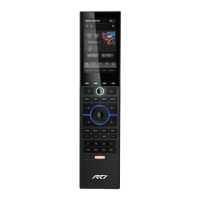
Battery Low Indicator
IR Transmission Window
Wireless Ethernet
Connection Indicator
Touchscreen Display
Backlight Button
COLORS:
Blue = Normal use
Red = T2x charging
Green = T2x charged
Multi-colored = T2x
connected to a PC.
Dock Connector Alignment Sleeve
5-Way Joystick
Programmable
Keypad
Buttons
Dock Connector Port
NOTE: The T2x dock connector port is used for battery charging and downloading software/
rmware updates into the remote. To insure a reliable connection between the remote and
the dock, the T2x utilizes a 10-pin connector that is compatible with a T2x Docking Station
or an RTI programming cable.
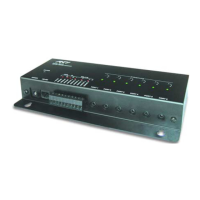
THE T2x DOCKING STATION
Dock Connector: A 10-pin dock connector is used to insure a reliable connection between the
remote and the dock during battery charging and software/rmware downloads.
Micro USB Port: The T2x dock has a micro USB port (located on the backside) for connection
of the AC power supply cable or a standard USB A to Micro B cable for connection to a PC.
Hard Buttons with
Replaceable Keycaps:
NOTE: These four button
keycaps may be replaced
with the keycaps that ship
with the T2x or keycaps
may be ordered separately
using the RTI Laser Shark
custom engraving service.
Visit the rticontrol.com
dealer website for Laser
Shark and button keycap
replacement instructions.

 Loading...