2
3
ENGLISHENGLISH
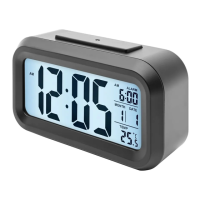
Specications
Power 1200 mAh Li-on rechargable battery
Charging input 5 V, at least 500 mA
Number of alarms 2
Time format 12/24 h
Backlight Yes
Snooze Yes
Temperature measurement 0 - 50 °C
Charging
The clock is powered by a rechargable Li-on battery. There are two indicators on the
front of the clock that indicates when the battery power is low or when the battery is
being charged. Insert a Micro USB cable in the socket on the back of the clock and a
wall charger or computer to charge the battery. The charging indicator will stop shining
when the battery is fully charged.
Time and date settings
Press and hold the SET button for 3 seconds to enter the time setting mode. The current
value will start blinking. The values are changed in this order: Hour > minute > year
> month > date > time zone > exit. Change the values with the C/F and 12/24 buttons,
conrm with the SET button.
RCC time setting
The clock automatically starts searching for a RCC signal for 7 minutes after it's
activated. This is indicated by the blinking radio mast signal on the display. If a signal
is found the display will show a DCF symbol. You can turn this function off manually by
pressing and holding the 12 /24 button for a few seconds.
Alarm settings
Press ALARM 1 or ALARM 2 depending on what alarm you want to activate, press the
button again to deactivate the alarm. Press and hold the ALARM 1 or ALARM 2 button
depending on what alarm you want to edit. After the chosen alarms value starts blinking
on the display change the values with C/F and 12/24. Conrm with the SET button. You
can also decide if the alarms should be active on weekdays (1-5), the weekend (6-7) or
all days (1-7) with the switch labeled ALARM on the back.
Features
Press the large light/snooze button to light up the display for three seconds.
Press the large light/snooze button when the alarm sounds to activate the snooze
function. The alarm will sound again after ve minutes.
Press the 12/24 button to switch time mode between 12 or 24 hour mode.
Press the C/F button to switch temperature unit between Celsius and Fahrenheit.
Slide the SENSOR switch to on to activate the backlight. It will be active in settings with
low light or in the dark and automatically turn off in sufcient lighting.
Safety information
Exhausted batteries are to be removed and replaced by a correct type battery.
Dispose of used batteries according to the instructions.
 Loading...