Do you have a question about the Russell Hobbs Mixer and is the answer not in the manual?
Appliance for adult use only, store out of reach of children.
Do not immerse in liquid, use near water, or outdoors.
Always unplug the appliance before cleaning or disassembly.
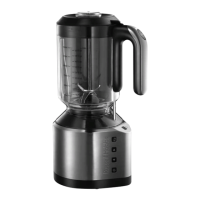
Safety switch prevents operation unless jug and lid are fitted.
Turn off the appliance before attaching the jug to the motor unit.
Turn off and wait for blades to stop before removing lid or jug.
Do not fill with liquids hotter than 40°C for safe handling.
Keep hands out of the jug due to sharp blades, even when removed.
Exercise caution when handling the sharp blade unit.
Do not insert objects into the jug while the blender is plugged in.
Never leave the appliance unattended when it is plugged in.
Position the cable to prevent tripping or catching.
Avoid jug overflow to prevent liquid damaging the motor unit.
Do not operate the appliance empty to prevent overheating.
Keep appliance and cable away from heat sources like hotplates.
Use only manufacturer-supplied attachments and accessories.
Use the appliance only for its intended purposes as described.
Sit the motor unit on a dry, firm, level surface near a power socket.
Align jug handle with the light indicator on the motor unit.
Mount the jug onto the motor unit and twist clockwise to lock.
Unlock and remove the lid by turning it anti-clockwise.
Add ingredients into the jug before proceeding.
Avoid filling past the 1500ml mark to prevent overflow.
Place lid on jug and turn clockwise to secure and engage safety switch.
Align cap pips with lid slots and turn clockwise to lock cap.
Never operate the appliance without the cap properly fitted.
Connect the appliance plug to a suitable power socket.
Press the power button; light and display will activate.
Use the '+' button to increase speed and '-' button to decrease it.
Speed settings range from 1 (lowest) to 12 (highest).
Motor automatically stops when speed is set to 0.
Press the 'D' button for a rapid stop of the motor.
Use longer timings and slower speeds for thick mixes and large quantities.
Use shorter timings and higher speeds for thinner mixes and smaller quantities.
Avoid continuous motor operation exceeding 2 minutes to prevent overheating.
Blend in short bursts, checking results, for optimal outcomes.
Pressing the pulse button gives a burst of high speed, overriding current settings.
Releasing the pulse button returns the motor to the previously set speed.
The pulse button can be used independently of speed settings.
Appliance has auto shut-off after 2 minutes to prevent overheating.
Allow appliance 2 minutes to cool down after auto shut-off before restarting.
Remove cap, add ingredients, then replace cap while blender is running.
Ensure added ingredients do not exceed the 1500ml mark in the jug.
Turn off the motor by releasing the button or setting speed to 0.
Press the power button to switch off the light and the appliance.
Remove the jug from the motor unit by turning it anti-clockwise.
Remove the lid from the jug by turning it anti-clockwise.
Ensure the appliance is clean and rinse thoroughly before crushing ice.
Experiment with ice cube shapes and sizes for best crushing results.
Begin with 1/2 to 3/4 cup ice and 15ml water for crushing.
Add lid, then pulse briefly or for a few seconds to crush ice.
Avoid over-blending ice, which turns it to liquid; under-blending chips edges.
Always add water when crushing ice to achieve satisfactory results.
Do not increase ice amount or blend longer; too much ice yields poor results.
Turn off and unplug the appliance before cleaning.
Clean the jug immediately after use to prevent residue build-up.
Detach the jug from the motor unit by twisting anti-clockwise.
Detach the lid from the jug by twisting anti-clockwise.
Wash jug, lid, and cap in warm soapy water and air dry.
Warning: Keep hands away from sharp blades during cleaning.
Avoid using cloths for drying the interior to prevent lint and cuts.
Use a nylon brush or crushed ice for stubborn residue inside the jug.
Clean the exterior of the motor unit with a damp cloth.
Never immerse the motor unit in water or any other liquid.
Do not place any appliance part in a dishwasher.
Avoid using harsh, abrasive cleaners or solvents for cleaning.
The blade unit can be removed for cleaning purposes.
Handle only the plastic parts of the blade unit, avoid touching metal.
It is best to handle the blade unit with the jug inverted.
Securely grip the jug handle with one hand.
Grip the base of the blade unit with your other hand.
Turn the blade unit clockwise to detach it from the jug base.
Carefully lift the blade unit out from the bottom of the jug.
Maneuver the blade unit gently if it is a tight fit for removal.
Use a knife to carefully lift the seal away from the blade unit.
Wash the seal and blade unit in warm soapy water and air dry.
Handle blades with extreme care, using a brush, not direct contact.
Place the seal back around the blade unit correctly.
Reinsert the blade unit, upside down, into the jug base.
Turn the blade unit anti-clockwise to secure it tightly.
Staining from carotenoids in vegetables is normal and does not affect function.
Dispose of marked appliances as hazardous waste, not municipal, for recovery/recycling.
Recipe for coriander pesto, detailing ingredients and preparation steps.
Additional recipes can be found on the Russell Hobbs website.
| Brand | Russell Hobbs |
|---|---|
| Model | Mixer |
| Category | Mixer |
| Language | English |