Do you have a question about the RUSTA 759013000401 and is the answer not in the manual?
Read the manual carefully and follow safety regulations to prevent injuries.
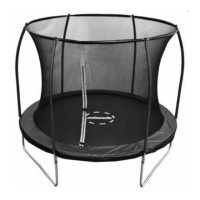
Adhere to usage limits, assembly, and user awareness for safe operation.
Ensure adequate space, flat surface, adult assembly, and correct installation location.
Follow rules like wearing no shoes, jumping in the middle, and limiting jump duration.
Replace safety net periodically, secure against wind, and check for wear.
Increased injury risk with tears, slack nets, loose seams, bent parts, or missing springs.
Dismantle or put away if any risk of injury is discovered until resolved.
Ensure 8m overhead clearance, 2m side clearance, and no nearby hazards.
Place on an even, illuminated surface, clear underneath, secure from unauthorized access, dry, and no wind.
Person in charge must notify users of rules and be present during use.
Store in a sheltered place, disassemble, or tie down to prevent wind damage.
Move with two people, tape points, keep horizontal; disassemble for other transport.
Practice basic positions and controlled jumps until mastered before advancing.
Climb carefully, hold frame, avoid edge protector, maintain control, and supervised jumping.
Limit jump time due to fatigue, jump solo, and be aware of limitations.
Understand and apply all safety instructions, provide advice, and ensure supervision.
Someone must always watch the jumper, regardless of age or experience.
Learn the standing jump with proper posture, arm movement, and landing.
Practice landing in a sitting position and returning to standing using hands.
Learn to land on the tummy and push back up to a standing position.
Master the twist by pushing up, turning, and landing safely on the tummy.
Use barefoot or socks, keep away from pets, check for wear or loose parts before use.
Check nuts, bolts, joints, coverings, sharp edges, fasteners, and overall integrity regularly.
Equip for strong winds, remove snow in winter, and store mat/enclosure indoors.
Dismantle and store in a dry, weather-protected area during prolonged non-use periods.
Inspect net for cracks, wear, brittleness, stretching, and connections from 1-6 months to 18-36 months.
Replace net yearly under normal use, even if no visible damage is present.
Pinch and pull netting for wear/tear; stop use if cracking or ripping sound occurs.
Walk perimeter to check pad for deterioration, tears, looseness, or loss of elasticity.
Return to place of purchase with receipt; user liable for damage from misuse or non-compliance.
Handle used products separately from household waste for recycling per local rules.
Use included spring loading tool; requires at least two adults for assembly.
Check part names/letters against table, ensure all parts are present, and wear protective gloves.
Attach springs in an opposite sequence (1&2, 3&4, etc.) for balance and even tension.
Adjust spring positions as needed to match the number of springs and attachments.
Attach safety net poles (B) to the frame using parts like 13, 12, 11, 9, 8, 15, 10, 5.
Tie cord to triangle rings on mat and net, repeating until entire net is secured.
Thread cord from net opening around mat, starting and finishing with a double knot.
Check strings, hooks, screws are secure and correctly positioned before use.
Regularly check and adjust locking mechanisms; stop use if worn or damaged.
Contact Rusta Customer Service via website or email for consumer inquiries.
| Brand | RUSTA |
|---|---|
| Model | 759013000401 |
| Category | Sports & Outdoors |
| Language | English |