RUVATI USA
www.ruvati.com
RUVATI USA
www.ruvati.com
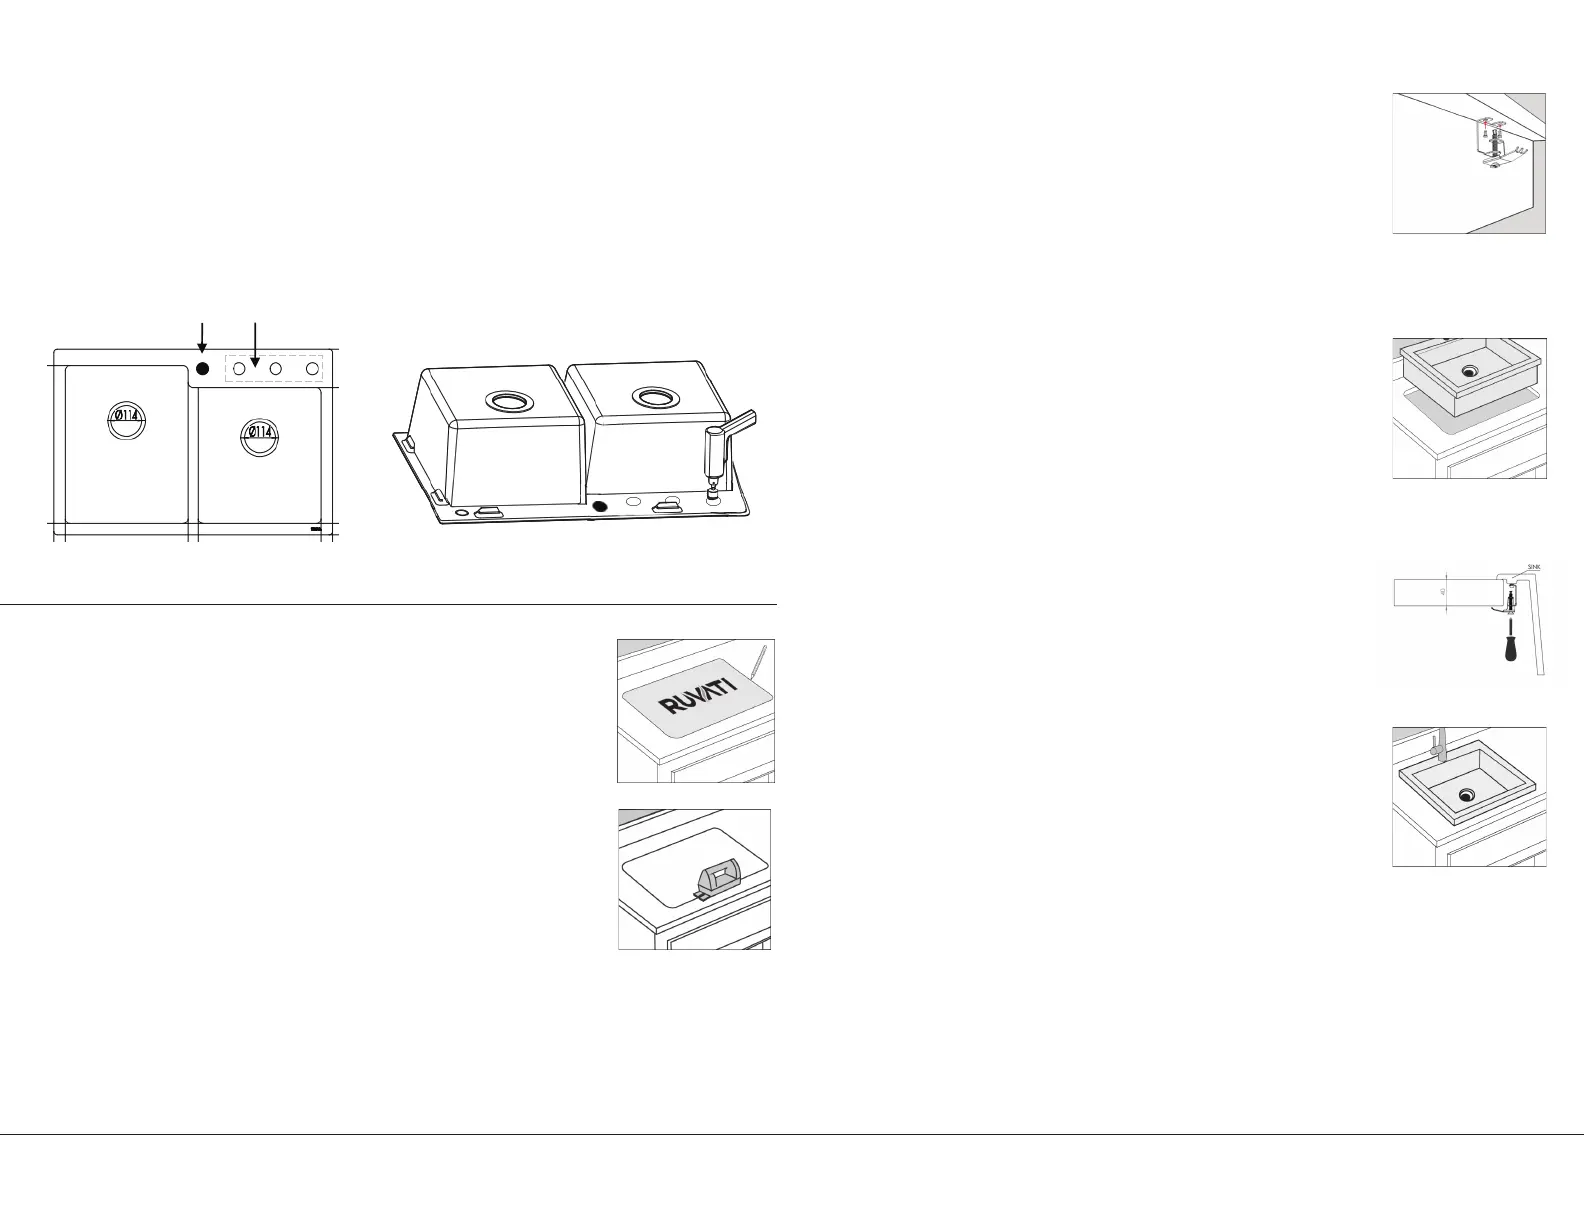
Additional Faucet Holes:
The sink comes pre-drilled with 1 full hole for faucet installation as well as 3
additional half-drilled holes. If you need additional holes for either a 2- or 3- hole
faucet, or for installing soap dispenser or air switch, you can open up any of these
additional holes as well. We recommend using a 1-3/8” (35mm) diamond bit hole saw
to drill through the half-drilled holes. In that way you get a clean cut. Turn the sink
upside-down and gently drill through the hole. The half-way drilled hole makes it
easy to place the drill bit and drill securely.
1. Place the sink cut-out template on the countertop,
where the sink is to be installed. Trace around the
outside perimeter with a pencil (Figure 1). Note:
Make sure you are using the top-mount template,
and not the undermount.
2. After tracing, remove the template. Use a straight
edge if necessary to straighten out the traced outline.
Use a drill with a 7/8” spade bit to drill four pilot
holes, one in each corner inside the outline. These
holes will be your starting points for sawing the hole,
so they must be large enough to fit the blade of a jig
saw or keyhole saw.
3. Cut the hole for the sink, using a jig sw to cut along the outline between
each hole (Figure 2).
4. Attach mounting clips to the sink body using the 2 short screws provided.
TOPMOUNT INSTALLATION
FULL HOLE
HALFDRILLED
KNOCKOUT HOLES
Makesure the hooked side of the mounting clip is
facing away from the sink (Figure 3).
5. Before installing the sink, place a bead of plumbers
putty along the edge of the drain opening inside the
sink and press the strainer body in place. Turn the sink
upside down and tighten the strainer locknut with a
wrench. While tightening, hold the strainer steady with
pliers to keep it from turning. Wipe away any excess
plumber’s putty.
6. Fit the gasket on the sink drain pipe (tailpiece) and
attach it to the strainer bottom with a slip nut. Tighten
this nut by hand. For most threaded connections,
apply a sealant such as plumbers putty, silicone tape
or “pipe dope” to the threads to ensure a watertight
connection.
7. Attach the drain pipe assembly that comes with your
sink.
8. Apply a “rope of plumbers putty or caulk around the
perimeter of the underside of the sink. Flip the sink
over and carefully place it into the countertop
opening, with all of the drains and attachments
secured. Press down firmly to seat the sink against the
countertop (Figure 4).
9. Position the bottom of the mounting clip so that it is
gripping the countertop. Use a screwdriver to tighten
the screw until the mounting clip is snug against the
countertop (Figure 5).
10. After the sink is positioned and securely in place,
place the plumbers putty around the underside of the
faucet body or its mounting plate and install it into the sink (Figure 6).
11. Attach all plumbing connections to the house drain line and water supply
tubing. Apply a bead of silicone caulking around the perimeter of the sink
where it meets the scounter to seal any gaps. Fill the sink with water and
leave it overnight to add weight and help it settle in place. Afterward,
retighten the sink clips if necessary.ap
Figure 2
Figure 1
Figure 3
Figure 4
Figure 5
Figure 6
 Loading...