Do you have a question about the RUVATI RVG1016 and is the answer not in the manual?
Place sink cut-out template on countertop, trace outline, and use pencil for marking.
Drill pilot holes at corners inside traced outline for starting points to saw the hole.
Use a jig saw to cut along the outline between the pilot holes.
Secure mounting clips to the sink body using the provided short screws.
Place plumber's putty along drain opening, press strainer, and tighten locknut.
Fit gasket on drain pipe, attach with slip nut, and ensure watertight connection.
Apply plumber's putty or caulk around sink underside, place sink, and press firmly.
Tighten mounting clip screws to secure the sink against the countertop.
Apply plumber's putty around faucet base or mounting plate and install into sink.
Attach plumbing connections, seal sink perimeter with silicone, and check clips.
This document provides comprehensive instructions for the installation, care, and maintenance of Ruvati Topmount Granite Composite Sinks. It also details the limited lifetime warranty that accompanies these products.
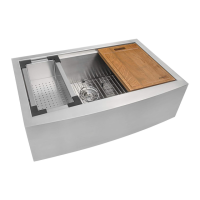
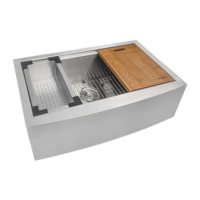
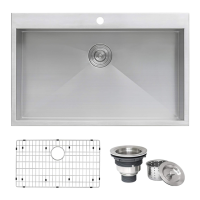
The Ruvati Topmount Granite Composite Sink is designed for residential kitchen use, offering a durable and aesthetically pleasing solution for washing and food preparation. It features a topmount installation style, meaning it is designed to be installed from above into a cutout in the countertop. The sink is equipped with pre-drilled holes to accommodate a faucet and additional accessories like a soap dispenser or air switch, providing flexibility in kitchen design and functionality. The composite granite material offers resistance to scratches, stains, and heat, making it a robust choice for busy kitchens.
Installation: The installation process begins by placing a provided cut-out template on the countertop to trace the sink's perimeter. Pilot holes are then drilled in each corner of the traced outline, large enough to accommodate a jigsaw or keyhole saw blade. The hole for the sink is then cut using a jigsaw. Mounting clips are attached to the sink body using short screws, ensuring the hooked side faces away from the sink.
Before placing the sink into the countertop, a bead of plumber's putty is applied along the edge of the drain opening inside the sink, and the strainer body is pressed into place. The sink is then turned upside down, and the strainer locknut is tightened with a wrench while holding the strainer steady with pliers. Any excess putty is wiped away. The gasket is fitted onto the sink drain pipe (tailpiece) and attached to the strainer bottom with a slip nut, tightened by hand. For most threaded connections, a sealant like plumber's putty, silicone tape, or "pipe dope" is applied to ensure a watertight connection. The drain pipe assembly is then attached to the sink.
A "rope" of plumber's putty or caulk is applied around the perimeter of the underside of the sink. The sink is then carefully flipped over and placed into the countertop opening, ensuring all drains and attachments are secured. Firm pressure is applied to seat the sink against the countertop. The mounting clips are positioned to grip the countertop and tightened with a screwdriver until snug. After the sink is securely in place, plumber's putty is applied around the underside of the faucet body or its mounting plate, and the faucet is installed into the sink. Finally, all plumbing connections are attached to the house drain line and water supply tubing. A bead of silicone caulking is applied around the perimeter of the sink where it meets the countertop to seal any gaps. The sink is filled with water and left overnight to add weight and help it settle, after which the sink clips are retightened if necessary.
Faucet Hole Customization: The sink comes with one full pre-drilled hole for faucet installation and three additional half-drilled holes. These half-drilled holes can be opened up to accommodate a 2- or 3-hole faucet, a soap dispenser, or an air switch. To open these holes, a 1-3/8" (35mm) diamond bit hole saw is recommended. The sink should be turned upside down, and the drill bit should be gently applied through the half-drilled hole. The pre-existing half-drilled nature of these holes simplifies the process, making it easier to place the drill bit and drill securely, ensuring a clean cut.
Regular Cleaning: The sink should be cleaned regularly with normal detergent and warm water. After each use, it is important to dry the sink and buff it with a soft cloth. This practice helps prevent the build-up of lime scale or other mineral deposits. Once a week, the sink should be cleaned using a non-abrasive cleanser, such as dish soap, and a soft sponge, then rinsed with water and wiped dry.
Avoiding Harmful Substances and Practices: It is crucial to avoid letting soap or other household cleaners dry on the sink's surface, as many products contain additives that can affect the finish. Bleach solutions should never be used on the sink, as they are harmful to stainless steel and can cause surface pitting if left on too long. Steel wool pads should also be avoided for cleaning, as they can damage the sink's surface and cause discoloration.
Addressing Scratches and Hard Water Stains: While the sink surface is hard and resistant to scratches, some may appear over time with normal use. These can often be removed by polishing with a mild abrasive pad, such as a 3M Maroon or Green pad, or a low-grit (220 grit or lower) sandpaper. For stubborn hard water stains, a straight or 50% vinegar solution can be used. The solution should be left on the sink for one hour, then scrubbed thoroughly with a 3M Scotch-Brite pad, and rinsed well.
Warranty Information: Ruvati sinks come with a limited lifetime warranty for residential use, covering defects in materials or workmanship. To make a claim, a valid proof of purchase showing the date and place of purchase is required. The warranty applies only to the original purchaser and is not transferable. It covers repair or replacement of defective products but does not include shipping or labor installation costs. Ruvati reserves the right to inspect the product and its installation. If an identical replacement is unavailable, Ruvati may replace it with a similar product. This warranty does not cover damage from failure to maintain the product according to instructions, normal wear and tear, scratches, accidental damage, improper use or installation, or defects in accessories like strainers and rinse grids. All incidental or consequential damages are specifically excluded. Some states may have different regulations regarding warranties, so specific legal rights may vary.
| Material | Stainless Steel |
|---|---|
| Gauge | 16 |
| Installation Type | Undermount |
| Sink Shape | Rectangular |
| Number of Bowls | 1 |
| Finish | Brushed |
| Faucet Hole Count | 1 |
| Minimum Cabinet Size | 36 inches |
| Drain Opening | 3.5 inches |