Do you have a question about the Ryobi C358 and is the answer not in the manual?
Guidance on selecting and using appropriate extension cords for safe and efficient operation.
Specifies the required power supply (120V, 60Hz AC) and warns against using DC power.
Details the tool's no-load speed and the importance of proper shop wiring for motor performance.
Explains the necessity of grounding for shock protection and how to ensure proper connection.
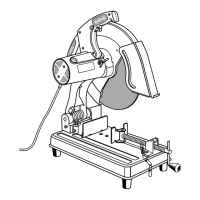
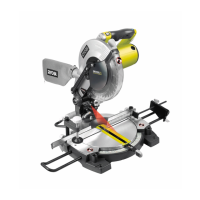
Details the electrical input, speed, arbor diameter, wheel diameter, net weight, and fence angle of the machine.
Carefully lift machine from the carton by the carrying handle and machine base, and place it on a level work surface.
Step-by-step guide for safely removing the old abrasive wheel and installing a new one.
Instructions for securing the machine base to a metal work surface using pre-drilled holes and hardware.
Covers adjusting the fence for cutting angles (0-45°) and repositioning for different material widths or heights.
Details on adjusting the depth stop bolt to control the wheel's downward travel for maximum cutting capacity.
Explains the function of the quick lock-release lever for fast opening and closing of the vise clamp.
Lists the intended uses of the tool for cutting various metal stock types, such as steel framing studs, bar stock, and pipe.
Check power supply meets tool requirements (120V, 60Hz, AC). Avoid voltage drops and overheating caused by undersized cords.
How to turn the cut-off machine ON by depressing the switch trigger and OFF by releasing it.
Instructions on how to engage and disengage the lock-on feature for continuous operation.
General safety and preparation advice before performing a cut, including securing the machine and material.
Detailed steps for making a cut: securing material, aligning cutting line, applying steady pressure, and stopping the wheel.
Advice on cleaning the tool using clean cloths and avoiding certain solvents that can damage plastic parts.
States that bearings are pre-lubricated for the life of the unit and no further lubrication is required.
Instructions for checking and replacing worn motor brushes, emphasizing safety and proper procedure.
Location of model and serial number on the tool's motor housing for identification and record-keeping.
Details the information required when ordering repair parts, including model and serial numbers.