This document provides assembly instructions and operational guidelines for the Ryonet X-Series Exposure Units, specifically the RXP (with optional lid) and X-Vactor Vacuum models. These units are designed for screen printing applications, facilitating the process of exposing coated screens to UV light to create stencils for printing.
Function Description:
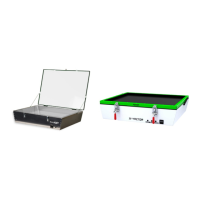
The Ryonet X-Series Exposure Units are essential tools in screen printing, used to transfer a positive image from a film onto a photo-emulsion coated screen. This process involves exposing the screen to ultraviolet (UV) light through the film positive. The UV light hardens the emulsion in the areas not covered by the opaque parts of the film, while the unexposed emulsion remains soft and can be washed away, creating the stencil. The RXP unit offers a basic exposure solution, while the X-Vactor provides a vacuum system for optimal film-to-screen contact, crucial for detailed exposures.
Important Technical Specifications:
The manual details various factors influencing exposure, which indirectly highlight the technical aspects of the units:
- Light Source: The units utilize UV light for exposure. The manual mentions "Unfiltered black light (HUV) exposure tables" and "500W bulb up to a metal halide unit," indicating a range of possible light sources depending on the specific model or configuration. The X-Vactor unit is specified to have "eight exposure bulbs and two yellow safe lights."
- Exposure Time Control: Both units rely on precise timing for exposure. The X-Vactor features a timer with specific settings for minutes and seconds, controlled by "Up keys 1 to 4" and "Down keys 1 to 4." The timer has a main display (12mm character height, red) for present value and a sub-display (6mm character height, green) for set value. It offers various time increments (0-24, 0-60, 0-2.4, 0-6) and can switch between minutes and seconds.
- Vacuum System (X-Vactor): The X-Vactor incorporates a vacuum pump to create a tight seal between the film positive and the screen. This is achieved by connecting a vacuum hose to a nipple on the blanket and placing a rope along the inside edge of the frame to facilitate air removal. The vacuum switch is one of three switches located to the left of the timer, alongside the exposure activation switch and yellow inspection lights switch.
- Physical Dimensions/Weight (RXP without lid): While not explicitly stated in numerical terms, the RXP without a lid requires external weight (minimum 40-60 pounds, e.g., four gallon containers) to ensure positive contact between the screen, film, and glass. This implies a design where pressure is applied externally rather than through an integrated lid mechanism.
- Electrical Warranty: Ryonet Corporation offers a 3-year electrical limited warranty on its branded electronic equipment, covering defects in materials and workmanship under normal use. This warranty covers components like the timer, lamp posts, frame, vacuum, push buttons, power cord, and gas shock & lid frame for fluorescent units. For LED units (LFX, FX), it covers LED power supplies, tablet charger power supply, tablet, relays, power chord, frame & lid frame.
Usage Features:
- Set-Up and Preparation:
- Requires a light-safe room, sealed from UV rays.
- Units should be placed on a flat surface and plugged in.
- Separation from the wash-out area is recommended to prevent overspray.
- Glass must be cleaned before each exposure.
- For lidless RXP units, foam (cut to fit frames) and a board are used, with external weights applied for contact.
- For X-Vactor, the vacuum hose is connected, and a rope is placed along the frame edge to ensure air removal. Muslin cloth is recommended to protect the vacuum blanket from dirty frames.
- Film Requirements:
- Film positives must be 100% opaque in the image area.
- Recommendations include stacking multiple films or using an opaque pen if light passes through.
- Toner aid is suggested for laser printer films to enhance darkness.
- Exposure Process:
- RXP (without lid): Place foam pad, then screen frame, then film, then board, and finally add minimum 40 pounds weight. Turn on the unit. It will turn off automatically when finished.
- X-Vactor: Place the rope, check the blanket for tears, close and lock the lid, turn on the vacuum switch. Once air is removed and the timer is set, turn on the exposure switch.
- Timer Operation:
- The timer has controls for "Mode," "Left control" (time increments), and "Right control" (minutes to seconds).
- The "Mode" should always be set to "E."
- The "Reset key" resets the present value and output.
- "Up keys" and "Down keys" adjust the time.
- Wash Out:
- Performed in a light-safe area.
- Gently wet both sides of the screen, let sit for 30 seconds.
- Spray the shirt side forcefully until the image clears.
- Rinse both sides gently until no soft/slimy emulsion remains.
- Blot excess water with newspaper (do not rub the inside).
- Pin Holes, Block-Out & Touch-Up:
- Applied when the screen is slightly damp.
- Options include Red Coat Block out pen, other block out pens, or scotch/screen tape.
- Allows for sealing screen edges and pinholes.
- Screen Taping:
- Apply solvent-resistant tape to the outside and inside edges of the screen to prevent ink from getting stuck or passing through.
Maintenance Features:
- Bulb Replacement: The manual notes that bulbs "will weaken over time and will need replaced," indicating that bulb replacement is a routine maintenance task. Exposure times lengthen with bulb age, serving as an indicator for replacement.
- Vacuum Blanket Inspection (X-Vactor): Users are instructed to "Check the blanket for tears (cause suction loss)," implying that inspecting and potentially repairing or replacing the vacuum blanket is part of maintaining optimal performance.
- Glass Cleaning: "Always clean the glass prior to exposing a screen" is a fundamental maintenance step to ensure clear exposures.
- Troubleshooting Guides: The manual includes sections on troubleshooting common issues, which aids in diagnosing and addressing problems:
- Screen Exposure Variables: Discusses how mesh tension, mesh count/color, coating thickness, scoop coater type, stroke speed, emulsion type (pre-sensitized vs. diazo), solids content, age, and moisture affect exposure.
- "Not all of the image washes out": Suggests checking film opacity, reducing exposure time, using an exposure calculator/step wedge test, and ensuring correct weight distribution for open-face units.
- "Too much of the image washes out": Suggests increasing exposure time, checking bulbs, and ensuring correct mesh count for detail.
- Step-Wedge Test: This is a crucial diagnostic tool described for determining correct exposure times, especially when unsure or when changing variables. It involves dividing a screen into sections and exposing each for incrementally longer times to find the optimal exposure.
- Post-Hardening: After washing, drying, and blocking out, screens can be post-hardened by exposing them for an additional 10-15 minutes or placing them in sunlight for 5 minutes to increase strength and longevity.