13
ENGLISH
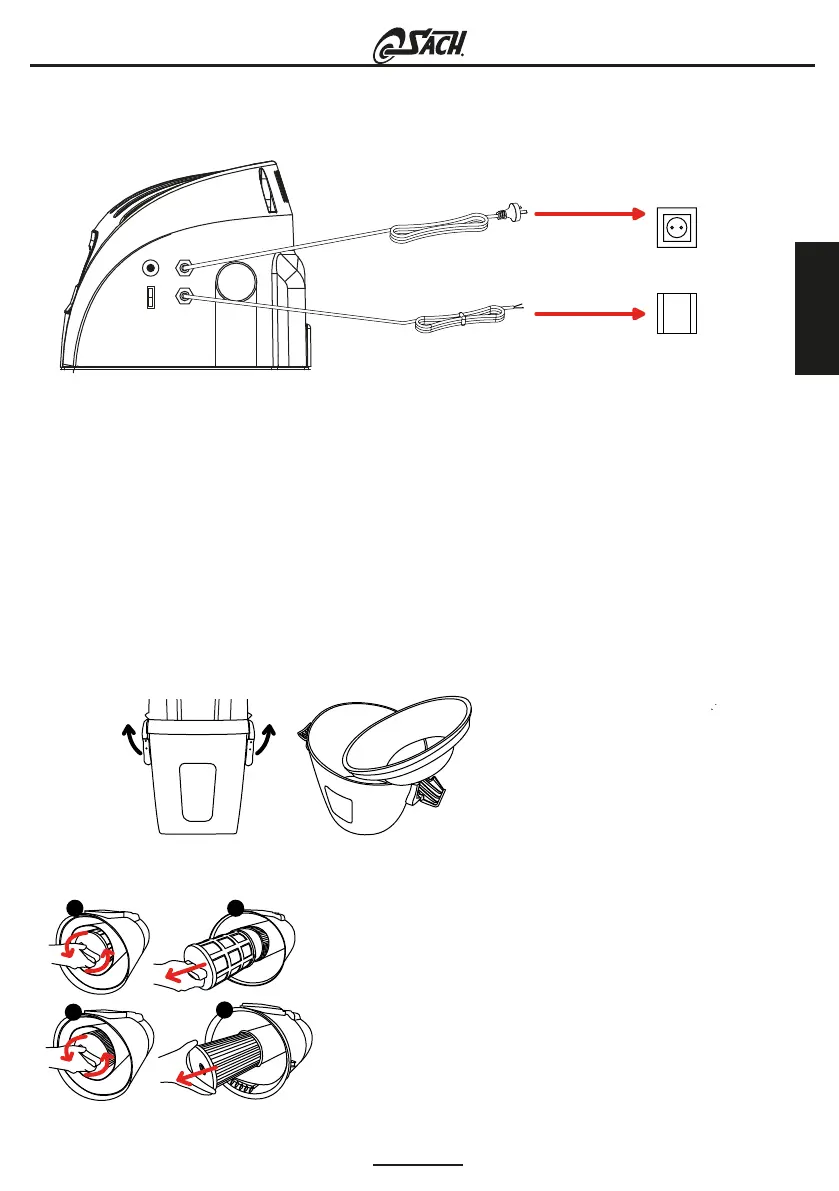
6. ELECTRICAL CONNECTION AND LOW VOLTAGE LINE
(TO THE VACUUM INLET VALVES)
Electrical power cable
230V / 50Hz
Low-voltage line
(to connect to the vacuum
inlet valves)
Schuko-style plug
230V / 50Hz
Vacuum inlet valve
An appropriate plug socket and a plug of the Schuko type is required to connect the central vacuum to
the electrical supply. Electrical connections should be made as indicated below.
WARNING: Ensure that the electrical supply corresponds to the power rating which appears on the
appliance’s rating plate. In the event that the power cable is damaged, you should only replace it with
another SACH power cable or contact your Service Engineer.
7. CLEANING AND MAINTENANCE
WARNING: DO NOT ATTEMPT THE MAINTENANCE OF YOUR CENTRAL VACUUM UNIT WITHOUT FIRST
DISCONNECTING IT FROM THE ELECTRICAL SUPPLY.
The effectiveness of the central vacuum unit and its optimum performance is dependent on its correct
use and maintenance. It is recommended that cleaning and maintenance is undertaken on a regular basis
to prevent mechanical breakdowns.
EMPTYING THE DUST CONTAINER
1. Detach the container by
unfastening the clamps.
2. Remove the Cyclonic Filter.
3. Empty the dust container.
4. Ensure the Cyclonic Filter is
repositioned correctly.
CLEANING AND MAINTENANCE
21
3
4
1. Detach the container from the central vacuum unit.
2. Access the protective filter located inside and remove it by turning
it 90 º anti-clockwise.
3. Remove both the cartridges together.
4.This protective filter is re-useable and can be washed using neutral
soap and water. Wait until it is completely dry before refitting it.
5.To access the Hepa filter follow the same procedure as for the
protective filter and wash in the same way. Don’t forget to wait until
the filter is dry before refitting it.
6. Check that both filters are in perfect condition. Never refit damp
or damaged filters. Also, please note that to use the central vacuum
unit without filters would damage it.
7.Re-position the Hepa filter inside the Pro-Tecta filter and fit both
filters together by turning the handle clockwise to lock the filters in
place
USER GUIDE VAC
R