Do you have a question about the Saeco Gran Baristo HD8965 and is the answer not in the manual?
Essential safety measures for appliance use, covering hot surfaces, water immersion, supervision, unplugging, and handling damaged parts.
Covers household use, servicing, water tank filling, handling hot parts, cleaning, water quality, and bean types.
Advises on storing water in the tank to prevent contamination and maintain hygiene.
Guidelines on cord length, entanglement risks, and safe usage of extension cords for the power supply.
Read safety instructions carefully to avoid injury. Understand WARNING/CAUTION terms and keep manual for reference.
Covers electrical connection, avoiding immersion in water, handling hot surfaces, and appliance damage.
Details age limits for use, supervision requirements for children, and safe reach for young children.
Ensures child supervision and safe operation around the coffee grinder, prohibiting insertion of foreign objects.
Covers household use, stable placement, hopper contents, cooling, water type, cleaning agents, and temperature limits.
Highlights the necessity of regular descaling to maintain machine performance and prevent warranty voidance.
Details compliance with Italian decree and EU directives on hazardous substances, waste disposal, and electromagnetic fields.
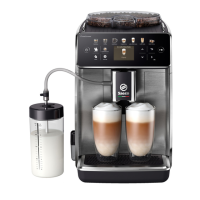
Diagram and numbering of the coffee machine's main parts for easy identification.
Comprehensive list and description of all machine parts, controls, and accessories.
Guidance on keeping packaging material and steps for machine installation, including placement.
Instructions for preparing the water tank and coffee bean hopper before first use.
Overview of first-time use: language selection, automatic rinse cycle, and manual rinse initiation.
Procedure for selecting the preferred language for the machine's display and menus.
Explanation of the automatic rinse cycle performed after the machine warms up.
Steps for performing a manual rinse cycle to flush the internal circuits with fresh water.
Steps to confirm ground coffee insertion and dispense water as part of the manual rinse.
Final steps for first-time operation, including refilling the water tank and readiness for brewing.
Instructions for using a test strip to measure water hardness and interpret the results.
Accessing machine settings to adjust the water hardness based on test results.
Steps to select and confirm the water hardness value (1-4) in the machine's menu.
Guide to prepare the INTENZA+ filter by immersing and de-airing it before installation.
Setting the filter based on water hardness and starting the activation process via the menu.
Steps to activate the installed filter by dispensing water and confirming the process.
Instructions for removing and safely storing the original small white filter from the water tank.
Guide to insert the INTENZA+ filter into the water tank and refill it with fresh water.
Confirming filter installation and proceeding with water dispensing for final activation.
Machine indicates readiness for brewing after successful filter activation and water dispensing.
Instructions for replacing the INTENZA+ water filter when the machine indicates it is needed.
Overview of the machine's ability to store up to 6 user profiles for personalized coffee settings.
Procedure to access the main menu and enable user profiles for customization.
Steps to disable an enabled user profile, while retaining its settings in memory.
Display confirmation after disabling a profile; exiting the programming menu.
Explanation of the self-adjusting system that optimizes coffee extraction based on bean type and roast.
Guide on adjusting the grinder knob using the key for personal taste, with safety warnings.
Reference marks in the hopper indicate 5 grind settings from coarse to fine for taste adjustment.
Procedure to adjust the ground coffee quantity for desired coffee strength and aroma.
How to move the dispensing spout up or down to fit different cup sizes and glasses.
Visual guide for recommended spout heights for various cup sizes and glasses.
Procedure to adjust the amount of brewed coffee for specific beverage buttons.
Steps to program a custom brew amount by holding a button until the 'MEMO' icon appears.
Steps for brewing coffee using whole beans, including cup placement and beverage selection.
Instructions for brewing one or two cups by pressing the beverage button once or twice.
Instructions for using pre-ground coffee, noting only one coffee can be brewed at a time.
Procedure for selecting the pre-ground function and confirming the insertion of coffee.
Guide to adding a scoop of pre-ground coffee to the compartment and closing the lid.
Caution: Only use pre-ground coffee; other substances may cause severe damage and void warranty.
Note on cleaning before use and recommendation to fill with cold milk for best results.
Procedure for filling the milk carafe with milk between the MIN and MAX levels.
Steps to remove the spout, tilt, and lock the milk carafe into the machine.
Procedure to rotate and lift the milk carafe upwards to detach it from the drip tray.
Press release buttons to remove the top, empty the carafe, and clean it properly.
Identification of buttons for milk-based beverages on the control panel.
Step-by-step guide for brewing a Cappuccino, starting with milk carafe preparation.
Note on using cold milk with sufficient protein for optimal froth consistency.
Reminder to insert the carafe and pull out the dispensing spout before brewing.
Machine grinds coffee as part of the milk-based beverage preparation process.
Machine dispenses milk froth, then brews coffee; press button to stop.
Note to clean the milk carafe after use as per the 'Cleaning and Maintenance' chapter.
Procedure to adjust the amount of milk-based beverage dispensed per button press.
Steps to program a custom brew amount by holding a button until the 'MEMO' icon appears.
Machine dispenses milk froth, then brews coffee; press button to stop.
Note that Hot Milk dispensing ends after milk froth is dispensed.
Procedure to enter the menu for brewing products like Hot Water, Ristretto, etc.
Warning about scalding danger from hot water/steam; wait until cycle ends before removing spout.
Instructions to remove milk carafe and insert water dispensing spout for hot water.
Steps to place container, select 'HOT WATER', and start dispensing.
Icon indicating machine preheating time before hot water dispensing.
Warning about scalding danger from hot water/steam; wait until cycle ends before removing spout.
Procedure to program a specific hot water volume by holding a button until 'MEMO' appears.
Instructions for brewing beverages from the 'Special Beverages' menu, using 'Strong Coffee' as an example.
Note: 'Flat white' requires preparation similar to brewing a Cappuccino.
Procedure to adjust the quantity of other beverages from the menu to personal taste.
Steps to program a custom beverage volume by holding a button until 'MEMO' appears.
Allows customization of beverages and memorization in user profiles.
Procedure to select an enabled profile to program specific beverages.
Setting the amount of coffee to grind, from very mild to extra strong aroma.
Adjusting the amount of water used for coffee brewing via a display bar.
Setting the coffee temperature to LOW, NORMAL, or HIGH.
Enables pre-brewing function (DELICATE, BALANCED, FULL BODY) to enhance coffee aroma.
Adjusting the quantity of milk for milk-based beverages using a display bar.
Setting the temperature for hot water dispensing to LOW, NORMAL, or HIGH.
Procedure to program the desired amount of hot water to be dispensed.
Restoring all beverage parameters for a profile to factory settings, deleting user customizations.
Restoring factory settings for a specific beverage, deleting user customizations for that item.
Allows customization of operating settings applied to all user profiles.
Adjusting water parameters like hardness, filter status, and activation.
Automatically adjusting machine parameters by selecting the preferred interface language.
Setting the time lapse for the machine to automatically enter stand-by mode after inactivity.
Restoring all machine settings to default values, which deletes all customized parameters.
Viewing the count of brewed beverages to help schedule maintenance operations.
Accessing the menu to manage automatic cycles for correct machine maintenance.
Activating the descaling cycle to remove limescale buildup and prevent clogging.
Enabling the monthly cleaning cycle for the brew group.
Enabling the monthly cleaning cycle for the milk carafe.
Emphasizing timely cleaning for machine longevity, covering exposure to humidity, coffee, and limescale.
Procedure for cleaning the machine daily, including opening the service door and removing internal parts.
Steps for emptying and cleaning the coffee grounds drawer and internal drip tray.
Instruction to remove, empty, and wash the external drip tray.
Removing and washing the filter (if installed), then refilling the water tank with fresh water.
Importance of daily cleaning for hygiene and froth consistency, with a warning about scalding.
Attaching the top, filling with fresh water for cleaning, and putting the lid back on.
Pulling out the milk carafe dispenser and placing a cup under the spout for rinsing.
Starting the dispensing procedure for cleaning the milk circuit.
Detailed steps for disassembling the milk carafe dispenser into five parts (A-E).
Cleaning the pre-ground coffee compartment with the provided cleaning brush.
Removing the carafe top, lid, and dispensing spout for thorough weekly cleaning.
Identification of the five parts (A-E) of the milk carafe dispenser for disassembly.
Detailed steps for removing and cleaning each part of the milk carafe dispenser.
Thoroughly wash brew group with lukewarm water and clean filter; avoid detergent or soap.
Reassembling the milk carafe dispenser parts following the reverse order of disassembly.
Steps to turn off machine, open door, and remove drip tray/grounds drawer before cleaning.
Opening the unlocking lever and pulling out the brew group handle.
Thoroughly washing the brew group with lukewarm water and cleaning the filter; caution against detergent.
Cleaning machine inside with damp cloth and upper filter with non-abrasive cloth.
Safety warning: Ensure machine has cooled down (at least one hour off) before cleaning hot components.
Ensuring brew group is correctly positioned, aligned, and locked into place.
Inserting the internal drip tray and grounds drawer, then closing the service door.
Recommends using Saeco Milk Circuit Cleaner for thorough monthly cleaning of milk residues.
Accessing the main menu to initiate the monthly carafe cleaning cycle.
Navigating maintenance menu to select and confirm 'CARAFE CLEANING'.
Filling the water tank to MAX level and confirming to start the carafe cleaning process.
Pouring milk cleaner bag into carafe and filling with water up to MAX level.
Inserting the carafe into the machine and confirming the dispenser position.
Placing a container under the dispensing spout to collect the cleaning solution.
Display shows the progress of the carafe cleaning cycle.
Emptying carafe, filling with fresh water, reinserting, and confirming for rinsing.
The rinse cycle is activated to clean the circuit with water; pause/resume available.
Machine automatically ends process when rinse water is dispensed. Wait for rinsing completion.
Lubricate after approx. 500 cups or monthly. Saeco grease available separately.
Caution: Clean and dry brew group before lubricating as per 'Weekly Cleaning' chapter.
Applying lubricant evenly on side guides and the piston of the brew group.
Lubricating the internal guides on both sides of the brew group.
Inserting the brew group into its seat and closing the service door.
Recommends cleaning with 'Coffee Oil Remover' after approx. 500 cups or monthly.
Caution: Tablets are for cleaning only, not descaling. Use descaling solution for descaling.
Accessing menu to select 'MAINTENANCE' then 'BREW GROUP CLEANING'.
Process takes approx. 35 minutes. Limescale needs regular removal to prevent clogging.
Caution: Not descaling stops machine operation and voids warranty.
Always use formulated descaling solution; never use vinegar.
Navigating menus to select and confirm the 'DESCALING' function.
Steps to prepare for solution: remove filter, insert white filter, pour descaling solution.
Filling the water tank with fresh water to the CALC CLEAN level.
Emptying the internal/external drip tray and placing it back.
Filling half the carafe with water and inserting it for the descaling rinsing phase.
Placing a container and starting the machine to dispense descaling solution at intervals.
After descaling, rinse water tank and fill to MAX level.
The rinse cycle is activated to clean the circuit with water; pause/resume available.
Machine automatically ends process when rinse water is dispensed. Wait for rinsing completion.
Meaning: Fill the coffee bean hopper.
Meaning: The brew group must be inserted into the machine.
Meaning: Insert the coffee grounds drawer and internal drip tray.
Meaning: Empty the coffee grounds drawer. Notes on correct procedure.
Meaning: Close the service door.
Meaning: Remove the water tank and fill it.
Meaning: Insert water spout to start dispensing; press ESC to exit.
Meaning: Insert milk carafe with spout open before dispensing.
Indicates descaling is needed. Follow 'Descaling' chapter; failure voids warranty.
Indicates the 'INTENZA+' water filter needs replacement.
The red light flashes, indicating stand-by mode. Press any button to exit.
Troubleshooting steps for power connection and button status when the machine is unresponsive.
Explanation of normal drip tray filling due to internal rinsing.
Solutions for coffee not being hot enough, including preheating cups and checking settings.
Troubleshooting steps for clogged hot water/steam spout.
Steps to check beverage programming and adjust coffee length settings.
Advice on adjusting grind, changing coffee blend, and using fresh beans for better crema.
Ensuring proper milk dispensing spout and carafe assembly for frothing.
Troubleshooting for slow warm-up or low water output, often related to limescale buildup.
Steps to ensure correct brew group removal by turning on the machine and closing the service door.
Troubleshooting for too much ground coffee or issues with coffee grounds' humidity.
Checks for water level, brew group cleanliness, and automatic dose adjustment.
Tips for weak coffee, including dose adjustment and checking coffee grind coarseness.
Solutions for slow brewing: check grind fineness, descale, and clean brew group.
Steps to clean the dispensing spout and ensure correct insertion.
Machine designed for energy saving; enters auto stand-by after inactivity, consuming <1Wh.
How to manually activate stand-by mode and conditions for activation (e.g., service door closed).
Methods to turn the machine back on from stand-by mode.
Instructions for environmentally friendly disposal at designated collection points, not household waste.
Information on recycling packaging and delivering the appliance to authorized service or waste facilities.
Product compliance with EU Directive 2002/96/EC for electrical and electronic equipment recycling.
Table listing voltage, housing, size, weight, cord length, panel, cup size, tank, hopper, pressure, boiler, and safety devices.
Reference to the supplied warranty booklet for detailed warranty conditions.
Information on registering the product and obtaining service or support via website or hotline.
Guidance on where to purchase Saeco maintenance products: online, local dealer, or service centres.
Overview of products: Descaling solution (CA6700), INTENZA+ Water Filter (CA6702), Grease (HD5061).
List of other products: Coffee Oil Remover (CA6704), Milk Circuit Cleaner (CA6705), Maintenance Kit (CA 6706).
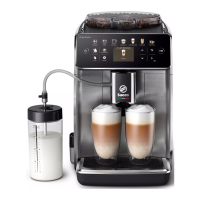
| Brand | Saeco |
|---|---|
| Model | Gran Baristo HD8965 |
| Category | Coffee Maker |
| Language | English |