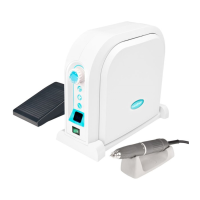
EasyManua.ls Logo

Saeyang MARATHON-N7R - User Manual

Default Icon
2 pages
Print Icon
To Next Page IconTo Next Page
Loading...

ECO450


8   


 
  








  
 
 
 




  
  

 








J
   

(1)

°

  

  


 


  

 
  

 

 
   
 

 

    

   
 
   
  
 
  
   
 




 
 



 



 
  


A 
 










 
 





 
 

&Notice






 
      



 


   
   
 



Troubles
Cause
Remedy



 













See 6. Safe 



system 


 
















 








Specifications



ECO450
  
 





 


 



 
 
�
SAEYANG MICROTECH
   
 
  

0

w









<
E
¾SGS
Question and Answer IconNeed help?

Do you have a question about the Saeyang MARATHON-N7R and is the answer not in the manual?

Summary

1. Compositions

Control Unit Components

Identifies parts of the control unit, including power, speed, and connectors.

Handpiece Components

Details the parts of the handpiece, such as the micromotor and chuck handle.

2. Accessories

Included Accessories

Lists items provided with the unit, such as the stand and wrench.

3. Features

Rotation Control

Describes the forward and reverse rotation capabilities of the motor.

Variable Speed Dialing

Explains the non-stage speed control system.

Foot Pedal Speed Control

Details the use of the foot pedal for variable speed operation.

4. Precaution

5. Operation Procedure

Bit Mounting and Removal

Instructions for attaching and detaching bits from the handpiece.

Motor Operation Guide

Steps for starting, stopping, and controlling the motor.

Foot Pedal Operation

Guide for operating the motor using the foot pedal.

6. Safety Protection System

Overview

The ECO 450 is a micro motor control unit designed for various applications, particularly in dental treatment, offering precise speed control and versatile operation. It is complemented by the SH37LN handpiece, which provides the actual working mechanism.

Function Description

The ECO 450 control unit manages the speed and direction of the connected handpiece. It features a power switch, power LED, speed control knob, motor connector, and a hand/foot selector switch. The SH37LN handpiece, comprising a micromotor and a chuck handle, is the primary tool for operation. The device supports both forward and reverse rotation, a non-stage speed dialing system, and variable speed control via a foot pedal.

A key safety feature is the integrated protection system. This system monitors the motor and control unit for excessive temperature rise, which can be caused by overloading, ball bearing failure, or increased loading on the bit. If the temperature exceeds a preset value, the power supply is automatically shut off. The system can be reset using the dedicated reset switch.

Important Technical Specifications

ECO450 Control Unit:

  • Input Voltage:
    • AC 100-120V, 50/60 Hz
    • AC 200-240V, 50/60 Hz
  • Output: DC30V/100W
  • Weight: 1.6 Kg
  • Dimensions (W x D x H): 141 x 185 x 97 mm

SH37LN Handpiece:

  • Input Voltage: DC 30V, 0.5A
  • Torque: 3.0 N-cm
  • Max. RPM: 45,000 rpm
  • Weight: 200 g
  • Dimensions (L x Φ): 149 x 26 mm

The device is designed to operate within a temperature range of 0-40°C. It uses a fuse for electrical protection, and a spare fuse is included in the fuse holder.

Usage Features

Bit Mounting and Removal (SH37LN Handpiece):

  • Removal: To remove a bit, turn the chuck handle clockwise until it clicks to stop, then pull out the bit.
  • Mounting: Ensure the chuck is in the open position, insert the bit all the way into the chuck, and then turn the chuck handle counter-clockwise until it clicks to stop.
    • Notice: Always thoroughly clean the collet chuck and bit before reassembly. Turn off the device completely before changing the micro motor or bit. Insert the bit shank all the way until it touches the back of the collet chuck, then tighten the collet chuck securely. Using a bit that is not fully inserted is dangerous due to potential vibration and detachment. After replacing a bit, always ensure the collet chuck is secure. Do not turn the chuck release ring while the motor is in operation. Only use standard, non-bent, asymmetrical, or damaged bits. When not in use, it is recommended to insert a test bit into the collet chuck.

Motor Operation:

  1. Plug the motor cord into the motor connector on the front of the control unit and ensure it is tightened.
  2. Press the Hand/Foot Selector switch: "Hand Mode" (LED On) for hand control, or "Foot Mode" (LED Off) for foot pedal control.
  3. Turn on the power switch to start the motor. Turn it off to stop the motor.
  4. Press the Forward/Reverse Selector switch: "FWD" (LED Off) for forward rotation, or "REV" (LED On) for reverse rotation.
    • Notice: While the handpiece is running, do not adjust the chuck handle to prevent damage to the control unit. Ensure the micromotor has stopped before operating the Forward/Reverse Selector to change rotation direction. Do not leave the handpiece in a "break" state for extended periods, as this may cause trouble or malfunction.
  5. Adjust motor speed between 0 and 45,000 rpm using the speed control knob.

Foot Pedal Usage:

  1. Connect the foot pedal plug to the jack marked "Foot Pedal Connector" at the rear of the control unit.
  2. Press the Hand/Foot Selector switch to "FOOT" (LED off).
  3. Set the speed control knob to the desired maximum speed.
  4. Press the foot pedal to run the motor.

Maintenance Features

Troubleshooting:

  • Motor fails to run:
    • Cause: Loose connection of motor plug with jack in control unit.
    • Remedy: Correctly plug the motor cord.
    • Cause: Defect in motor cord.
    • Remedy: Replace motor cord.
    • Cause: Trouble in motor.
    • Remedy: Check motor and repair if troubled.
  • Motor stops suddenly in use (Safety protection system functioned):
    • Cause: Overloaded, or chuck is opened during operation.
    • Remedy: Refer to the safety protection system (Section 6). Check and close the chuck if opened.
  • Motor fails to run when Foot Pedal is used:
    • Cause: H/F Selector is at "Hand".
    • Remedy: Set it at "Foot".
    • Cause: Foot Pedal fails to function.
    • Remedy: Check and replace Foot Pedal.
    • Cause: Defect in Foot Pedal cord.
    • Remedy: Check and replace Foot Pedal.
    • Cause: Loose connection of Foot Pedal plug with jack in control unit. Remedy: Check Foot Pedal plug and connection.
    • Cause: Switch OFF.
    • Remedy: Check Power Switch "ON".

If any malfunction occurs, contact the dealer where the unit was purchased.

Precautionary Maintenance:

  • Install the control unit in a room with a suitable temperature (0-40°C). Avoid excessively dusty, warm, or humid locations, as this can damage the control unit.
  • Handle the control unit and handpiece with care to prevent drops, which can damage ball bearings or weaken durability.
  • Never plug or unplug the power cord with wet hands to avoid electric shock.
  • Do not use damaged electric cables.
  • Avoid inserting too many power cords into one socket to prevent fire.
  • Do not disassemble or alter the units.
  • Prevent water or other liquids from spilling onto and into the control unit and micromotor, as this can cause short-circuits, abnormal heating, or other troubles due to rusting.
  • Operate the unit carefully, prioritizing patient or customer safety.
  • Use only by authorized personnel for dental treatment.
  • Avoid using or leaving the unit in high heat environments (e.g., direct hot sun, parked cars, near fire or stove).
  • Always check the unit for looseness, vibration, sound, and operating temperature. Perform a distant check before using on a patient. If any abnormality is detected, immediately stop operation and call the dealer.
  • Always place the handpiece on its stand while in use.
  • Check the electric rating label (AC100-120V, 50-60Hz or AC200-240V, 50-60Hz) on the rear of the control unit. Replace the fuse only with an identical type and rating. The fuse holder contains a spare fuse.

Saeyang MARATHON-N7R Specifications

General IconGeneral
BrandSaeyang
ModelMARATHON-N7R
CategoryDental equipment
LanguageEnglish

Related product manuals