©2004 Dorel Juvenile Group
Made in CHINA
www.safety1st.com
(800) 544-1108
Styles and colors may vary.
Distributed by Dorel Juvenile Group, Inc.,
2525 State Street,
Columbus, IN 47201-7494
In Canada: 12345 Albert-Hudon,
Suite 100,
Montreal, QC Canada H1G 3K9
11/04 4358-3591B
©2004 Dorel Juvenile Group
Fabriqué en CHINE
www.safety1st.com
(800) 544-1108
Les styles et les couleurs peuvent varier.
Distribué par Dorel Juvenile Group, Inc.
2525 State Street,
Columbus, IN 47201-7494 USA
Au Canada : 12345 Albert-Hudon,
Suite 100,
Montréal, QC Canada H1G 3K9
11/04 4358-3591B
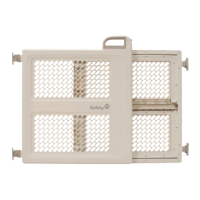
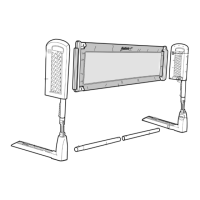
41823
Barrière de sécurité
Double Action
Mode d’emploi
WARNING:
• TO PREVENT SERIOUS INJURY OR DEATH, securely install gate or
enclosure and use according to manufacturer’s instructions.
• TO PREVENT FALLS, never use at top of stairs as pressure mounted
gate. Enclosed hardware MUST be used when installed at top of stairs.
• NEVER use with a child able to climb over or dislodge/open the gate
or enclosure.
• NEVER leave a child unattended.
• USE ONLY with the locking/latching mechanism securely engaged.
• ALWAYS install as close to the floor as possible when used as a
pressure mounted gate.
• GATE is not meant to replace proper adult supervision.
• INTENDED for use with children from 6 months through 24 months.
• THIS PRODUCT will not necessarily prevent all accidents.
• DO NOT allow gate to swing over stairs.
CAUTION:
• ALWAYS check regularly to ensure
gate and locking systems are secure.
• For top of the stairs use, DO NOT
place gate on any stair below the top
level stair.
• For bottom of the stairs use, place the
gate on the lowest stair from bottom.
• DO NOT use gate if any parts are
missing or broken. Contact Dorel
Juvenile Group for replacement parts
and instructional literature if needed.
• DO NOT substitute parts.
• DO NOT immerse in water. To clean,
wipe with a damp cloth and dry.
MISE EN GARDE :
• POUR ÉVITER TOUTE BLESSURE GRAVE OU LE DÉCÈS, poser la barrière
de façon sécuritaire et l’utiliser conformément aux directives du
fabricant.
• POUR ÉVITER TOUT RISQUE DE CHUTE, ne jamais utiliser dans le haut d’un
escalier en tant que barrière à montage sous pression. La visserie ci-jointe
DOIT être utilisée lorsque la barrière est installée dans le haut d’un escalier.
• NE JAMAIS utiliser lorsqu’un enfant est capable de grimper par-dessus
ou d’ouvrir la barrière.
• NE JAMAIS laisser un enfant sans surveillance.
• UTILISER SEULEMENT lorsque le mécanisme de verrouillage est bien
enclenché.
• TOUJOURS poser le plus près possible du plancher en mode
assemblage sous pression.
• La BARRIÈRE n’est pas conçue pour remplacer la supervision d’un adulte.
• CONÇUE pour les enfants de 6 à 24 mois.
• CE PRODUIT ne prévient pas nécessairement tous les accidents.
• NE PAS laisser la barrière ouvrir au-dessus de l’escalier.
ATTENTION :
• TOUJOURS vérifier régulièrement si la
barrière et le système de verrouillage
sont bien verrouillés.
• Lorsque la barrière est utilisée dans le haut
d’un escalier, NE PAS la placer sur une
marche autre que la marche supérieure.
• Lorsque la barrière est utilisée dans le
bas d’un escalier, la placer sur la
marche la plus basse de l’escalier.
• NE PAS utiliser la barrière s’il manque des
pièces ou que certaines pièces sont
brisées. Communiquer avec Dorel Juvenile
Group pour obtenir des pièces de rechange
et un mode d’emploi si nécessaire.
• NE PAS substituer les pièces.
• NE PAS plonger dans l’eau. Nettoyer
avec un linge humide, puis sécher.
Keep These Instructions For Future Use Conserver ces instructions pour consultation ultérieure
• Adult assembly required.
CAUTION:
• Keep small parts away from child during assembly.
• Read all instructions before assembly and use.
• Do not return this product to the place of purchase, If
any parts are missing, call Consumer Relations at
(800) 544-1108. Or visit our web site at
www.safety1st.com.
Have the model number (41823) and date code (manufacture
date) located
on inner gate panel
ready.
•
This gate is for use in openings from 28 to 42 inches (71.12
cm to 106.7 cm), in pressure mount mode. The minimum
opening is 30 inches (76.2 cm) with hardware.
•
Doit être assemblé par un adulte.
ATTENTION :
• Pendant le montage, garder les petites pièces hors de la portée des enfants.
• Lire toutes les instructions avant d’assembler et d’utiliser la barrière.
• Ne pas retourner ce produit à l'endroit où il a été acheté. Si une pièce est
manquante, communiquer avec le service à la clientèle au (800) 544-1108 ou aller
à notre site Web à
www.safety1st.com. Ayez en main le numéro de modèle (41823) et
le code de la date (date de fabrication) situés sur le panneau intérieur de la barrière.
•
Cette barrière est utilisée dans des ouvertures variant entre 28 et 42 po (71,12 cm et
106,7 cm), en mode assemblage sous pression. L'ouverture minimum est de 30 po
(76,2 cm) avec visserie.