EasyManua.ls Logo

Safety 1st Oven Front Lock User Manual

Safety 1st Oven Front Lock
3 pages
To Next Page IconTo Next Page
Page #1 background imageLoading...
Page #1 background image
Care and Cleaning
Using Oven Lock
To Install
Safety Information:
CAUTION: This product is only a deterrent. It is not a substitute for proper adult
supervision. Discontinue use when child becomes old enough to defeat it.
Test oven lock before each use.
User Guide
Questions? Comments?
Missing Parts? Contact Us:
www.safety1st.com
(800) 544-1108
©2004 Dorel Juvenile Group
Made in CHINA
www.safety1st.com
(800) 544-1108
Styles and colors may vary.
Distributed by
Dorel Juvenile Group
2525 State Street,
Columbus, IN 47201-7494
In Canada: 12345 Albert-Hudon,
Suite 100,
Montreal-N, QC Canada H1G 3K9
09/04 4358-5344
1 Remove paper backing from adhesive (Figure 1).
2
Locate the center of oven door.
Position lock at center (Figure 2).
3 Lift lock up so that adhesive lightly sticks to the top (Figure 3). Then open oven door to
adhere lock firmly in position.
4 Test lock to be sure it is firmly in place.
Read all instructions
before using.
• Remove all contents
from packaging and
discard box, and/or
poly bags.
• Do not return this
product to the place
of purchase. If any
parts are missing, call
Consumer Relations at
(800) 544-1108. Or
visit our web site at
www.safety1st.com.
Have the model
number ready (48408)
and date code
(manufacture date)
located on package.
Keep These Instructions
For Future Use
BEFORE YOU BEGIN: Clean all surfaces that the lock will be adhered to, including the
top of the oven door and the underside of the oven. Oven lock will not adhere properly if
any grease is present.
1
Wipe clean. Keep free of grease.
TO UNLOCK: Slide lock to the right, and lift hinge up 90°.
TO LOCK: Close oven door. Rotate hinge down in front of oven door.
Latch will click into place.
2
Oven Front Lock
48408
A
A
Parts List:
Oven Front Lock
Tools Needed:
Measuring tape
3
Question and Answer IconNeed help?

Do you have a question about the Safety 1st Oven Front Lock and is the answer not in the manual?

Safety 1st Oven Front Lock Specifications

General IconGeneral
Product TypeOven Front Lock
BrandSafety 1st
CategoryProtection Device
MaterialPlastic
ColorWhite
InstallationAdhesive
CompatibilityMost ovens

Summary

Safety Information and Usage

Product Safety Warning

Product is a deterrent, not a substitute for adult supervision. Discontinue use if child can defeat it.

Pre-Use Check

Ensure the oven lock is firmly in place before each use.

Product Components and Tools

Parts List

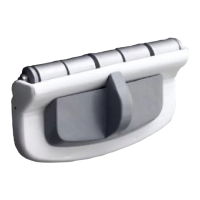
Identifies the main component as the Oven Front Lock (A).

Tools Required

Lists the necessary tool for installation: a measuring tape.

Installation Guide

Preparation and Placement

Clean oven surfaces, remove backing, position lock on oven door center.

Securing the Lock

Lift lock to lightly stick, then open door to adhere firmly and test.

Operating Instructions

How to Unlock

Slide the lock to the right and lift the hinge up 90 degrees.

How to Lock

Close oven door and rotate hinge down; latch will click into place.

Care and Maintenance

Cleaning Instructions

Wipe the lock clean and ensure it remains free of grease.

User Support and Reference

Contact and Questions

Information for contacting Safety 1st regarding questions, comments, or missing parts.

Keep Instructions

Advise to read all instructions before use and keep for future reference.