Do you have a question about the Samsung Impax 210 i and is the answer not in the manual?
Explains automatic film rewinding after all pictures are taken.
Describes how to rewind the film before the roll is completed.
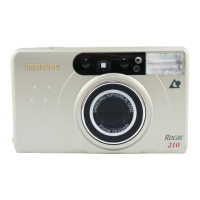
This document describes the Samsung Rocas 210 (i) and Impax 210 (i) cameras, focusing on their operation, features, and basic troubleshooting.
The camera operates with a 3V lithium battery (CR2). It's crucial to ensure the battery is inserted correctly, and non-rechargeable batteries should not be recharged. To prevent damage, never expose the battery to fire, heat, or short circuits, and keep it away from water. If the electronic components become hot, immediately remove the battery, as it may be extremely hot. Always dispose of exhausted batteries separately from household garbage.
The camera's shutter will not operate under several conditions: when there is no battery or the battery is almost drained, when the power is off (especially if the lens cap is closed), during zoom operation, or while the film is winding or rewinding. Rewinding will stop if the shutter button is pressed. The shutter also won't operate if film remains in the camera after rewinding, when the flash is charging, or if a new film hasn't loaded. The camera is electronically controlled by a microcomputer and may temporarily malfunction in strong electromagnetic fields (e.g., near a TV or microwave). If this occurs, remove the battery and reinsert it after 2-3 minutes.
The camera features several key components:
The LCD panel displays important information:
When the power is turned off, the date and exposure unit will remain displayed on the LCD panel for about 4 seconds (210i model), after which the panel clears.
The camera records all photographic information (magnetic or optical) on the film, which is essential for development. This information enables high-quality prints (PQI - Print Quality Improvement) and allows for altering print types during development. Look for the APS sign when choosing a film processing service.
To load the battery:
The camera automatically powers off after 3 minutes of inactivity. Remove the battery if the camera won't be used for an extended period. Remember to check the date and shooting mode when loading a new battery (210i model).
Refer to the illustrations provided in the manual to correctly attach the camera strap.
This camera uses IX 240 film for APS cameras. The film status can be checked by a mark on the film itself. A white circle indicates unexposed film. If the symbols for partially exposed, fully exposed but not processed, or processed film are white, it means the film has already been used, and you will need a new roll.
Before inserting film, confirm the battery is in place. Do not open the film chamber cover while taking pictures, and do not force the cover closed. The camera automatically sets the film speed (e.g., ISO 200, 400, 1600). The exposure unit numbers will decrease with each picture taken.
To avoid camera shake, hold the camera steadily with both hands. Place the camera strap over your wrist. Keep your elbows (for horizontal pictures) or one elbow (for vertical pictures) close to your body. Keep your eye close to the viewfinder to ensure correct framing and that all four sides of the viewing frame are visible when composing your shot.
When taking vertical pictures with flash, ensure the flash is above the lens. Avoid obstructing the lens, exposure sensor, or autofocus windows with fingers, hair, or the camera strap, as this can spoil pictures.
Automatic Rewinding: After all pictures on an IX film are taken, the camera automatically rewinds the film. The motor stops when rewinding is complete. The "0" and an icon will blink on the LCD panel. Open the film chamber cover by moving the lever and remove the fully exposed film (film status symbol will be displayed).
Mid-roll Rewinding: To rewind film mid-roll, press the mid-roll rewind button. If the motor stops before the LCD shows "0," replace the battery. Do not open the film chamber cover until the battery is replaced. If the shutter button is pressed during rewinding, the process will be interrupted until the button is released. After rewinding, the film status symbol will be marked on the film.
To change the date:
When replacing the battery, the date format will reset to "no print," so you'll need to reset or confirm it. The camera automatically sets the date until 2098. The last two digits of the year will be printed on the picture (e.g., 1999 -> "99"). Under normal circumstances, the camera will operate as expected.
This APS (Advanced Photo System) camera allows you to change the print type (C/H/P) at any time during a film roll. Move the C/H/P lever to select between:
Red-eye reduction helps minimize the red-eye phenomenon in low-light portraits. This mode reduces the possibility of red-eye. When selected, the red-eye reduction lamp blinks for about 0.5 seconds before the flash fires.
The self-timer allows you to take a picture of yourself. Press the SELF button once to activate it. When the shutter button is pressed, the self-timer lamp illuminates for 7 seconds, then blinks rapidly for 3 seconds before the picture is taken.
Shutter not operating:
Picture partially dark or out of focus:
| Brand | Samsung |
|---|---|
| Model | Impax 210 i |
| Category | Digital Camera |
| Language | English |