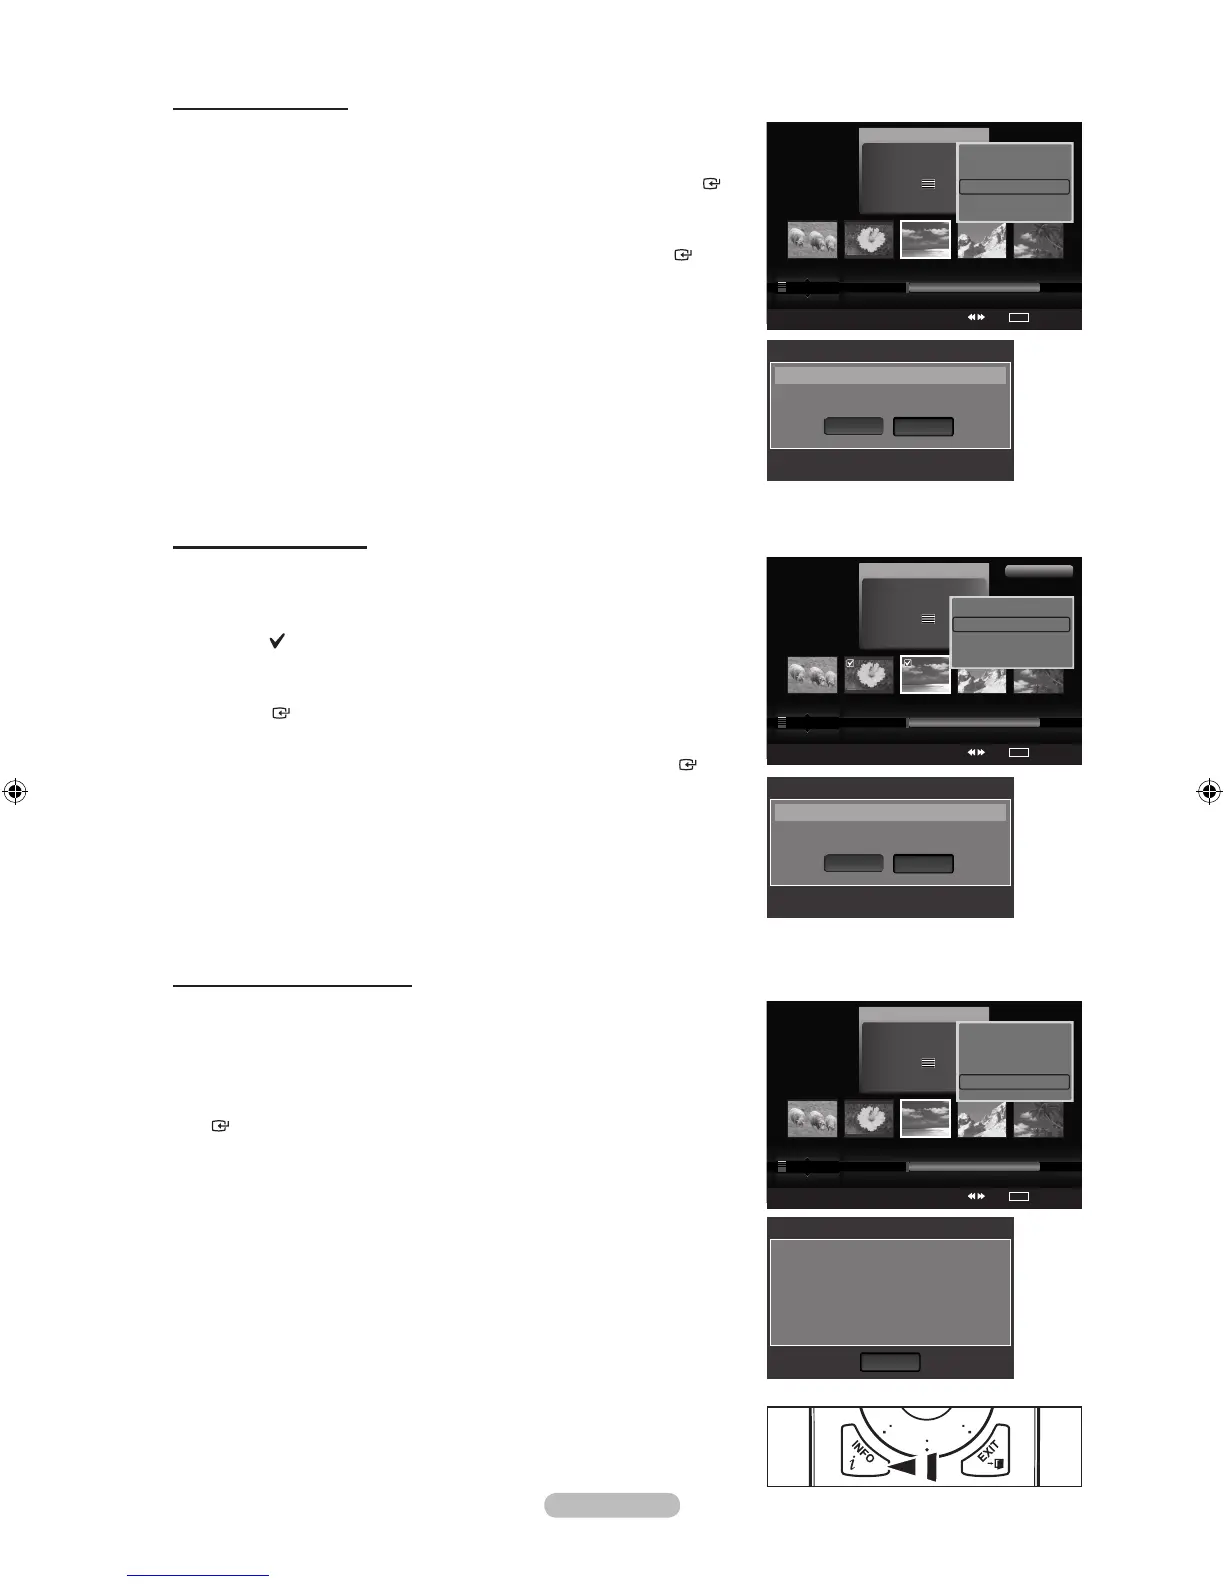
DeletingthePhotole
1. Press the ◄ or ► button to select the desired photo in the Photo list.
2. Press the TOOLS button.
3. Press the ▲ or ▼ button to select “Delete”, then press the ENTER
button.
The “Delete this le?” message appear.
4. Press the ◄ or ►button to select “OK”, then press the ENTER button.
The photo is deleted.
When a read-only le is deleted, the “Read-only le(s). Delete the
le(s)?” message appear.
If you select “Cancel”, the deletion is cancelled.
5. To exit “WISELINK” mode, press the W.LINK button on the remote
control.
You cannot remove the PTP-connected digital camera picture les.
While removing les, don’t remove the USB memory device.
You cannot recover a deleted photo le.
Deleting Multiple Photos
1. Press the ◄ or ► button to select the desired photo in the Photo list.
Then press the yellow button.
Repeat the above operation to select multiple photos.
The mark appears to the left of the selected photo.
2. Press the TOOLS button.
3. Press the ▲ or ▼ button to select “Delete selected File”, then press the
ENTER button.
The “Delete the selected les?” message appear.
4. Press the ◄ or ► button to select “OK”, then press the ENTER button.
The selected photos are deleted.
If you select “Cancel”, the deletion is cancelled.
5. To exit “WISELINK” mode, press the W.LINK button on the remote
control.
You cannot remove the read-only les from the selected ones.
You cannot recover a deleted photo le.
Viewing the Photo Information
The photo le information including the order of the le in the current directory,
the name, the size, the resolution, the date modied and the path is displayed.
1. Press the ◄ or ► button to select the desired photo in the Photo list.
2. Press the TOOLS button.
3. Press the ▲ or ▼ button to select “Information”, then press the ENTER
button.
The information on the selected photo appears.
Press the INFO button to viewing the information.
➣
➣
➣
➣
➣
➣
➣
➣
➣
➣
➣
➣
➣
➣
➣
O
Name : image_1.jpg
Size : 2.0MB
Resolution : 440x440
Date : Jan.1.2008
Path : /Photo/
OK
Photo Info
Photo
SUM
Device
Favorites Setting
Select
Jump
TOOLS
Option
image_1.jpg
Month : Jan
Date : Jan.01.2008
Color : Gray
Composition :
Folder : P-other
Favorite :
★ ★ ★
Preference
Monthly
Timeline
Jan Nov
▲
Silde Show
Delete selected File
Deselect All
Safe Remove
2File(s) Selected
Photo
SUM
Device
Favorites Setting
Select
Jump
TOOLS
Option
image_1.jpg
Month : Jan
Date : Jan.01.2008
Color : Gray
Composition :
Folder : P-other
Favorite :
★ ★ ★
Preference
Monthly
Timeline
Jan Nov
▲
Silde Show
Play Current Group
Delete
Information
▼
Delete
Cancel
OK
Selected File(s) : image... 2 File(s)
Delete the selected files?
Photo
SUM
Device
Favorites Setting
Select
Jump
TOOLS
Option
image_1.jpg
Month : Jan
Date : Jan.01.2008
Color : Gray
Composition :
Folder : P-other
Favorite :
★ ★ ★
Preference
Monthly
Timeline
Jan Nov
▲
Silde Show
Play Current Group
Delete
Information
▼
Delete
Cancel
OK
Selected File(s) : image... 1 File(s)
Delete this file?





 To Next Page