EasyManua.ls Logo

SAN HIMA SGBR015 - User Manual

SAN HIMA SGBR015
10 pages
Print Icon
To Next Page IconTo Next Page
Loading...
INSTALLATION INSTRUCTIONS
E-BIKE HITCH BIKE RACK SGBR015
Question and Answer IconNeed help?

Do you have a question about the SAN HIMA SGBR015 and is the answer not in the manual?

Summary

WARNING

No Modifications Allowed

The rack and its parts must not be modified in any way.

Car Wash and Storage Precautions

Remove rack before automatic car wash and when not in use.

Ground Clearance Requirement

A ground clearance of 10" or higher is recommended for safe operation.

Speed Limit on Bumps

Drive slowly over speed bumps, at a maximum of 5-10 mph (8-16 kph).

Vehicle Dimensions Change Warning

Rack mounting increases vehicle length/height. Exercise care in garages.

Driving Behavior and Side Winds

Be aware of altered driving characteristics and vulnerability to side winds.

Exhaust Clearance

Do not position e-bike tires directly behind the vehicle's hot exhaust.

Tire and Wheelbase Compatibility

Accommodates tires up to 3.35" (8.5cm) wide and wheelbases up to 53.15" (135cm).

Compatibility Limitations

Not suitable for use with tandems or recumbent bicycles.

Transport Restrictions

Do not transport e-bikes with attached baby seats, panniers, or covers.

Hardware Securing

Ensure all hardware is secured according to the installation instructions.

E-bike Securing Verification

Verify e-bikes are secured before operating the vehicle.

Battery Safety

Follow e-bike manual for battery safety; consider removal for theft/damage.

Tail Light Obstruction

If tail lights are obstructed, an external light board must be fitted.

License Plate Requirement

An additional number plate may be required by local laws.

Wind Noise

Be aware that wind noise may be generated during transport.

PARAMETER

Hitch Size Specification

Specifies the hitch size as 2 inches.

Maximum Load Capacity

Details load capacity: 77lbs (35kg) per bike on-road, 46lbs (21kg) off-road.

Tire Width Limit

Maximum tire width supported is 3.35 inches (8.5cm).

Wheelbase Limit

Maximum wheelbase supported is 53.15 inches (135cm).

INSTALLATION

Assemble Tongue to Rack

Align holes on the tongue with the rack, install bolts, washers, nuts, and clevis pin.

Install Tongue into Hitch Receiver

Insert tongue into hitch receiver, align holes, and install hitch bolt and nut.

Center the Trays

Loosen underside nuts, center the trays, and then tighten the nuts.

LOADING

Prepare for Loading

Loosen ramp knobs, pull out ramps, unbuckle mast strap, raise mast, and loosen stabilizer knobs.

Roll E-bikes into Place

Roll e-bikes up ramps onto trays. Do not use electric power; center e-bikes.

Secure E-bikes with Stabilizers

Adjust stabilizer height, rotate to engage frames, clamp, and tighten knobs.

Secure Wheel Straps

Adjust straps below axles, thread around tires, pull tabs to tighten.

Store Ramps

Store Ramps When Not in Use

Push ramps into trays and tighten ramp knobs when not in use.

Unloading

Pull Out Ramps for Unloading

Loosen ramp knobs and pull out the ramps.

Release Wheel Straps

Press gray release tabs on buckles to release the straps.

Release Stabilizer Clamps

Loosen stabilizer knobs to release the clamps.

Roll E-bikes onto Ground

Roll your e-bikes off the rack onto the ground.

Store Ramps After Unloading

Push ramps into the trays and tighten the ramp knobs after unloading.

Tilt

Prepare for Tilt Operation

Remove clevis pin & R clip and install into the lower hole.

Support Load and Remove Pin

Remove security pin & clip while supporting the load.

Lower Rack Carefully

Slowly and carefully lower the rack after removing the pin.

Two-Person Operation for Tilt

Tilt feature requires two people; one must support the load during pin removal.

Storage

Unload E-bikes for Storage

Unload e-bikes by following the Unloading steps.

Fold Down Mast

Remove mast security pin & clip and fold down the mast.

Secure Folded Mast

Insert the security pin & clip in place to secure the folded mast.

Strap Mast Securely

Buckle the strap to secure the mast in its folded position.

Remove Clevis Pin for Storage

Remove the clevis pin & R clip before final storage.

Fold Up Rack for Storage

Fold up the e-bike rack into its compact storage position.

Install Clevis Pin in Higher Hole

Install the clevis pin & R clip into the higher hole for storage.

Removal

Unload E-bikes for Removal

Ensure e-bikes are unloaded before proceeding with rack removal.

Remove Hitch Bolt and Nut

Remove the hitch bolt and nut securing the rack to the vehicle.

Detach Rack from Vehicle

Carefully detach the rack from the vehicle's hitch receiver.

Store Rack Safely

Store the rack in a safe and secure place when not in use.

WARRANTY

Overview

This document describes the San Hima E-Bike Hitch Bike Rack, model SGBR015, providing installation instructions, usage guidelines, and warranty information.

Function Description:

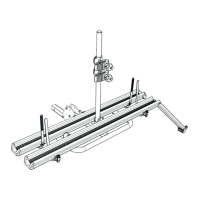
The San Hima SGBR015 is a hitch-mounted bike rack designed specifically for transporting e-bikes. It attaches to a vehicle's 2-inch hitch receiver and features two trays with ramps for easy loading and unloading of e-bikes. The rack includes stabilizers and wheel straps to securely hold the bikes during transport. It also incorporates a tilt feature for convenient access to the vehicle's rear cargo area and a folding design for compact storage when not in use.

Important Technical Specifications:

  • Hitch Size: 2 inches
  • Maximum Load Capacity:
    • On-road: 2 e-bikes, 77 lbs (35 kg) per bike
    • Off-road: 2 e-bikes, 46 lbs (21 kg) per bike
  • Tire Width Accommodation: Up to 3.35 inches (8.5 cm)
  • Bike Wheelbase Accommodation: Up to 53.15 inches (135 cm)
  • Ground Clearance Recommendation: 10 inches or higher
  • Speed Limit Recommendation (over speed bumps): 5-10 mph (8-16 kph) max.

Usage Features:

  • Installation:
    • The tongue is assembled to the rack using bolts, nuts, washers, a clevis pin, and an R clip.
    • The assembled tongue is then inserted into the vehicle's 2-inch hitch receiver and secured with a hitch bolt and nut.
    • The trays can be centered by loosening and tightening underside nuts.
  • Loading E-Bikes:
    • Ramps are pulled out by loosening ramp knobs.
    • The mast is prepared by unbuckling its strap, pulling a security pin and clip, raising it, and re-inserting the pin and clip.
    • Stabilizer knobs are slightly loosened and rotated out of the way, and straps are unbuckled.
    • E-bikes are rolled up the ramps and onto the trays. E-bikes can be loaded in the same or opposite directions.
    • Recommendation: Carry the heavier e-bike on the inside tray and always center e-bikes on the trays.
    • Caution: Do not use electric power to load e-bikes.
  • Securing E-Bikes:
    • Stabilizers: Loosen stabilizer knobs, adjust height, rotate stabilizers toward e-bikes, position them to engage with frames or seat posts, and then tighten the knobs.
    • Wheel Straps: Loosen strap knobs, adjust straps below axles, thread straps around tires and through buckles, and pull gray release tabs to tighten.
    • For two e-bikes, trays can be offset to clear saddles and handlebars.
  • Unloading E-Bikes:
    • Loosen ramp knobs and pull out ramps.
    • Press gray release tabs on buckles to release straps.
    • Loosen stabilizer knobs to release clamps.
    • Roll e-bikes onto the ground.
    • Push ramps into trays and tighten ramp knobs for storage.
  • Tilt Feature:
    • Allows the rack to be tilted down for access to the vehicle's rear cargo area.
    • Requires two people to operate: one to support the load while the other removes the security pin and clip.
    • Remove the clevis pin and R clip, install them into the lower hole, remove the security pin and clip while supporting the load, and slowly lower the rack.
    • Caution: Do not put any part of your body under the rack while tilting. Be careful to avoid hitting your head.
  • Storage:
    • After unloading e-bikes, remove the security pin and clip of the mast, fold down the mast, and re-insert the pin and clip.
    • Buckle the strap to secure the mast.
    • Remove the clevis pin and R clip, fold up the e-bike rack, and install the clevis pin and R clip into the higher hole.
    • Ramps can be pushed into the trays and secured with ramp knobs when not in use.
  • Removal:
    • Unload e-bikes.
    • Remove the hitch bolt and nut.
    • Remove the rack from the vehicle.
    • Store the rack in a safe place.

Maintenance Features:

  • Regular Checks: Attachment hardware can loosen over time; check before each use and tighten if necessary.
  • Cleaning: Not explicitly mentioned, but general cleaning of components would be beneficial for longevity.
  • Battery Handling: Read the e-bike owner's manual for safe battery keeping. Consider removing the battery if concerned about theft, damage, or performance loss from prolonged heat/cold.

Warnings and Important Notes:

  • Do not modify the rack or its parts.
  • Remove the rack before entering an automatic car wash or when not in use.
  • Vehicle's total length, height, and width may increase; take special care when reversing or entering garages.
  • Vehicle's driving characteristics and braking behavior might change; vehicle might become vulnerable to side winds.
  • Do not position e-bike tires directly in back of the vehicle's hot exhaust.
  • Not for use with tandems or recumbents.
  • Do not transport e-bikes with attached baby seats, panniers, wheel covers, or full bike covers.
  • Ensure all hardware is secured and e-bikes are secured to the rack before operating the vehicle.
  • Vehicle's tail lights can be obstructed; an external light board might be required.
  • An additional number plate might be required, attached according to local laws.
  • Wind noise may be generated during transport.
  • This product is not designed for vehicles with a rear-mounted spare tire; a hitch extension is required in such cases.
  • The warranty covers defects in materials and workmanship for 5 years from the date of receipt, provided the rack is used according to the manual and not misused or overloaded. The warranty does not cover normal wear and tear, incorrect fitting, or damages from negligence, alteration, abuse, or acts of nature.

SAN HIMA SGBR015 Specifications

General IconGeneral
BrandSAN HIMA
ModelSGBR015
CategoryAutomobile Accessories
LanguageEnglish