EasyManua.ls Logo

S&G SG-0007C User Manual

S&G SG-0007C
6 pages
To Next Page IconTo Next Page
Page #1 background imageLoading...
Page #1 background image

 ! "#$ %&
'() Operating the system without water will cause severe damage.
'() SHOCK HAZARD! No user serviceable parts. Do not attempt to service this control. Contact your
dealer or service center for assistance. Follow all users manual power connection instructions. Installation must
be performed by a certified licensed electrician and all grounding connections must be properly installed.
(&( 
*+ Please open the tub skirt according to instruction on it, connect the power supply correctly. If the power
supply is 220V/50HZ, the wires serving as equipotential bonding conductors shall have a cross
sectional area not less than 3×10mm
2
. If the power supply is 380V/50HZ, the wires serving as
equipotential bonding conductors shall have a cross sectional area not less than 5×6mm
2
.The protection
system should be based on a residual current device (RCD). Be sure that the earth cable connection is
correctly made. The circuit diagram of hot tub is shown as following. (Fig 1)
,$*+
-+ Before infuse water into hot tub for using, please check the valve for each pipeline. The hot tub’s drain
valve must be in normal close while valves for other pipeline must be in normal open. After confirm
1
Question and Answer IconNeed help?

Do you have a question about the S&G SG-0007C and is the answer not in the manual?

S&G SG-0007C Specifications

General IconGeneral
CategoryControl Panel
ModelSG-0007C
Battery LifeUp to 2 years
TypeElectronic
Operating Temperature-10°C to 50°C
CompatibilityStandard door locks

Summary

Installation

Power Supply Connection and Bonding

Connect power supply, check equipotential bonding conductors. Ensure correct earth cable connection.

Pre-Water Infusion Checks

Check valves before filling. Ensure drain valve is closed and others are open.

Operation Instruction

Power Key Operation and System Check

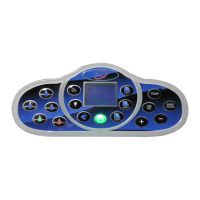
Press power key to start system. Auto-check, heating activation, and display of temp/status.

Pump Activation

Press pump keys (PUMP1, PUMP2, PUMP3) to activate corresponding pumps.

Bubble Key Operation

Press the bubble key to activate the air massage system instantly.

Ozone Disinfection System

Press O3 key to turn ozone disinfection system on/off. Circulation pump runs automatically.

Lamp Key Operation

Press LAMP key to turn underwater lights on/off. Cycle through auto-color, fixed color, off.

Temperature Adjustment

Use TEMP key with +/- to adjust water temperature between 10°C and 42°C.

Radio/AV/DVD Input Control

Control radio, TV, or DVD inputs. Cycle through modes to adjust volume or display temperature.

Tuning and Volume Control

Adjust radio frequency and volume. Long press to search for radio stations.

Heating System Operation

Heater activates 10s after circulation pump, stops when set temp is reached.

Heater and Pump Interlock System

Switch between interlock and non-interlock modes for heater and pump operation.

Temperature Sensor Self-Checking

Panel shows EO for disconnected sensor, E1 for short-circuit. Heating system unavailable.

Water-Lacking Protection System

Protects pump/heater from dry running. Filter blockage symbol flashes to indicate cleaning needed.

Anti-Freezing System

Activates automatically below 9°C. Pumps and heater work to prevent freezing.

Automatic Working Mode

System cycles circulation pump for 60 mins on, 180 mins off. Heater activates if temp is low.

Control Box Overheat Protection

Shuts down system if internal temperature exceeds limits. Resumes when cooled.

Water Overheat Protection

Stops pumps, blower, heater if water exceeds 43°C. Resumes at 40°C.

Screen and Time Controls

Screen backlight off after 1 min. Massage pumps/blower shut off after 1 hour.

Automatic Cleaning Function

System cleans automatically every 12 hours by running all equipment briefly.

Combination Lock Instructions

Resetting the Combination Lock

Default is 0-0. Reset by pressing the reset button while turning dials.

Cleaning Instructions

Surface Cleaning Recommendations

Use mild soap and warm water with a soft cloth. Avoid harsh abrasives.

Instructions to Drain Water

Draining Procedure

Open skirt panel, loosen drain valve anticlockwise to drain water. Close clockwise.

Draining Remarks

Empty remaining water manually. Use air blower to dry air pipelines.