EasyManua.ls Logo

Sandleford PKSS70 - User Manual

Sandleford PKSS70
2 pages
Print Icon
To Next Page IconTo Next Page
Loading...
PORTABLE
KEY SAFE
PKSS70
Operating Instructions
KEY SAFE INSTRUCTIONS
ATTENTION
Please read the operating instructions carefully
before you operate the lock or try to set a new
combination of numbers. We can not accept any
liability for malfunction due to the setting of the
combination being carried out incorrectly.
We can not accept any liability for any damage or
for loss of property. The product is used entirely
at the owner’s risk. The Key Keeper leaves the
factory with no preset code please note you will
need to set your own code before use.
FIRST OPENING
1. Slide the black button marked CLEAR
downwards
2. Slide the Silver OPEN button downwards
3. Remove the Key Safe Cover
SET YOUR CODE
1. Choose your code 3 to 10 numbers
2. Remove the White back cover
using a Philips Head Screwdriver
on the centre screw
CHECKING YOUR CODE
1. Slide the black clear button downward
2. Enter your code (note: you can enter in any order)
3. Slide the silver open button downwards.
If your code is set correctly the silver latch
will retract completely.
4. With the silver latch completely retracted the
Key Safe Cover can be inserted back into
the Key Holder
OPENING YOUR SAFE
1. Slide the clear button downwards
2. Enter your code
(note: you can enter in any order)
3. Slide the silver open button downwards and
remove key safe cover
OPENING SHACKLE
1. Open the safe and remove the Safe cover
2. Lift the Shackle Lever towards you to
release the shackle
3. Slide the shackle upwards to remove
from housing
LOCKING SHACKLE
1. Slide shackle back into housing until it clicks back
into the shackle lever
2. Replace the safe cover
5. Slide the black clear button downwards.
6. Replace the white back cover
3. You will see 10 small Black Screws with
Arrows pointing upwards.
4. With the Setting Key provided turn the screws
clockwise 180 degrees so the Arrows are
pointing downwards E.g. if your code is 1,2,3,4
these Arrows should be facing downwards and
the others still facing upwards.
Not Active
Slide the black
button marked
CLEAR
DOWNWARDS
Active
C
M
Y
CM
MY
CY
CMY
K
PKSS70_final.pdf 1 22/11/2016 2:55 pm
Question and Answer IconNeed help?

Do you have a question about the Sandleford PKSS70 and is the answer not in the manual?

Summary

Key Safe Instructions

Attention

Important warnings and disclaimers regarding operation and liability.

First Opening

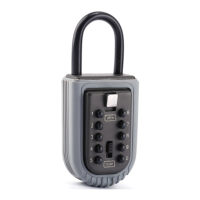
Step-by-step guide for the initial opening of the key safe.

Set Your Code

Instructions on how to choose and set a new combination code.

Checking Your Code

Procedure to verify if the entered code correctly retracts the latch.

Opening Your Safe

Steps to enter the code and remove the key safe cover.

Opening Shackle

How to release the shackle from its housing.

Locking Shackle

Instructions for re-inserting and securing the shackle.

Parts List

Overview

The Sandleford Portable Key Safe, model PKSS70, is a robust and secure device designed to store keys safely, offering convenient access to authorized users while protecting against theft. It's a portable unit, making it versatile for various applications, from home use to real estate showings or emergency access for caregivers. The key safe operates with a user-defined numerical code, providing a customizable security solution.

Function Description:

The primary function of the PKSS70 is to securely store keys, preventing unauthorized access while allowing designated individuals to retrieve them. It features a combination lock mechanism that requires a specific sequence of numbers to open. The device is designed to be portable, meaning it can be easily moved and attached to various fixtures using its shackle. This portability makes it suitable for temporary or permanent key storage needs in different locations. The internal compartment is spacious enough to hold multiple keys or even small access cards.

Usage Features:

Setting Your Code:

  1. Code Selection: Users can choose a personal code consisting of 3 to 10 numbers. This flexibility allows for varying levels of security based on user preference.
  2. Accessing the Setting Mechanism: To set the code, the white back cover of the key safe must be removed. This is done by unscrewing the center screw using a Philips Head Screwdriver.
  3. Adjusting the Code Screws: Inside, there are 10 small black screws, each with an arrow pointing upwards. A provided setting key is used to turn these screws. To include a number in the code, the corresponding screw must be turned clockwise 180 degrees so that its arrow points downwards. For example, if the desired code is 1, 2, 3, 4, the screws corresponding to these numbers should have their arrows pointing downwards, while the others remain pointing upwards.
  4. Finalizing the Setting: After adjusting the screws, the black clear button should be slid downwards, and the white back cover replaced.

Checking Your Code:

  1. Initiating Check: To verify the newly set code, first slide the black clear button downwards.
  2. Entering Code: Enter the chosen code. The order of entry does not matter for this device, which simplifies the user experience.
  3. Retracting Latch: Slide the silver open button downwards. If the code is correctly set, the silver latch will retract completely.
  4. Reinserting Cover: With the silver latch fully retracted, the Key Safe Cover can be reinserted back into the Key Holder.

Opening Your Safe (First Opening & Regular Use):

  1. First Opening: For the very first use, the device leaves the factory without a preset code. To open it initially, slide the black button marked "CLEAR" downwards, then slide the silver "OPEN" button downwards, and finally remove the Key Safe Cover.
  2. Regular Opening: For subsequent openings, slide the clear button downwards. Enter your personal code (again, the order of entry does not matter). Then, slide the silver open button downwards, and the key safe cover can be removed, granting access to the stored keys.

Opening the Shackle:

  1. Accessing Shackle Lever: After opening the safe and removing the safe cover, the shackle mechanism becomes accessible.
  2. Releasing Shackle: Lift the Shackle Lever towards you. This action releases the shackle.
  3. Removing Shackle: Slide the shackle upwards to remove it from its housing. This allows the safe to be attached to a door handle, fence, or other suitable fixture.

Locking the Shackle:

  1. Reinserting Shackle: Slide the shackle back into its housing until it clicks into place within the shackle lever. This ensures the shackle is securely fastened.
  2. Replacing Cover: Replace the safe cover to secure the contents and the shackle mechanism.

Maintenance Features:

The manual emphasizes the importance of reading the operating instructions carefully before using the lock or setting a new combination. This highlights a preventative maintenance approach, ensuring correct setup to avoid malfunction. While explicit "maintenance" steps like cleaning or lubrication are not detailed, the design suggests a low-maintenance product. The robust construction is intended for durability, and proper use as outlined in the instructions is the primary form of "maintenance" to ensure longevity and reliable operation. The product is designed to be user-serviceable for code changes, which is a key aspect of its long-term usability.

Important Considerations:

The manufacturer explicitly states that they cannot accept liability for malfunction due to incorrect code setting, or for any damage or loss of property. The product is used entirely at the owner's risk. This underscores the importance of careful code setting and responsible use. The device is shipped without a preset code, requiring the user to set their own code before the first use, which is a crucial initial setup step.

Sandleford PKSS70 Specifications

General IconGeneral
TypePadlock
Shackle Diameter7mm
Weather ResistantYes
Body MaterialSteel
Shackle MaterialHardened Steel
Number of Keys2