Do you have a question about the SANUS VuePoint F180d and is the answer not in the manual?
Verify TV weight, wall material, tools, and readiness before installation.
Critical safety advice on product use, wall compatibility, and potential hazards.
Identification of the wall plate, template, and lag bolt hardware for mounting.
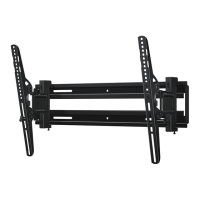
Identification of the arm assembly and its securing screws for installation.
Details on cable ties and cable tunnel kit for organizing wires.
Guide to measuring the TV's VESA mounting hole width and height in cm.
Instructions for assembling TV bracket configurations A and B based on VESA patterns.
Instructions for assembling TV bracket configurations C and D based on VESA patterns.
Guide to choosing the correct screw diameter (M5, M6, M8) for your TV.
Guide to choosing the correct screw length and using spacers for TV attachment.
Instructions for attaching the assembled TV bracket to the TV using selected hardware.
Instructions for locating wall studs and positioning the wall plate template.
Steps for drilling pilot holes and securely fastening the wall plate to the wall studs.
Instructions for hanging the arm assembly onto the wall plate and securing it.
Instructions for attaching the TV bracket onto the arm assembly.
Final step to secure the TV bracket to the arm using a locking screw.
Instructions on using cable ties to route and secure cables for a cleaner look.
Notes on tunnel compatibility, painting, cutting, and adhesive clip removal.
Step-by-step guide for installing the cable tunnel assembly and securing it to the wall.
How to adjust the tilt tension knob for proper TV positioning and stability.
Instructions for leveling the TV using the locking screw.
Procedure for safely removing the TV from the wall mount assembly.
This document describes the Sanus Vuepoint F180d, an instruction manual for a full-motion TV wall mount designed to provide a stress-free installation experience. The mount is intended for use with televisions weighing up to 100 lbs (45.4 kg) and is specifically designed for installation into wood studs. It is crucial to verify the TV's weight and the wall type before proceeding with installation to ensure compatibility and safety. The manual emphasizes the importance of proper tool usage and adherence to safety precautions to prevent personal injuries and property damage.
The Sanus Vuepoint F180d is a full-motion TV wall mount that allows for a wide range of adjustments, including tilt, swivel, and extension, to achieve optimal viewing angles from various positions in a room. The mount's design enables the TV to shift 3 inches (7.61 cm) to the right or left when in the home position, offering flexibility in choosing the wall mount's location. The full-motion capability ensures that glare can be reduced, and the TV can be positioned for comfortable viewing, whether from a couch, kitchen, or other areas. The mount is designed to securely hold the TV while providing smooth and easy movement.
The installation process begins with measuring the TV's hole pattern to determine the correct TV bracket configuration (A, B, C, or D). The manual provides detailed instructions on how to assemble the TV bracket, including the use of TV bracket extenders for larger hole patterns. It also guides users in selecting the appropriate TV screw diameter (M5, M6, or M8) and length, offering solutions for flat-back TVs, round/irregular back TVs, TVs with inset mounting holes, and situations requiring extra space for cables. The importance of verifying adequate thread engagement for the screws is highlighted to ensure the TV is securely held and to prevent damage.
Attaching the TV bracket to the TV involves positioning it centrally over the TV's hole pattern and securing it with the chosen screws and washers. The manual illustrates different configurations for flat-back and round-back/extra space scenarios. Once the TV bracket is attached, the next step involves attaching the wall plate to the wall. This requires locating and marking the center of wood studs, using a wall plate template to ensure correct height and level, and drilling pilot holes. The wall plate is then securely fastened to the wall using lag bolts and washers. A crucial safety note emphasizes that all four lag bolts must be firmly tightened to prevent unwanted movement of the wall plate.
After the wall plate is installed, the TV is attached to the wall plate. This step is noted as "HEAVY!" and suggests assistance. The arm assembly is first hooked onto the wall plate, then secured with wall plate screws. The arm's ability to slide side-to-side along the wall plate allows for perfect positioning. The TV bracket, with the TV attached, is then hung onto the arm, again by first hooking the top support and then resting it into place. A locking screw is then installed to secure the TV bracket to the arm, which is an important step for safety and stability.
The mount also includes cable management features. Cables can be routed through cable channels on the top and bottom of the arm and secured with cable ties for a cleaner, organized look. Additionally, an optional cable tunnel kit is provided for concealing cables along the wall. This kit is not recommended for brick, plaster, or wallpapered walls and requires the wall paint to be cured for at least 30 days before installation. The cable tunnels can be painted to match the wall and cut to the required length. The installation of the cable tunnel involves attaching clips to the wall and then reattaching the tunnels over the wires, ensuring enough slack in the cables to prevent interference during TV movement.
The manual outlines TV adjustment features for both tilt and level. For tilt adjustment, the tilt tension knob can be adjusted by hand to ensure the TV moves easily but stays in place. It is important to tighten this knob once the TV is in its desired position to prevent unwanted movement. For level adjustment, the locking screw can be loosened to level the TV, and then tightened again. The locking screw is critical for securing the TV onto the arm. To remove the TV from the arm assembly, users are instructed to disconnect all cables and then reverse the installation procedures from STEP 3. The manual reiterates that this step may require assistance due to the TV's weight.
| Category | Racks & Stands |
|---|---|
| Model | F180d |
| Brand | SANUS |
| Weight Capacity | 180 lbs |
| Construction Material | Steel |
| Color | Black |
| Installation | Wall-mounted |
| Compatibility | Most flat-panel TVs |
| Type | Full-motion TV wall mount |