This document describes the Saturn ST-EC0126 Bread Maker, a versatile appliance designed for home use to simplify the bread-making process. It offers a range of functions, allowing users to bake various types of bread with different crust colors and weights, as well as prepare dough, jam, and gluten-free recipes.
Function Description
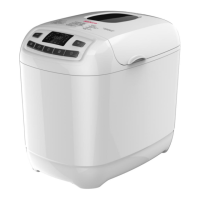
The Saturn ST-EC0126 Bread Maker is an automated appliance that handles the entire bread-making process from kneading to baking. It features a viewing window to monitor the baking process, a kneading paddle for mixing ingredients, and a bread pan with a handle for easy removal. The control panel includes buttons for selecting programs, adjusting loaf size, and choosing crust color. A display shows the selected weight, menu number, remaining time, crust color, and the current working process (Preheat, Knead, Rest, Rise, Bake, Warm, End), along with error codes.
The bread maker offers 13 pre-set programs, including:
- Basic (1): For white and brown bread, and bread with herbs or raisins.
- French (2): For light-weight bread with a crispy crust and light texture, requiring a longer preparation time.
- Whole Wheat (3): For bread with significant amounts of whole wheat, featuring a longer preheating time for grain soaking and expansion. Not recommended for delay timer use.
- Low Carb (4): Specifically for low-carb bread.
- Fast Bake I (5) (1:20): For a 750g white bread with a reduced baking time, resulting in a shorter, moister loaf.
- Fast Bake II (6) (1:55): For a 1000g white bread with a reduced baking time, resulting in a shorter, moister loaf.
- Quick (7) (2:10): For white bread requiring a shorter time, typically producing a smaller, denser loaf.
- European (8) (3:25): For European-style bread like focaccia and raisin pumpernickel.
- Dough (9) (1:30): Prepares dough only, without baking. Users can remove the dough to shape bread rolls, pizza, etc.
- Gluten-free (10) (2:45): For bread using gluten-free flours, with a longer rising time.
- Jam (11) (1:05): For making jam from fresh fruits.
- Bake (12) (1:00): A bake-only program that can be used to increase baking time on selected programs, particularly useful for jam preparation.
- Favourite Bread (13) (3:25): Allows users to create their own bread-making processes.
The appliance also includes a delay timer function, allowing users to set the start time up to 15 hours in advance, with 10-minute increments. After baking, the bread maker automatically enters a 60-minute "Warm" function (except for Dough and Jam programs) to keep the bread warm.
Important Technical Specifications
- Power: 650 W
- Rated Voltage: 220-240 V
- Rated Frequency: 50 Hz
- Rated Current: 3 A
- Net Weight: 4.20 kg
- Gross Weight: 4.65 kg
The bread maker supports three loaf sizes: 500g, 750g, and 1000g, and three crust colors: Light, Medium, and Dark, plus a Rapid Browning option.
Usage Features
Before First Use:
Unpack the bread maker and remove all packaging materials. Wash the bread pan, kneading paddle, measuring cup, spoon, and hook in warm soapy water, then rinse and dry thoroughly.
Operation:
- Placement: Place the bread maker on a dry, flat, and stable surface.
- Bread Pan Insertion: Open the lid and lift out the bread pan by its handle. It's important to fill the bread pan with ingredients outside the appliance to prevent spills from igniting on heating elements.
- Kneading Paddle Attachment: Attach the kneading paddle to the drive shaft by pushing it on.
- Ingredient Measurement: Accurately measure all liquid and dry ingredients. Liquids should be measured using the measuring cup or spoon, ensuring the level is at eye level. Dry ingredients should be leveled off in the measuring cup without compacting them.
- Ingredient Placement: Add ingredients to the bread pan in the order specified in the recipe. Typically, this order is liquids, dry ingredients (flour, sugar, salt), and finally yeast. Yeast should be kept separate from wet ingredients and salt to prevent premature activation. Create a small hole in the dry ingredients for the yeast. Ensure all ingredients are at room temperature unless otherwise specified.
- Bread Pan Insertion: Insert the bread pan into the baking chamber, pressing down on the rim until it snaps securely into place.
- Power On: Close the lid and plug the appliance into the mains socket. The appliance will beep, and the display will show the first menu and standard time.
- Program Selection: Press the "Menu" button repeatedly to select the desired program (1 to 13). Each press will cause a beep, and the program number will appear on the display.
- Crust Color Selection: Press the "Crust Color" button repeatedly to choose the desired crust color (Light, Medium, Dark, Rapid Browning). The default is Medium.
- Loaf Size Selection: Press the "Loaf Size" button repeatedly to select the desired loaf size (500g, 750g, or 1000g), where applicable. The default is 1000g.
- Delay Timer (Optional): To set a delayed start, use the "+" and "-" buttons to adjust the time in 10-minute increments, up to 15 hours. Skip this step for immediate operation.
- Start Program: Press the "Start/Stop" button. The colon (:) on the display will flash, and the countdown will begin.
- Automatic Process: The bread maker will automatically proceed through the bread-making steps. Steam may be released from the air vents, which is normal.
- Program End: At the end of the program, 10 beeps will sound, and "0:00" will appear on the display.
- Stop Program: To turn off the bread maker, press and hold the "Start/Stop" button for 2 seconds. If not turned off, the appliance will enter a 60-minute "Warm" function (except for Dough and Jam programs). For best results, remove the bread immediately after baking.
- Unplug: After use, unplug the appliance from the mains socket.
- Bread Removal: Open the lid and use oven mitts to remove the hot bread pan. Do not place the hot pan directly on tablecloths, plastic surfaces, or other heat-sensitive surfaces.
- Cooling: Invert the bread pan and gently shake the bread onto a cooling rack.
- Cooling Bread: Allow the bread to cool. If the kneading paddle remains in the bread, let the bread cool, then use the hook (included) to remove it from the base of the bread. Always remove the kneading paddle before slicing.
- Slicing and Storage: Use an electric knife or a sharp serrated knife for even slices. Homemade bread contains no preservatives, so it should be consumed within 2-3 days. For longer storage, wrap sliced bread in foil or place it in a tightly sealed container in the freezer. French bread may soften when stored, so it's best not to cover it before slicing.
Maintenance Features
Cleaning and Maintenance:
- Cool Down: Always unplug the appliance from the mains socket and allow it to cool down completely before cleaning.
- Thorough Cleaning: Clean each part thoroughly before first use and after every use.
- Part Inspection: Periodically check all parts before assembly.
- Cleaning Agents: Do not use sharp instruments, abrasive, or chemical cleaning agents.
- Immersion: Never immerse the appliance in water or any other liquid.
- Appliance Body: To clean the appliance and control panel, wipe with a clean damp cloth and dry before storing.
- Bread Pan & Accessories: Wash the bread pan, kneading paddle, measuring cup, and spoon in warm soapy water. Rinse and dry thoroughly. Do not use metal tools in the bread pan; always use plastic spatulas.
- Stuck Kneading Paddle: If the kneading paddle is difficult to remove from the drive shaft, fill the bread pan with warm water and let it soak for approximately 30 minutes. This will loosen the paddle for easy removal.
- Baking Chamber: Remove any bread crumbs from the baking chamber by tipping them out or wiping them away with a slightly damp cloth or clean pastry brush.
- Storage: Before storing, ensure the appliance is completely cooled, clean, dry, and the lid is closed.
- Food Hygiene: Regularly clean surfaces in contact with food to prevent cross-contamination. Use warm, clean water with a mild detergent. Always follow correct food hygiene practices.
Troubleshooting:
The manual provides a detailed troubleshooting guide for common issues like:
- Crust too thick/thin: Often related to incorrect program selection or ingredients.
- Unevenly mixed/baked ingredients: Check program selection, dough consistency, and bread pan fitting.
- Motor sound but no kneading: Check bread pan fitting and dough stiffness.
- Small bread: Insufficient yeast or inactive yeast.
- Dough rising above pan/collapsing: Too much yeast/water, or too soft/weak dough.
- Hollow center: Too much water/yeast, no salt.
- Powder remains in pan: Too little water.
- Display errors "E00" or "E01": Indicates appliance temperature is too low or too high.
Solutions typically involve adjusting ingredient quantities (e.g., yeast, flour, salt, water), ensuring ingredients are fresh and at room temperature, selecting the correct program, and proper bread pan fitting. For temperature-related errors, allow the appliance to return to room temperature before restarting.
The manufacturer reserves the right to change specifications and design of goods.