4
Applying Traction
1. Lie on your back, positioning your body so the neck wedges cradle
the middle or narrowest part of your neck and your head rests
Preparing for Treatment
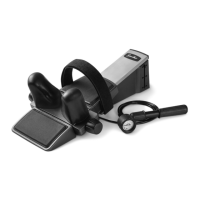
1. Place the Saunders Cervical Traction device on a carpeted floor or
other firm surface. Check to make sure that the air hose is not
being pinched by the bottom of the unit. Make sure you have
enough room to lie down in a comfortable position.
2. Separate the neck wedges by rotating either of the black adjustment
knobs so that your neck fits easily between the wedges. You can
make additional adjustments after you lie down in the Saunders
Cervical Traction device.
NOTE: Do not over-rotate the adjustment
knobs. This will result in stripping the internal gear.
3. Loosen the adjustable head strap.
4. Ensure the device is in the starting position - neck carriage should
be touching the base. If not, rotate the gauge housing to the
“RELEASE” position.
5. Set the traction angle prescribed by your health care provider by
squeezing and sliding the tabs on both sides of the Angle Adjuster
until it locks into place.
Angle Adjuster Positions: Top = 15 degrees, Middle = 20 degrees,
Bottom = 25 degrees
NOTE: If your health care provider did not specify the angle of pull,
leave the Angle Adjuster in the top position as shown (in Figure 1.)
6. Place the pump in a position so that you can reach it during
treatment.
7. Set a timer for the length of treatment (not included with your
Saunders Cervical Traction device.)