This document is the instruction manual for the Schafer Barista Automatic Filter Coffee Machine, a device designed to facilitate coffee preparation.
Function Description
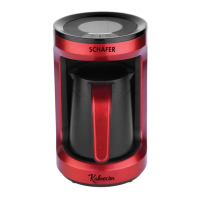
The Schafer Barista Automatic Filter Coffee Machine is a versatile appliance capable of brewing coffee from both whole coffee beans and pre-ground coffee. It features an integrated grinder for fresh coffee preparation. The control panel allows users to select different brewing modes based on the desired number of cups and whether whole beans or ground coffee are used. The machine includes a steam outlet, a grind basket with a lid, a filter, an anti-drip valve, a water tank with a lid and level indicator, a warm plate to keep the coffee warm, and a jug for serving. A spoon is provided for accurate measurement of coffee grounds or beans.
Important Technical Specifications
- Product Name: Automatic Mini Coffee Machine
- Model: BARISTA
- Voltage: 220-240V~
- Frequency: 50-60 Hz
- Input Power: 600W
- Capacity: 560 ml
Usage Features
Control Panel and Modes:
The control panel features an ON/OFF button with an indicator light. After plugging in, pressing this button once illuminates the indicator light, putting the machine in standby mode. Pressing it again during brewing will stop the process.
The machine offers several modes:
- Off: The machine is turned off.
- Whole Coffee Beans (3-4 European Cups / 2 American Cups): For brewing larger quantities using whole beans.
- Whole Coffee Beans (1-2 European Cups / 1 American Cup): For brewing smaller quantities using whole beans.
- Ground Coffee: For brewing coffee using pre-ground coffee.
- Grinder Off: This mode is selected when using ground coffee, indicating the grinder will not operate.
Recommended Dosage:
The manual provides a clear dosage guide for both coffee beans and coffee powder:
- 1 cup: 1 flat spoon (approx. 7g)
- 2 cups: 2 flat spoons (approx. 14g)
- 3 cups: 3 flat spoons (approx. 21g)
- 4 cups: 4 flat spoons (approx. 28g)
It is crucial not to exceed the MAX indication inside the filter when adding coffee beans or powder, as this can negatively impact the grinding effect.
First-Time Use and Cleaning:
Before initial use, the machine requires a thorough cleaning. This involves disassembling and cleaning the grind basket, filter, and jug.
- Disassembly:
- Press the button on the side of the grinder basket lid and lift to remove it.
- Grasp the filter handle and lift it out.
- Turn the grind basket anti-clockwise (signal ①) until a click is heard, then lift it up (signal ②).
- Assembly:
- Wipe the outside surface of the grind basket and place it into the housing (signal ①), then turn it clockwise (signal ②) until a click is heard.
- Insert the filter into the grind basket, ensuring it is correctly assembled.
- Lock the grind basket lid by pressing downwards until a click is heard. Ensure the water tube aligns with the water inlet.
- Initial Cleaning Cycle:
- Fill the water tank with fresh water.
- Place the jug into the coffee machine.
- Plug in the machine. A "bip" sound indicates standby mode.
- Press the ON/OFF button, then the Coffee powder button. The machine will start, and the indicator light for the coffee powder button will flash continuously.
- Once the indicator light stops flashing, pour out the hot water from the jug.
- Repeat steps 2-4 for another cleaning cycle.
Brewing Process:
- Unlock the grind basket lid and add the desired quantity of coffee beans or coffee powder into the filter. Ensure coffee beans do not fall into the water inlet to prevent malfunction.
- Lock the grind basket lid.
- Fill the water tank with fresh cold water up to the required level.
- Close the water tank lid.
- Place the jug on the warm plate.
- Plug in the machine. A "bip" sound confirms standby mode.
- Press the ON/OFF button, then press the appropriate coffee beans or coffee powder button within 5 minutes. The corresponding indicator light will flash continuously, signifying grinding or brewing. The light will stop flashing once the water tank is empty, and the machine will automatically enter keep-warm mode.
- The appliance will automatically switch to off mode within 30 minutes, and all indicator lights will turn off.
- Once brewing is complete, the coffee is ready to be served.
After Use:
- Unplug the machine from the socket.
- Allow the coffee machine to cool down.
- Remove the grind basket lid.
- Turn the grind & brew basket anti-clockwise and lift it upwards.
- Take out the filter.
- Remove the jug from the warm plate.
- Clean the grind basket, filter, grind basket lid, and jug.
Maintenance Features
Cleaning:
Regular cleaning of the components is essential for optimal performance and hygiene. The manual illustrates how to wash the grind basket, filter, grind basket lid, jug, and anti-drip valve.
Descaling:
The appliance must be descaled regularly to maintain coffee taste and prevent permanent damage from scale buildup. Signs that descaling is needed include increased noise during brewing, longer brewing times, or the appliance switching off before the water tank is empty.
The frequency of descaling depends on water hardness and brewing frequency:
- Soft water: At least once every 3 months.
- Hard water: At least once every month.
Consult your local tap water company if unsure about water hardness.
It is recommended to use a liquid descaler suitable for coffee makers, following the instructions on its packaging or user manual.
- Mix an adequate amount of descaler with cold water in a measuring jug. If using solid descaler, ensure it is thoroughly dissolved before filling.
- Fill the water tank up to the Max level with the prepared solution.
- Operate the appliance as described in the "Before using for the first time" section, but remove the filter and lock the grind basket lid (do not add coffee beans or powder).
- Press the ON&OFF button, then the Coffee powder button. The machine will start, and the indicator light will flash continuously.
- Wait until the indicator light stops flashing.
- Pour out the hot water from the jug.
- Fill with fresh cold water and repeat steps 4-5 for another descaling cycle to rinse the machine.
Important: Never refill the water tank with used descaling solution. Do not interrupt the descaling process. Malfunctions caused by scale buildup due to improper descaling are not covered by the guarantee.
Safety Precautions:
The manual emphasizes several safety precautions:
- Read instructions carefully before use and save for future reference.
- Children aged 8 and above can use the appliance under supervision and with proper instruction. Children should not play with the appliance, and cleaning/maintenance should not be done by children unless supervised and over 8 years old.
- Keep the appliance and its cord out of reach of children under 8.
- Do not immerse the supply cord, plug, or appliance in water or other liquids.
- Never operate the machine unattended.
- Regularly check the supply cord for damage. If damaged, it must be replaced by the manufacturer or qualified personnel.
- Do not operate the appliance with a damaged cord, plug, or if it malfunctions or has been damaged. Return it to an authorized service agent.
- Intended for household and similar uses (staff kitchen areas, farmhouses, hotels, motels, bed and breakfast environments).
- Never use outdoors; always place in a dry environment.
- Connect only to an earthed outlet. Ensure voltage matches local mains voltage.
- Always unplug in case of malfunction, before filling, after use, or before cleaning.
- Do not allow the appliance or its cord to touch hot surfaces or heat sources.
- Never unplug or move the appliance by pulling the cord. Do not wind or twist the cord around the appliance.
- Place the appliance on a stable, flat surface.
- Check the grinder basket for foreign objects before use.
- Use the coffee grinder only for roasted coffee beans. Grinding other substances can dull the blade or cause injury.
- Avoid contact with moving parts.
- Do not touch hot parts (warm plate, glass jug). Handle the jug by its handle only.
- The warm plate surface remains hot after use.
- Be careful of steam escaping from the vent. Do not cover the vent with cloths.
- Never use the coffee maker without water. Use only fresh, cold water.
- Never fill the water tank beyond the Max. level. Do not use if overflowing.
- Never put the jug in an oven (including microwave) to warm coffee.
- Handle the hot jug carefully to avoid scalding.
- Handle the glass jug with care as it is fragile. Do not use if it shows signs of cracks.
- Never place an empty or almost empty glass jug on the warm plate when the coffee maker is in use or on other hot surfaces.
- Do not use accessories not recommended by the manufacturer.
- Always set controls to "off" before unplugging.
- Ensure ambient temperature is above 0°C for proper functioning.
- Cool down the appliance before cleaning or storing.
- Some smoke/smell may occur during first few uses due to oil on parts; this will disappear.
- Exercise care when handling sharp cutting blades, emptying the bowl, and cleaning.
- Switch off and disconnect from supply before changing accessories or touching moving parts.
- The appliance must not be immersed in water.
Troubleshooting:
The manual includes a troubleshooting guide for common issues such as the appliance not working, leaking water, excessive noise, coffee grounds entering the jug, slow brewing, machine shutting off prematurely, coffee being too weak or too strong, poor coffee taste, coffee not being hot enough, difficulty placing/removing the jug, and less coffee than expected. Most solutions involve checking power, water levels, proper assembly, filter condition, and descaling.
Support and Warranty:
The document provides contact information for customer support (444 20 63) and outlines warranty conditions, including a 2-year warranty period, coverage of all parts, consumer rights in case of defects (return, price reduction, free repair, replacement), and a maximum repair time of 20 working days. It also specifies that damages from improper use are not covered and directs consumers to relevant authorities for disputes.
Transportation and Recycling:
The appliance should be kept in its original packaging during transport to prevent damage. It should be kept in its regular position and protected from impacts. Damages during transport after delivery are not covered by warranty. The product complies with WEEE Regulations and should not be disposed of with domestic waste. Users are advised to contact the nearest collection center for recycling.