www.scheppach.com
GB
|
35
Attention! Metal parts must be clamped so that they
cannot be pulled up. Depending on the workpiece, cor-
rectly adjust the height and inclination. There must be
enough distance between the top of the workpiece and
the tip of the drill.
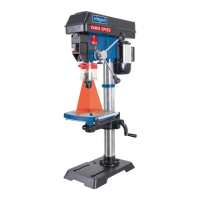
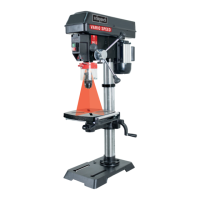
Laser operation, Fig. 21, 23
Switching on: Move the laser on/o switch (16) to
position “I” to switch on the laser. Two laser lines are
projected onto the workpiece to be machined, the in-
tersection of which indicates the centre of the drill tip.
Switching o: Move the laser on/o switch (16) into
the “0” position.
Work lamp operation, Fig. 21, 24
Note: Always ensure good lighting at the work station.
Switching on: Set the on/o switch for the work lamp
(18) to the “I” position to switch the work lamp (24) on.
Switching o: Set the on/o switch for the work lamp
(18) to the “0” position.
Working speeds
Ensure that the speed is correct when drilling. This de-
pends on the drill bit diameter and the material.
The list below helps you to choose speeds for the var-
ious materials.
The specied speeds are only guideline values.
Drill
bit ø
Cast
iron
Steel Stain-
less
steel
Alu-
mini-
um
Wood
3 2200 2100 1200 4500 3000
4 1700 1800 1000 4000 2600
5 1550 1500 800 3500 2150
6 1400 1200 600 3000 1800
7 1200 1000 450 2500 1400
8 1000 800 360 2000 110 0
9 910 650 270 1600 850
10 825 500 220 1200 650
11 740 450 200 1050 575
12 650 400 180 900 500
13 610 370 165 800 435
14 575 340 150 700 370
16 500 300 140 580 300
The speed can be continuously adjusted using the
speed adjustment lever (6). The set speed is shown in
revolutions per minute on the digital display (15).
Attention! Never run the drill when the V-belt cover is
open. Always pull the mains plug before opening the
cover.
Never reach into the V-belt while it is running.
Drill depth stop, Fig. 16
The drill spindle has a rotatable scale (19) ring for set-
ting the drilling depth. Only set up work while stopped.
• Press the drill spindle down until the drill tip lies on
the workpiece.
• Loosen the clamping screw and turn the scale ring
forwards until it stops.
• Turn the scale ring back by the desired drilling depth
and x it with the clamping screw.
Attention! When setting the drilling depth of a cylindri-
cal hole, you must add the length of the drill tip.
Setting the inclination of the drilling table, Fig. 17
• Loosen the hexagonal bolt (25) under the drilling
table (4).
• Set the drilling table (4) to the desired angle.
• Tighten the hexagonal bolt (25) again to x the drill-
ing table (4) in this position.
Setting the height of the drill table, Fig. 18/19
• Loosen the clamping handle (3).
• Move the drilling table (4) to the desired position us-
ing the crank handle (20).
• Retighten the clamping handle (3).
Drilling table and roller support, Fig. 20
• After releasing the clamping handle (3), the drilling
table (4) can be rotated.
• The roller support (13) can be pulled out once the
wing screws (14) have been loosened.
Tensioning the workpiece
Always clamp workpieces rmly using a machine
vice (not included in the scope of delivery) or suitable
clamping equipment. Never hold workpieces by hand!
When drilling, the workpiece should be movable on the
drilling table (4) so that self-centering can take place.
Always secure the workpiece against twisting. The
best way to do this is to place the workpiece or machine
vice against a xed stop.