Do you have a question about the Schlage HP-1000 and is the answer not in the manual?
Biometrics is a term describing the automatic measurement and comparison of human characteristics.
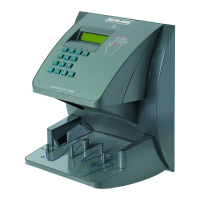
The HandPunch uses low-level infrared light, optics, and a CMOS camera to capture a three-dimensional image of the hand.
The HandPunch has the following options available. Backup Battery Support.
The HandPunch has the following options available. Modem Communication.
Before you begin installation, check the site blueprints, riser diagrams, and specifications for important information about HandPunch location.
The recommended height for the HandPunch platen is 40 inches (102 cm) from the finished floor.
HandPunch/host computer communications can be configured in one of two ways: via a direct RS-232 connection or an optional Modem.
Select an installation location based on the guidelines provided in the Planning an Installation section beginning on page 8.
Loosen the three bottom mounting screws until there is approximately 1/8 inch (3 mm) clearance between the screw head and the wall plate.
Table 2 on page 17 provides the pinouts for the RS-232 Serial Host Computer Connection.
The erase memory function allows a HandPunch's setup and/or user database to be erased.
Press the CLEAR and ENTER keys simultaneously to enter a command menu.
Enter your ID number on the keypad and place your hand on the platen for verification.
Authority Levels control whether or not a user has access to the command menus.
When setting up HandPunch operations there is a general programming/operations order that should be followed.
List the Users authorized to use a HandPunch. This is done through the Management Menu.
Set a user's reject threshold (adjusting the sensitivity applied when a HandPunch reads a hand).
Enter the appropriate password to enter the Service command menu.
There are two commands available from the Service command menu: Calibrate, Status Display.
Enter the appropriate password to enter the Setup command menu.
There are six commands available from the Setup command menu.
Enter the appropriate password to enter the Management command menu.
There are four commands available from the Management command menu.
Enter the appropriate password to enter the Enrollment command menu.
Here are a few guidelines to help you prepare for an enrollment session.
There are three commands available from the Enrollment command menu.
Enter the appropriate password to enter the Special command menu.
The Special Enroll command allows a user to be enrolled such that the ID number is the primary criteria for determining access.
Inspect and clean the HandPunch regularly to maintain optimum performance.
Periodically check users' scores (refer to the Read Score section on page 36).
Here are a few guidelines to help you prepare for an enrollment session.
To reset the memory of the HandPunch follow these steps-
This appendix details mechanical installation and wiring procedures for the HandPunch.
Various messages can appear on the HandPunch's display during hand verification.
Various messages can appear on the HandPunch's display during hand verification.
| Brand | Schlage |
|---|---|
| Model | HP-1000 |
| Category | Touch terminals |
| Language | English |